
Get early access
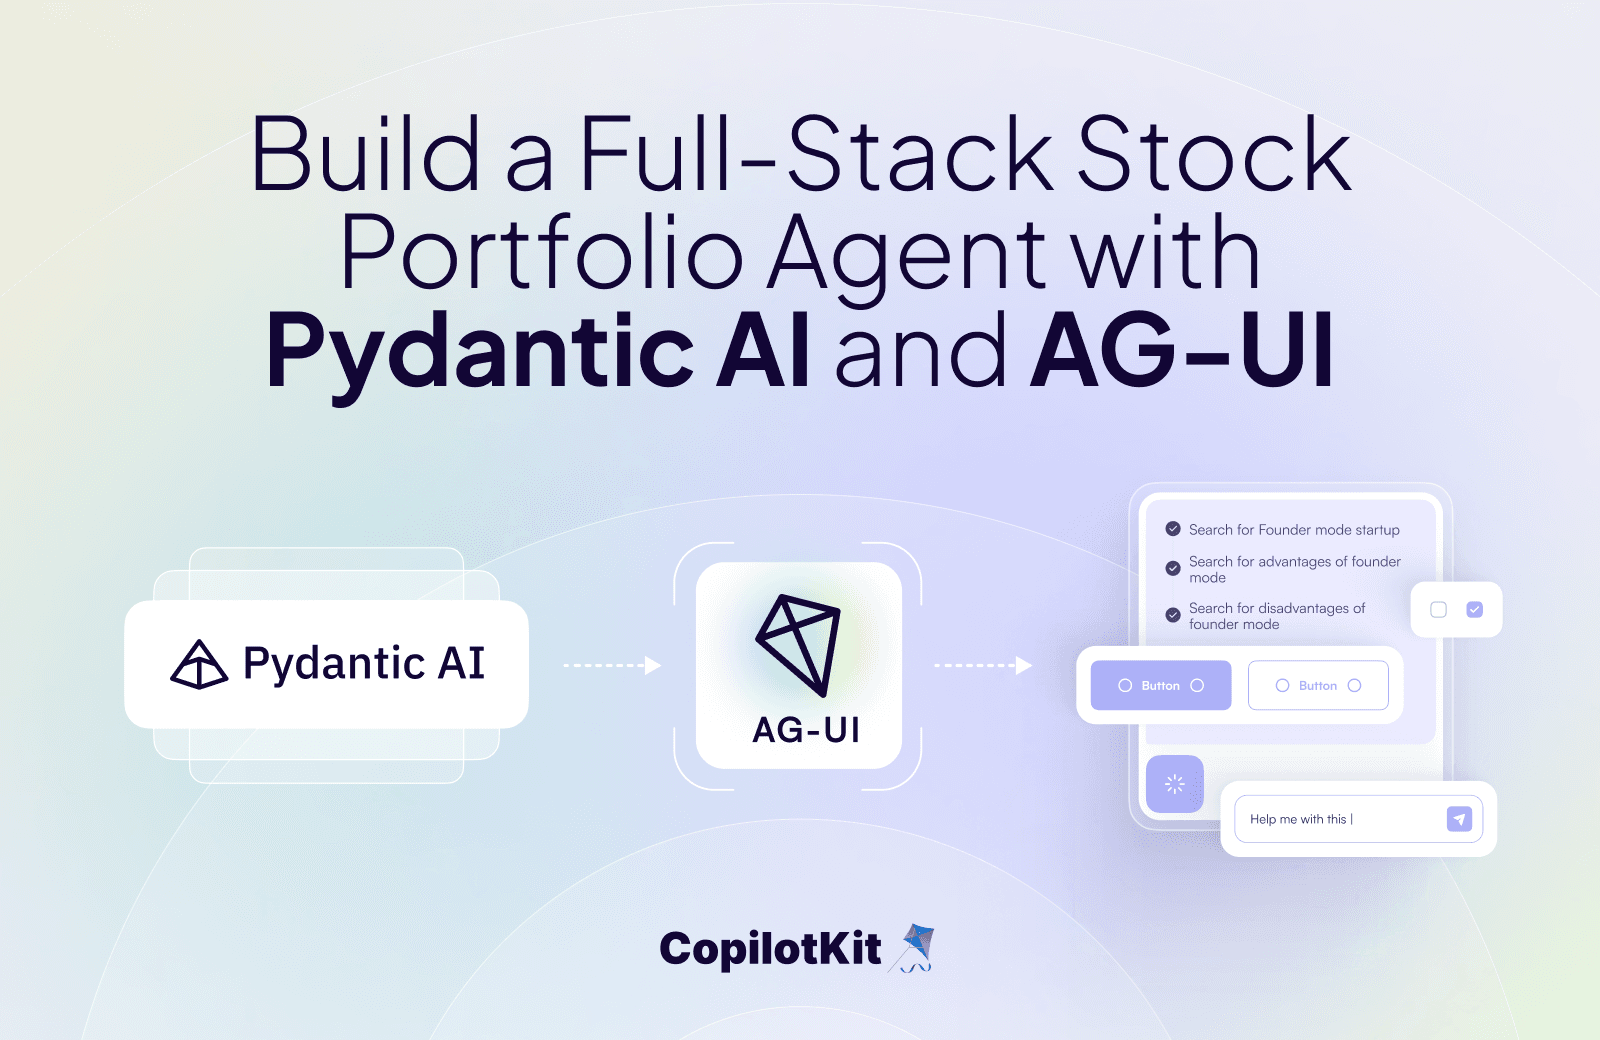
In this guide, you will learn how to build fullstack AI agents with Pydantic AI with the AG-UI protocol. Also, we will cover how to integrate the AG-UI + Pydantic AI agents with CopilotKit to chat with the agent and stream its responses in the frontend.
Before we jump in, here is what we will cover:
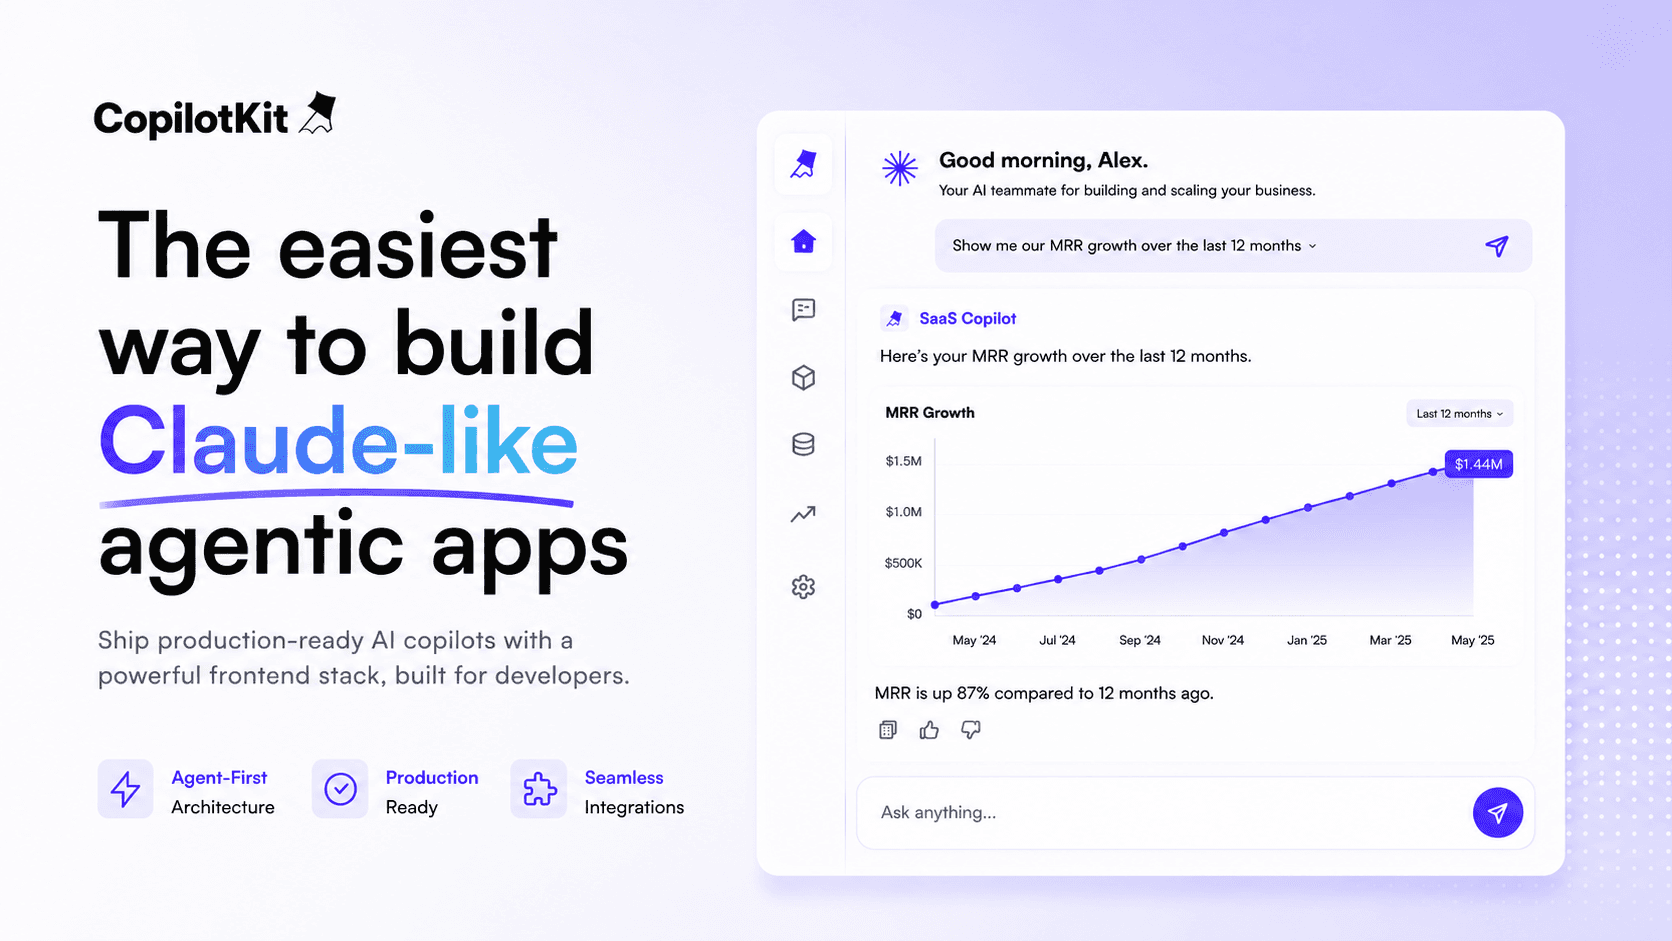
Here’s a preview of what we will be building:
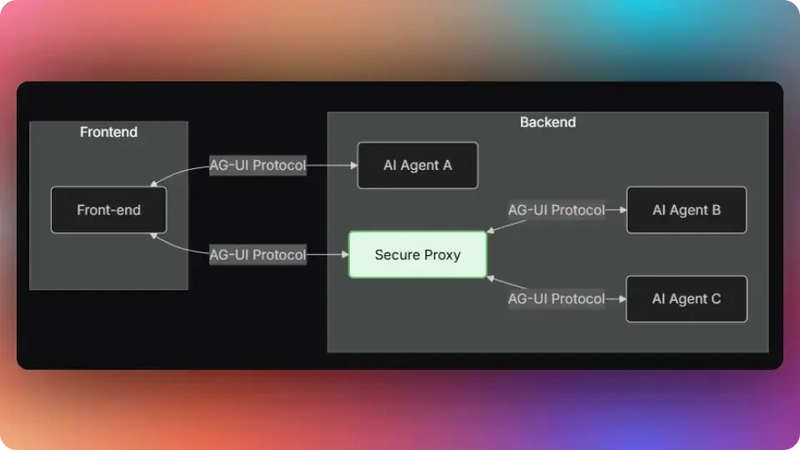
Let's break down this cool thing called the Agent User Interaction Protocol, or AG-UI for short. It's made by CopilotKit, and it's an open-source tool that's super lightweight and based on events. Basically, it helps create smooth, real-time chats between your app's frontend (like the user interface) and AI agents (think smart bots that can do tasks).
AG-UI makes it easy to handle things like event-driven chats, keeping track of states (like what's happening right now), using tools, and even streaming responses from the AI so they show up bit by bit, just like in a live conversation.
To pass info back and forth between the frontend and the AI agent, AG-UI uses different kinds of events. Here's a simple rundown:
RUN_STARTED (hey, we're beginning!) and RUN_FINISHED (all done!).TEXT_MESSAGE_START (starting a new message), TEXT_MESSAGE_CONTENT (here's some text to add), and TEXT_MESSAGE_END (message complete).STATE_SNAPSHOT (a full picture of the current state) and STATE_DELTA (just the changes since last time).TOOL_CALL_START (starting the tool), TOOL_CALL_ARGS (passing in the details it needs), and TOOL_CALL_END (tool's done, here's the result).If you want to dive deeper into how AG-UI works and its setup, check out the docs here: AG-UI docs. Keep coding—you've got this!
Now that we have learned what the AG-UI protocol is, let us see how to integrate it with the Pydantic AI agent framework.
Let’s get started!
To fully understand this tutorial, you need to have a basic understanding of React or Next.js.
We'll also make use of the following:
To get started, clone the Open AG UI Demo repository that consists of a Python-based backend (agent) and a Next.js frontend (frontend).
Next, navigate to the backend directory:
cd agentThen install the dependencies using Poetry:
poetry installAfter that, create a .env file with OpenAI API Key API key:
OPENAI_API_KEY="your-OpenAI-key-here"br>Then run the agent using the command below:Then run the agent using the command below:
poetry run python main.pyLet us now see how to integrate AG-UI protocol with Pydantic AI agents framework.
Using Pydantic AI's BaseModel, define an AgentState class that holds all data the agent needs. In our stock example, we track things like available_cash, investment_portfolio, and tool_logs , as shown in the agent/stock.py file.br>
from pydantic import BaseModel, Field

class AgentState(BaseModel):
    """
    Main application state that holds all the data for the stock portfolio agent.
    This state is managed throughout the agent's lifecycle and updated by various tools.
    """
    tools: list = []                                    # List of available tools for the agent
    be_stock_data: Any = None                          # Backend stock price data (dictionary format)
    be_arguments: dict = {}                            # Arguments passed to backend operations
    available_cash: float = 0.0                        # Amount of cash available for investment
    investment_summary: dict = {}                      # Summary of investment performance and holdings
    investment_portfolio: list = []                    # List of stocks in the portfolio with amounts
    tool_logs: list = []                               # Log of tool executions for debugging
render_standard_charts_and_table_args: dict = {} # Arguments for rendering charts and tablesOnce you have defined the agent state, initialize your Pydantic AI agent and pass the AgentState to its shared state container, as shown in the agent/stock.py file.br>
# Pydantic AI imports for agent creation and context management
from pydantic_ai import Agent, RunContext
from pydantic_ai.ag_ui import StateDeps

agent = Agent(
    "openai:gpt-4o-mini",  # Specify the AI model to use
    deps_type=StateDeps[AgentState],  # Specify the state dependency type
)First, define the core agent tool, such as the Stock Data Tool, as shown in the agent/stock.py file.br>
@agent.tool
async def gather_stock_data(
    ctx: RunContext[StateDeps[AgentState]],
    stock_tickers_list: list[str],
    investment_date: str,
    interval_of_investment: str,
    amount_of_dollars_to_be_invested: list[float],
    operation: Literal["add", "replace", "delete"],
    to_be_replaced : list[str]
) -> list[StateSnapshotEvent, StateDeltaEvent]:
    """
    Gathers historical stock data and manages the investment portfolio based on the specified operation.
    This is the primary tool for setting up and modifying stock portfolios.

    This tool is used for chat purposes. If the user query is not related to the stock portfolio,
    you should use this tool to answer the question. The answers should be generic and should be relevant to the user's query.

    Args:
        ctx: The current run context containing the agent state
        stock_tickers_list: List of stock ticker symbols (e.g., ['AAPL', 'GOOGL', 'MSFT'])
        investment_date: Starting date for the investment in YYYY-MM-DD format
        interval_of_investment: Frequency of investment (currently supports "single_shot")
        amount_of_dollars_to_be_invested: List of dollar amounts to invest in each corresponding stock
        operation: Type of portfolio operation - "add" (append to existing), "replace" (override existing), or "delete" (remove specified)
        to_be_replaced: List of tickers to be replaced (used with "replace" operation)

    Returns:
        list: Contains StateSnapshotEvent and StateDeltaEvent for updating the UI state
    """

// ...To configure AG-UI state management events, first define a JSON Patch object for making incremental updates to the application state, as shown in the agent/stock.py file.br>
class JSONPatchOp(BaseModel):
    """
    A class representing a JSON Patch operation (RFC 6902).
    Used for making incremental updates to the application state.
    """
    op: Literal["add", "remove", "replace", "move", "copy", "test"] = Field(
        description="The operation to perform: add, remove, replace, move, copy, or test",
    )
    path: str = Field(description="JSON Pointer (RFC 6901) to the target location")
    value: Any = Field(
        default=None,
        description="The value to apply (for add, replace operations)",
    )
    from_: str | None = Field(
        default=None,
        alias="from",
        description="Source path (for move, copy operations)",
    )
Then configure the AG-UI state management events to update the frontend with UI changes, as shown in the agent/stock.py file.br>
@agent.tool
async def gather_stock_data(
    ctx: RunContext[StateDeps[AgentState]],
    stock_tickers_list: list[str],
    investment_date: str,
    interval_of_investment: str,
    amount_of_dollars_to_be_invested: list[float],
    operation: Literal["add", "replace", "delete"],
    to_be_replaced : list[str]
) -> list[StateSnapshotEvent, StateDeltaEvent]:
    """
    Gathers historical stock data and manages the investment portfolio based on the specified operation.
    This is the primary tool for setting up and modifying stock portfolios.

    This tool is used for chat purposes. If the user query is not related to the stock portfolio,
    you should use this tool to answer the question. The answers should be generic and should be relevant to the user's query.

    Args:
        ctx: The current run context containing the agent state
        stock_tickers_list: List of stock ticker symbols (e.g., ['AAPL', 'GOOGL', 'MSFT'])
        investment_date: Starting date for the investment in YYYY-MM-DD format
        interval_of_investment: Frequency of investment (currently supports "single_shot")
        amount_of_dollars_to_be_invested: List of dollar amounts to invest in each corresponding stock
        operation: Type of portfolio operation - "add" (append to existing), "replace" (override existing), or "delete" (remove specified)
        to_be_replaced: List of tickers to be replaced (used with "replace" operation)

    Returns:
        list: Contains StateSnapshotEvent and StateDeltaEvent for updating the UI state
    """
    // ...

    # Initialize list to track state changes for the UI
    changes = []

    # Add initial tool log entry to show the tool has started
    tool_log_start_id = str(uuid.uuid4())
    changes.append(
        JSONPatchOp(
            op="add",
            path="/tool_logs/-",
            value={
                "message": "Starting stock data gathering...",
                "status": "in_progress",
                "id": tool_log_start_id,
            },
        )
    )

    // ...

    # STEP 2: Update the investment portfolio in the application state
    changes.append(
        JSONPatchOp(
            op="replace",
            path="/investment_portfolio",
            value=[
                {
                    "ticker": ticker,
                    "amount": amount_of_dollars_to_be_invested[index],
                }
                for index, ticker in enumerate(stock_tickers_list)
            ],
        )
    )

    // ...

    # STEP 5: Store stock data in application state
    # Convert the closing prices to dictionary format for easier handling
    changes.append(
        JSONPatchOp(
            op="replace",
            path="/be_stock_data",
            value=data["Close"].to_dict(),  # Extract closing prices and convert to dict
        )
    )
    ctx.deps.state.be_stock_data = data["Close"].to_dict()  # Update local state

    # STEP 6: Store the arguments used for this data gathering operation
    changes.append(
        JSONPatchOp(
            op="replace",
            path="/be_arguments",
            value={
                "ticker_symbols": stock_tickers_list,
                "investment_date": investment_date,
                "amount_of_dollars_to_be_invested": amount_of_dollars_to_be_invested,
                "interval_of_investment": interval_of_investment,
            },
        )
    )

    # Generate a unique ID for completion tool logging
    tool_log_id = str(uuid.uuid4())
    # Add completion tool log entry for data gathering
    changes.append(
        JSONPatchOp(
            op="add",
            path="/tool_logs/-",
            value={
                "message": "Stock data gathering completed successfully",
                "status": "completed",
                "id": tool_log_id,
            },
        )
    )

    // ...

    # STEP 7: Return state events for UI updates
    return [
        # Complete state snapshot for full UI refresh
        StateSnapshotEvent(
            type=EventType.STATE_SNAPSHOT,
            snapshot=(ctx.deps.state).model_dump(),
        ),
        # Incremental changes for efficient UI updates
        StateDeltaEvent(type=EventType.STATE_DELTA, delta=changes),
]To configure Human-in-the-Loop functionality, define an @agent.instructions async function that instructs the Pydantic AI agent to call the frontend action tool by name to ask the user for feedback, as shown in the agent/stock.py file.
@agent.instructions
async def instructions(ctx: RunContext[StateDeps[AgentState]]) -> str:
    """
    Dynamic instructions for the agent that can access the current state context.
    These instructions guide the agent's behavior and tool usage patterns.

    Args:
        ctx: The current run context containing the agent state

    Returns:
        str: Formatted instructions for the agent
    """
    return dedent(f"""You are a stock portfolio analysis agent.
                  Use the tools provided effectively to answer the user query.
                  When a user asks something related to the stock investment, make
                  sure to call the frontend tool render_standard_charts_and_table
                  with the tool argument render_standard_charts_and_table_args as
the tool argument to the frontend after running the generate_insights tool""")Finally, set up the FastAPI server and configure the /pydantic-agent endpoint that processes requests using the pydantic AI agent with AG UI integration, as shown in the agent/stock.py file.br>
# Import the AG UI request handler
from pydantic_ai.ag_ui import handle_ag_ui_request

# Load environment variables from .env file (must be called before using env vars)
load_dotenv()

# Create FastAPI application instance
app = FastAPI()

@app.post('/pydantic-agent')
async def run_agent(request: Request) -> Response:
    """
    Handle POST requests to the /pydantic-agent endpoint.

    This endpoint processes requests using the Pydantic AI agent with AG UI integration.
    It creates a new agent state for each request and delegates processing to the
    AG UI request handler.

    Args:
        request: The incoming HTTP request containing the user's input

    Returns:
        Response: The agent's response, typically streamed back to the client
    """
    return await handle_ag_ui_request(agent = agent, deps = StateDeps(AgentState()), request=request)

def main():
    port = int(os.getenv("PORT", "8000"))  # Get port from environment or use default
    uvicorn.run(
        "main:app",  # Module and app instance to run
        host="0.0.0.0",  # Listen on all network interfaces
        port=port,
        reload=True,  # Enable auto-reload for development
    )

if __name__ == "__main__":
    # Entry point: run the server when this script is executed directly
    main()
Congratulations! You have integrated a Pydantic AI agent workflow with the AG-UI protocol. Let’s now see how to add a frontend to the AG-UI + Pydantic AI agent workflow.
In this section, you will learn how to create a connection between your AG-UI + Pydantic AI agent workflow and a frontend using CopilotKit.
Let’s get started.
First, navigate to the frontend directory:
cd frontendNext, create a .env file with OpenAI API Key API key:br>
OPENAI_API_KEY=<<your-OpenAI-key-here>>Then install the dependencies:br>
pnpm installAfter that, start the development server:br>
pnpm run devNavigate to http://localhost:3000, and you should see the AG-UI + Pydantic agent frontend up and running.

Let’s now see how to build the frontend UI for the AG-UI + Pydantic AI agent using CopilotKit.
Before creating an HttpAgent instance, let’s first understand what the HttpAgent is.
HttpAgent is a client from the AG-UI Library that bridges your frontend application with any AG-UI-compatible AI agent’s server.
To create an HttpAgent instance, define it in an API route as shown in the src/app/api/copilotkit/route.ts file.br>
// CopilotKit runtime imports for building AI-powered applications
import {
  CopilotRuntime, // Core runtime that manages AI agents and conversations
  copilotRuntimeNextJSAppRouterEndpoint, // Next.js App Router integration helper
  OpenAIAdapter, // Adapter for OpenAI API communication
} from "@copilotkit/runtime";

// Next.js server-side request handling
import { NextRequest } from "next/server";

// AG UI client for communicating with external agent services
import { HttpAgent } from "@ag-ui/client";

// Step 1: Configure the external Pydantic AI agent connection
// This HttpAgent connects to our Python FastAPI backend that handles stock analysis
const pydanticAgent = new HttpAgent({
  // Use environment variable for agent URL, fallback to localhost development server
  url:
    process.env.NEXT_PUBLIC_PYDANTIC_URL ||
    "http://0.0.0.0:8000/pydantic-agent",
});

// Step 2: Initialize OpenAI adapter for AI model communication
// This adapter handles the integration between CopilotKit and OpenAI's language models
const serviceAdapter = new OpenAIAdapter();

// Step 3: Create the main CopilotRuntime instance
// This runtime orchestrates the entire AI conversation system and manages connected agents
const runtime = new CopilotRuntime({
  agents: {
    // @ts-ignore - TypeScript ignore for agent type compatibility
    // Register our Pydantic agent under the name 'pydanticAgent'
    // This makes the stock analysis agent available to the frontend
    pydanticAgent: pydanticAgent,
  },
});

// Alternative: Simple runtime without agents (commented out)
// const runtime = new CopilotRuntime()
// Step 4: Define the POST endpoint handler for CopilotKit API requests
// This endpoint processes all AI conversation requests from the frontend
export const POST = async (req: NextRequest) => {
  // Step 4a: Initialize the CopilotKit endpoint handler with our configuration
  const { handleRequest } = copilotRuntimeNextJSAppRouterEndpoint({
    runtime, // The runtime instance with our registered agents
    serviceAdapter, // OpenAI adapter for language model communication
    endpoint: "/api/copilotkit", // The API route path for this endpoint
  });

  // Step 4b: Process the incoming request through the CopilotKit system
  // This handles:
  // - Authentication and validation
  // - Message routing to appropriate agents
  // - Streaming response coordination
  // - Error handling and recovery
  return handleRequest(req);
};To set up the CopilotKit Provider, the [<CopilotKit>](https://docs.copilotkit.ai/reference/components/CopilotKit) component must wrap the Copilot-aware parts of your application.
For most use cases, it's appropriate to wrap the CopilotKit provider around the entire app, e.g., in your layout.tsx, as shown below in the src/app/layout.tsx file.br>
// Next.js imports for metadata and font handling
import type { Metadata } from "next";
import { Geist, Geist_Mono } from "next/font/google";
// Global styles for the application
import "./globals.css";
// CopilotKit UI styles for AI components
import "@copilotkit/react-ui/styles.css";
// CopilotKit core component for AI functionality
import { CopilotKit } from "@copilotkit/react-core";

// Configure Geist Sans font with CSS variables for consistent typography
const geistSans = Geist({
  variable: "--font-geist-sans",
  subsets: ["latin"],
});

// Configure Geist Mono font for code and monospace text
const geistMono = Geist_Mono({
  variable: "--font-geist-mono",
  subsets: ["latin"],
});

// Metadata configuration for SEO and page information
export const metadata: Metadata = {
  title: "AI Stock Portfolio",
  description: "AI Stock Portfolio",
};

// Root layout component that wraps all pages in the application
export default function RootLayout({
  children,
}: Readonly<{
  children: React.ReactNode;
}>) {
  return (
    <html lang="en">
      <body
        className={`${geistSans.variable} ${geistMono.variable} antialiased`}>
        {/* CopilotKit wrapper that enables AI functionality throughout the app */}
        {/* runtimeUrl points to the API endpoint for AI backend communication */}
        {/* agent specifies which AI agent to use (stockAgent for stock analysis) */}
        <CopilotKit runtimeUrl="/api/copilotkit" agent="pydanticAgent">
          {children}
        </CopilotKit>
      </body>
    </html>
  );
}CopilotKit ships with several built-in chat components, which include CopilotPopup, CopilotSidebar, and CopilotChat.
To set up a Copilot chat component, define it as shown in the src/app/components/prompt-panel.tsx file.br>
// Client-side component directive for Next.js
"use client";

import type React from "react";
// CopilotKit chat component for AI interactions
import { CopilotChat } from "@copilotkit/react-ui";

// Props interface for the PromptPanel component
interface PromptPanelProps {
  // Amount of available cash for investment, displayed in the panel
  availableCash: number;
}

// Main component for the AI chat interface panel
export function PromptPanel({ availableCash }: PromptPanelProps) {
  // Utility function to format numbers as USD currency
  // Removes decimal places for cleaner display of large amounts
  const formatCurrency = (amount: number) => {
    return new Intl.NumberFormat("en-US", {
      style: "currency",
      currency: "USD",
      minimumFractionDigits: 0,
      maximumFractionDigits: 0,
    }).format(amount);
  };

  return (
    // Main container with full height and white background
    <div className="h-full flex flex-col bg-white">
      {/* Header section with title, description, and cash display */}
      <div className="p-4 border-b border-[#D8D8E5] bg-[#FAFCFA]">
        {/* Title section with icon and branding */}
        <div className="flex items-center gap-2 mb-2">
          <span className="text-xl">🪁</span>
          <div>
            <h1 className="text-lg font-semibold text-[#030507] font-['Roobert']">
              Portfolio Chat
            </h1>
            {/* Pro badge indicator */}
            <div className="inline-block px-2 py-0.5 bg-[#BEC9FF] text-[#030507] text-xs font-semibold uppercase rounded">
              PRO
            </div>
          </div>
        </div>
        {/* Description of the AI agent's capabilities */}
        <p className="text-xs text-[#575758]">
          Interact with the LangGraph-powered AI agent for portfolio
          visualization and analysis
        </p>

        {/* Available Cash Display section */}
        <div className="mt-3 p-2 bg-[#86ECE4]/10 rounded-lg">
          <div className="text-xs text-[#575758] font-medium">
            Available Cash
          </div>
          <div className="text-sm font-semibold text-[#030507] font-['Roobert']">
            {formatCurrency(availableCash)}
          </div>
        </div>
      </div>
      {/* CopilotKit chat interface with custom styling and initial message */}
      {/* Takes up the majority of the panel height for conversation */}
      <CopilotChat
        className="h-[78vh] p-2"
        labels={{
          // Initial welcome message explaining the AI agent's capabilities and limitations
          initial: `I am a Crew AI agent designed to analyze investment opportunities and track stock performance over time. How can I help you with your investment query? For example, you can ask me to analyze a stock like "Invest in Apple with 10k dollars since Jan 2023". \n\nNote: The AI agent has access to stock data from the past 4 years only.`
        }}
      />
    </div>
  );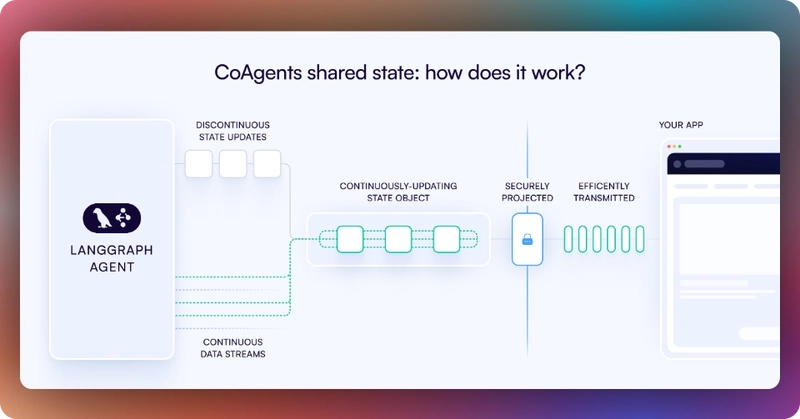
}In CopilotKit, CoAgents maintain a shared state that seamlessly connects your frontend UI with the agent's execution. This shared state system allows you to:
You can learn more about CoAgents’ shared state here on the CopilotKit docs.
To sync your AG-UI + Pydantic AI agent state with the frontend, use the CopilotKit useCoAgent hook to share the AG-UI + Pydantic AI agent state with your frontend, as shown in the src/app/page.tsx file.
"use client";

import {
  useCoAgent,
} from "@copilotkit/react-core";

// ...

export interface SandBoxPortfolioState {
  performanceData: Array<{
    date: string;
    portfolio: number;
    spy: number;
  }>;
}
export interface InvestmentPortfolio {
  ticker: string;
  amount: number;
}

export default function OpenStocksCanvas() {

  // ...

  const [totalCash, setTotalCash] = useState(1000000);

  const { state, setState } = useCoAgent({
    name: "pydanticAgent",
    initialState: {
      available_cash: totalCash,
      investment_summary: {} as any,
      investment_portfolio: [] as InvestmentPortfolio[],
    },
  });

    // ...

  return (
    <div className="h-screen bg-[#FAFCFA] flex overflow-hidden">
       {/* ... */}
    </div>
  );
}
Then render the AG-UI + Pydantic AI agent's state in the chat UI, which is useful for informing the user about the agent's state in a more in-context way.
To render the AG-UI + Pydantic AI agent's state in the chat UI, you can use the useCoAgentStateRender hook, as shown in the src/app/page.tsx file.
"use client";
import {
useCoAgentStateRender,
} from "@copilotkit/react-core";
import { ToolLogs } from "./components/tool-logs";
// ...
export default function OpenStocksCanvas() {
// ...
useCoAgentStateRender({
name: "pydanticAgent",
render: ({ state }) => <ToolLogs logs={state.tool_logs} />,
});
// ...
return (
<div className="h-screen bg-[#FAFCFA] flex overflow-hidden">
{/* ... */}
</div>
);
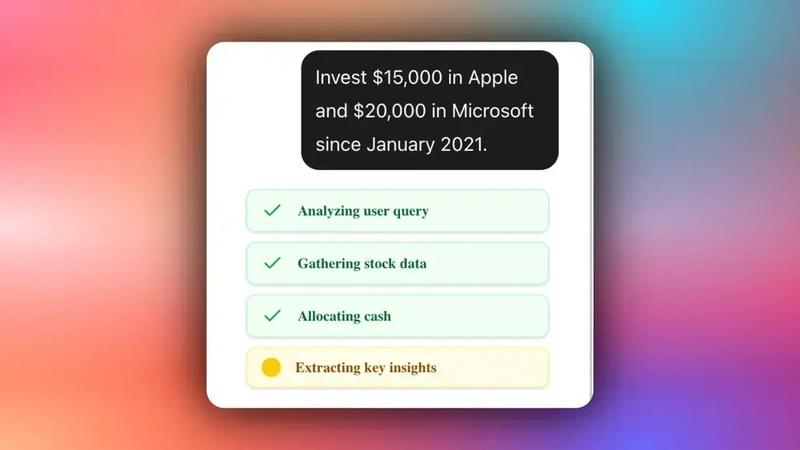
}If you execute a query in the chat, you should see the AG-UI + Pydantic AI agent’s state task execution rendered in the chat UI, as shown below.
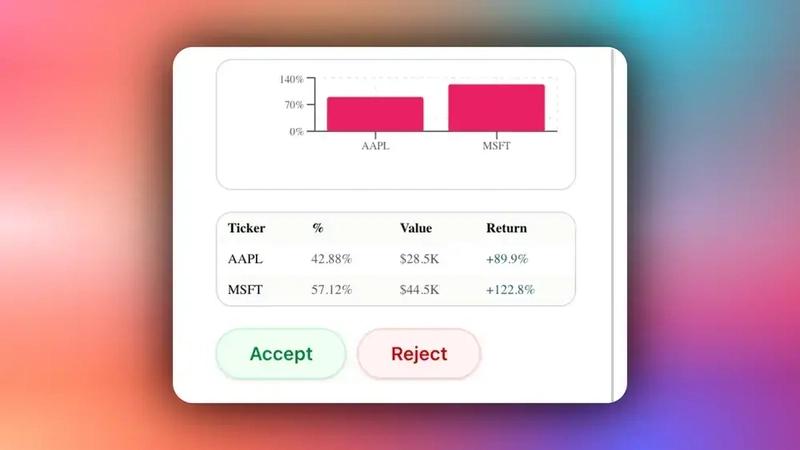
Human-in-the-loop (HITL) allows agents to request human input or approval during execution, making AI systems more reliable and trustworthy. This pattern is essential when building AI applications that need to handle complex decisions or actions that require human judgment.
You can learn more about Human in the Loop here on CopilotKit docs.
To implement Human-in-the-Loop (HITL) in the frontend, you need to use the CopilotKit useCopilotKitAction hook with the renderAndWaitForResponse method, which allows returning values asynchronously from the render function, as shown in the src/app/page.tsx file.br>
"use client";
import {
useCopilotAction,
} from "@copilotkit/react-core";
// ...
export default function OpenStocksCanvas() {
// ...
useCopilotAction({
name: "render_standard_charts_and_table",
description:
"This is an action to render a standard chart and table. The chart can be a bar chart or a line chart. The table can be a table of data.",
renderAndWaitForResponse: ({ args, respond, status }) => {
useEffect(() => {
console.log(args, "argsargsargsargsargsaaa");
}, [args]);
return (
<>
{args?.investment_summary?.percent_allocation_per_stock &&
args?.investment_summary?.percent_return_per_stock &&
args?.investment_summary?.performanceData && (
<>
<div className="flex flex-col gap-4">
<LineChartComponent
data={args?.investment_summary?.performanceData}
size="small"
/>
<BarChartComponent
data={Object.entries(
args?.investment_summary?.percent_return_per_stock
).map(([ticker, return1]) => ({
ticker,
return: return1 as number,
}))}
size="small"
/>
<AllocationTableComponent
allocations={Object.entries(
args?.investment_summary?.percent_allocation_per_stock
).map(([ticker, allocation]) => ({
ticker,
allocation: allocation as a number,
currentValue:
args?.investment_summary.final_prices[ticker] *
args?.investment_summary.holdings[ticker],
totalReturn:
args?.investment_summary.percent_return_per_stock[
ticker
],
}))}
size="small"
/>
</div>
<button
hidden={status == "complete"}
className="mt-4 rounded-full px-6 py-2 bg-green-50 text-green-700 border border-green-200 shadow-sm hover:bg-green-100 transition-colors font-semibold text-sm"
onClick={() => {
debugger;
if (respond) {
setTotalCash(args?.investment_summary?.cash);
setCurrentState({
...currentState,
returnsData: Object.entries(
args?.investment_summary?.percent_return_per_stock
).map(([ticker, return1]) => ({
ticker,
return: return1 as number,
})),
allocations: Object.entries(
args?.investment_summary?.percent_allocation_per_stock
).map(([ticker, allocation]) => ({
ticker,
allocation: allocation as a number,
currentValue:
args?.investment_summary?.final_prices[ticker] *
args?.investment_summary?.holdings[ticker],
totalReturn:
args?.investment_summary?.percent_return_per_stock[
ticker
],
})),
performanceData:
args?.investment_summary?.performanceData,
bullInsights: args?.insights?.bullInsights || [],
bearInsights: args?.insights?.bearInsights || [],
currentPortfolioValue:
args?.investment_summary?.total_value,
totalReturns: (
Object.values(
args?.investment_summary?.returns
) as number[]
).reduce((acc, val) => acc + val, 0),
});
setInvestedAmount(
(
Object.values(
args?.investment_summary?.total_invested_per_stock
) as number[]
).reduce((acc, val) => acc + val, 0)
);
setState({
...state,
available_cash: totalCash,
});
respond(
"Data rendered successfully. Provide a summary of the investments by not making any tool calls."
);
}
}}>
Accept
</button>
<button
hidden={status == "complete"}
className="rounded-full px-6 py-2 bg-red-50 text-red-700 border border-red-200 shadow-sm hover:bg-red-100 transition-colors font-semibold text-sm ml-2"
onClick={() => {
debugger;
if (respond) {
respond(
"Data rendering rejected. Just give a summary of the rejected investments by not making any tool calls."
);
}
}}>
Reject
</button>
</>
)}
</>
);
},
});
// ...
return (
<div className="h-screen bg-[#FAFCFA] flex overflow-hidden">
{/* ... */}
</div>
);
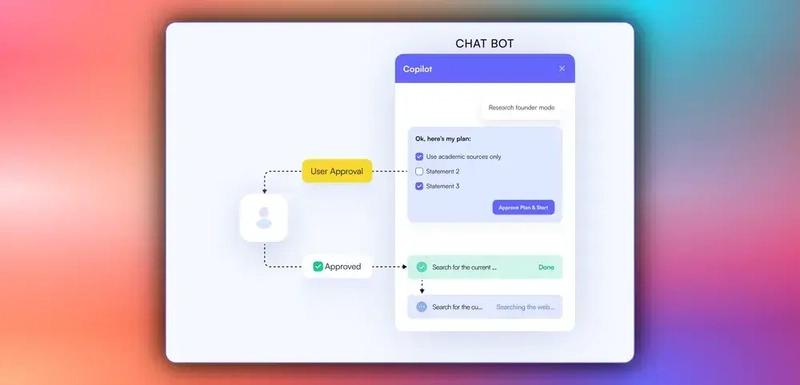
}When an agent triggers frontend actions by tool/action name to request human input or feedback during execution, the end-user is prompted with a choice (rendered inside the chat UI). Then the user can choose by pressing a button in the chat UI, as shown below.
To stream your AG-UI + Pydantic AI agent responses or results in the frontend, pass the agent’s state field values to the frontend components, as shown in the src/app/page.tsx file.br>
"use client";

import { useEffect, useState } from "react";
import { PromptPanel } from "./components/prompt-panel";
import { GenerativeCanvas } from "./components/generative-canvas";
import { ComponentTree } from "./components/component-tree";
import { CashPanel } from "./components/cash-panel";

// ...

export default function OpenStocksCanvas() {
  const [currentState, setCurrentState] = useState<PortfolioState>({
    id: "",
    trigger: "",
    performanceData: [],
    allocations: [],
    returnsData: [],
    bullInsights: [],
    bearInsights: [],
    currentPortfolioValue: 0,
    totalReturns: 0,
  });
  const [sandBoxPortfolio, setSandBoxPortfolio] = useState<
    SandBoxPortfolioState[]
  >([]);
  const [selectedStock, setSelectedStock] = useState<string | null>(null);


  return (
    <div className="h-screen bg-[#FAFCFA] flex overflow-hidden">
      {/* Left Panel - Prompt Input */}
      <div className="w-85 border-r border-[#D8D8E5] bg-white flex-shrink-0">
        <PromptPanel availableCash={totalCash} />
      </div>

      {/* Center Panel - Generative Canvas */}
      <div className="flex-1 relative min-w-0">
        {/* Top Bar with Cash Info */}
        <div className="absolute top-0 left-0 right-0 bg-white border-b border-[#D8D8E5] p-4 z-10">
          <CashPanel
            totalCash={totalCash}
            investedAmount={investedAmount}
            currentPortfolioValue={
              totalCash + investedAmount + currentState.totalReturns || 0
            }
            onTotalCashChange={setTotalCash}
            onStateCashChange={setState}
          />
        </div>

        <div className="pt-20 h-full">
          <GenerativeCanvas
            setSelectedStock={setSelectedStock}
            portfolioState={currentState}
            sandBoxPortfolio={sandBoxPortfolio}
            setSandBoxPortfolio={setSandBoxPortfolio}
          />
        </div>
      </div>

      {/* Right Panel - Component Tree (Optional) */}
      {showComponentTree && (
        <div className="w-64 border-l border-[#D8D8E5] bg-white flex-shrink-0">
          <ComponentTree portfolioState={currentState} />
        </div>
      )}
    </div>
  );
}
If you query your agent and approve its feedback request, you should see the agent’s response or results streaming in the UI, as shown below.
In this guide, we have walked through the steps of integrating Pydantic AI agents with AG-UI protocol and then adding a frontend to the agents using CopilotKit.
While we’ve explored a couple of features, we have barely scratched the surface of the countless use cases for CopilotKit, ranging from building interactive AI chatbots to building agentic solutions—in essence, CopilotKit lets you add a ton of useful AI capabilities to your products in minutes.
Hopefully, this guide makes it easier for you to integrate AI-powered Copilots into your existing application.
Follow CopilotKit on Twitter and say hi, and if you'd like to build something cool, join the Discord community.
Subscribe to our blog and get updates on CopilotKit in your inbox.
