
Get early access
In this guide, you will learn how to integrate a Mastra AI agent with the AG-UI protocol. Also, we will cover how to integrate the AG-UI + Mastra AI agent with CopilotKit in order to chat with the agent and stream its responses in the frontend.
Before we jump in, here is what we will cover:
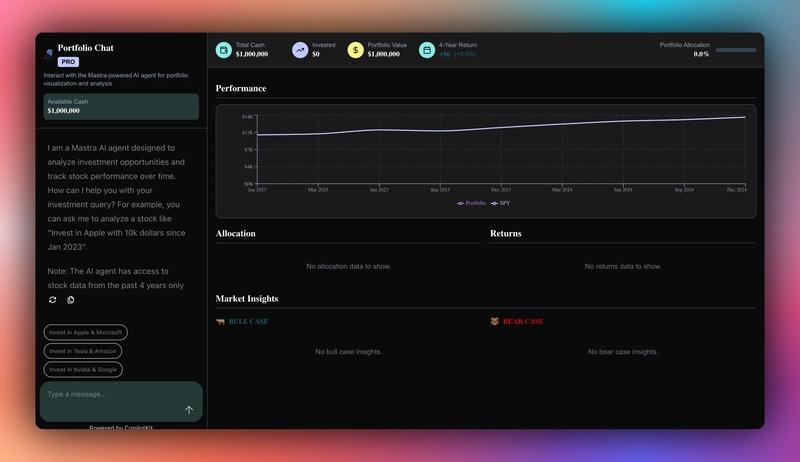
Here’s a preview of what we will be building:
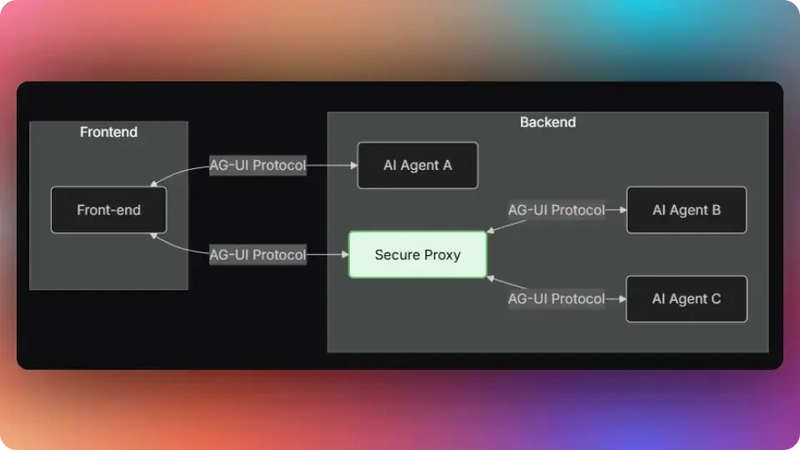
The Agent User Interaction Protocol (AG-UI), developed by CopilotKit, is an open-source, lightweight, event-based protocol that facilitates rich, real-time interactions between the frontend and AI agents.
The AG-UI protocol enables event-driven communication, state management, tool usage, and streaming AI agent responses.
To send information between the frontend and your AI agent, AG-UI uses events such as:
RUN_STARTED and RUN_FINISHED events.TEXT_MESSAGE_START, TEXT_MESSAGE_CONTENT, and TEXT_MESSAGE_END events.TOOL_CALL_START, TOOL_CALL_ARGS, and TOOL_CALL_END events.STATE_SNAPSHOT and STATE_DELTA events.You can learn more about the AG-UI protocol and its architecture here on AG-UI docs.
Now that we have learned what the AG-UI protocol is, let us see how to integrate it with the LlamaIndex agent framework.
Let’s get started!
To fully understand this tutorial, you need to have a basic understanding of React or Next.js.
We'll also make use of the following:
To get started, clone the Open AG UI Mastra Demo repository that consists of a Node-based backend (agent) and a Next.js frontend (frontend).
Next, navigate to the backend directory:
cd agentThen install the dependencies using Pnpm:
pnpm installAfter that, create a .env file with OpenAI API Key API key:
OPENAI_API_KEY=<<your-OpenAI-key-here>>Then run the agent using the command below:
pnpx ts-node src/ag-ui-mastra.tsTo test the AG-UI + Mastra AI integration, run the curl command below on https://reqbin.com/curl.
curl -X POST "http://localhost:8000/mastra-agent" \
  -H "Content-Type: application/json" \
  -d '{
    "thread_id": "test_thread_123",
    "run_id": "test_run_456",
    "messages": [
      {
        "id": "msg_1",
        "role": "user",
        "content": "Analyze AAPL stock with a $10000 investment from 2023-01-01"
      }
    ],
    "tools": [],
    "context": [],
    "forwarded_props": {},
    "state": {}
  }'
Let us now see how to integrate AG-UI protocol with Mastra AI agents framework.
Before integrating AG-UI protocol with Mastra AI agents, define and configure your Mastra AI agent workflow as shown in the src/mastra/workflows/stock-analysis-workflow.ts file
/**
 * MAIN WORKFLOW: Stock Analysis Workflow
 *
 * This is the main workflow orchestrator that ties together all the steps
 * to provide a complete stock analysis from user query to insights.
 */
const stockAnalysisWorkflow = createWorkflow({
  id: "stock-analysis-workflow",
  // Define workflow input schema - what the workflow expects to receive
  inputSchema: z.object({
    messages: z.any(), // Chat conversation messages
    availableCash: z.number().describe("The available cash of the user"),
    toolLogs: z
      .array(
        z.object({
          message: z.string().describe("The message to display to the user"),
          status: z.string().describe("The status of the message"),
        })
      )
      .describe("The tool logs of the workflow"),
    emitEvent: z.function().input(z.any()).output(z.any()), // Function to emit UI state updates
    investmentPortfolio: z
      .array(
        z.object({
          ticker: z.string(),
          amount: z.number(),
        })
      )
      .describe("The investment portfolio of the user"),
  }),
  // Define workflow output schema - what the completed workflow will return
  outputSchema: z.object({
    skip: z.boolean().describe("Whether to skip this step"),
    investmentPortfolio: z
      .array(
        z.object({
          ticker: z.string(),
          amount: z.number(),
        })
      )
      .describe("The investment portfolio of the user"),
    textMessage: z.string().describe("The text message to display to the user"),
    toolLogs: z
      .array(
        z.object({
          message: z.string().describe("The message to display to the user"),
          status: z.string().describe("The status of the message"),
        })
      )
      .describe("The tool logs of the workflow"),
    availableCash: z.number().describe("Available cash after investments"),
    // Time series performance data
    result: z.array(
      z.object({
        date: z.string().describe("The date"),
        portfolioValue: z.number().describe("Portfolio value at the time"),
        benchmarkValue: z.number().describe("Benchmark value at the time"),
      })
    ),
    // Individual ticker performance
    totalReturns: z.array(
      z.object({
        ticker: z.string().describe("The ticker value"),
        rets: z.number().describe("The total returns from the ticker"),
        retsNum: z
          .number()
          .describe("The total returns from the ticker in number"),
      })
    ),
    // Portfolio allocation breakdown
    allocations: z.array(
      z.object({
        ticker: z.string().describe("The ticker data"),
        percentOfAllocation: z
          .number()
          .describe("Percentage of allocation this ticker has"),
        value: z.number().describe("Current value of ticker in the portfolio"),
        returnPercent: z
          .number()
          .describe("Percentage of return from this ticker"),
      })
    ),
    // Generated market insights
    bullInsights: z.array(
      z.object({
        title: z.string().describe("The title of the insight"),
        description: z.string().describe("The description of the insight"),
        emoji: z.string().describe("The emoji of the insight"),
      })
    ),
    bearInsights: z.array(
      z.object({
        title: z.string().describe("The title of the insight"),
        description: z.string().describe("The description of the insight"),
        emoji: z.string().describe("The emoji of the insight"),
      })
    ),
  }),
})
  // Chain the workflow steps in sequence:
  .then(fetchInformationFromUserQuery) // Step 1: Extract investment parameters from user query
  .then(gatherStockInformation) // Step 2: Fetch historical stock data from Yahoo Finance
  .then(calculateInvestmentReturns) // Step 3: Calculate portfolio performance and returns
  .then(gatherInsights); // Step 4: Generate market insights using LLM

// Workflow setup and initialization
stockAnalysisWorkflow.commit(); // Finalize the workflow definition
stockAnalysisWorkflow.createRun(); // Create a new workflow run instance

// Export the workflow for use in other modules
export { stockAnalysisWorkflow };Once you have defined and configured your Mastra AI agent workflow, register the workflow using workflows in the main Mastra instance, as shown in the src/mastra/index.ts file.
// Import necessary dependencies for Mastra framework configuration
import { Mastra } from "@mastra/core/mastra"; // Core Mastra framework class for orchestrating agents and workflows
import { PinoLogger } from "@mastra/loggers"; // Structured logging library for debugging and monitoring
import { LibSQLStore } from "@mastra/libsql"; // Database storage provider for telemetry, evaluations, and persistence
import { stockAnalysisAgent } from "./agents/stock-analysis-agent"; // The intelligent stock analysis agent
import { stockAnalysisWorkflow } from "./workflows/stock-analysis-workflow"; // The complete stock analysis workflow

/**
 * Mastra Framework Configuration
 *
 * This file serves as the central configuration and initialization point for the entire
 * stock analysis system. It brings together all the components:
 *
 * 1. Agents - Intelligent conversational interfaces that understand user queries
 * 2. Workflows - Multi-step business processes that execute complex analysis
 * 3. Storage - Database layer for persistence and telemetry data
 * 4. Logging - Structured logging for debugging and monitoring
 *
 * The Mastra instance acts as the main orchestrator that coordinates all these
 * components and provides a unified interface for the application.
 */
export const mastra = new Mastra({
  // Step 1: Register all available workflows
  // Workflows are multi-step processes that can be executed by agents or triggered directly
  workflows: { stockAnalysisWorkflow }, // Register the stock analysis workflow for investment calculations

  // Step 2: Register all available agents
  // Agents are intelligent interfaces that can understand natural language and execute workflows
  agents: { stockAnalysisAgent }, // Register the stock analysis agent for handling user conversations

  // Step 3: Configure data storage
  // Storage handles persistence of telemetry data, evaluation results, and system state
  storage: new LibSQLStore({
    // Use in-memory storage for development/testing (data is lost when process stops)
    // For production: change to "file:../mastra.db" to persist data to disk
    // stores telemetry, evals, ... into memory storage, if it needs to persist, change to file:../mastra.db
    url: ":memory:", // In-memory database - fast but non-persistent
  }),

  // Step 4: Configure structured logging
  // Logger captures system events, errors, and debugging information
  logger: new PinoLogger({
    name: "Mastra", // Logger name for identifying log source
    level: "info", // Log level - captures info, warn, and error messages (filters out debug/trace)
  }),
});After registering your Mastra AI agent workflow with Mastra instance, create an endpoint with Express that handles frontend requests and responses. Then import the Mastra instance, as shown in the src/ag-ui-mastra.ts file.
// =============================================================================
// IMPORTS AND DEPENDENCIES SECTION
// =============================================================================

// Load environment variables from .env file
// This must be imported first to ensure environment variables are available
import "dotenv/config";

// Import Express.js framework and type definitions
// Express provides the HTTP server and middleware functionality
import express, { Request, Response } from "express";

// Import AG-UI core types and schemas for input validation and event types
// These provide the protocol definitions for Agent Gateway UI communication
import {
  RunAgentInputSchema, // Schema for validating incoming agent requests
  RunAgentInput, // TypeScript interface for agent input data
  EventType, // Enumeration of all possible event types
  Message, // Interface for chat message structure
} from "@ag-ui/core";

// Import event encoder for Server-Sent Events (SSE) formatting
// This handles the encoding of events for real-time streaming
import { EventEncoder } from "@ag-ui/encoder";

// Import UUID generator for creating unique message IDs
// Used to track individual messages and tool calls
import { v4 as uuidv4 } from "uuid";

// Import the configured Mastra instance containing our stock analysis agent
// This is the main AI workflow engine that processes user requests
import { mastra } from "./mastra";

// =============================================================================
// EXPRESS APPLICATION SETUP
// =============================================================================

// Create Express application instance
const app = express();

// Enable JSON body parsing middleware for incoming requests
// This allows the server to parse JSON payloads from HTTP requests
app.use(express.json());

// =============================================================================
// MAIN AGENT ENDPOINT IMPLEMENTATION
// =============================================================================

// Define the main mastra-agent (Agent Workflow Protocol) endpoint
// This endpoint handles streaming communication with AG-UI agents
app.post("/mastra-agent", async (req: Request, res: Response) => {

  //...

});

// =============================================================================
// SERVER INITIALIZATION SECTION
// =============================================================================

// START EXPRESS SERVER
// Configure and start the HTTP server on port 8000
app.listen(8000, () => {
  console.log("Server running on http://localhost:8000");
  console.log("AG-UI endpoint available at http://localhost:8000/mastra-agent");
});Inside your Express server endpoint, configure input validation, setup Server-Sent Events response headers and initialize the AG-UI protocol event encoder instance to format events for SSE transmission, as shown below.
app.post("/mastra-agent", async (req: Request, res: Response) => {
  try {
    // STEP 1: Parse and Validate Input
    // Parse the incoming request body using the RunAgentInputSchema to ensure
    // it contains all required fields (threadId, runId, messages, etc.)
    const input: RunAgentInput = RunAgentInputSchema.parse(req.body);

    // STEP 2: Setup Server-Sent Events (SSE) Response Headers
    // Configure HTTP headers to enable real-time streaming communication
    res.setHeader("Content-Type", "text/event-stream"); // Enable SSE format
    res.setHeader("Cache-Control", "no-cache"); // Prevent browser caching
    res.setHeader("Connection", "keep-alive"); // Keep connection open for streaming

    // STEP 3: Initialize Event Encoder
    // Create encoder instance to format events for SSE transmission
    const encoder = new EventEncoder();

    // ...

    // STEP 13: Close SSE Connection
    // End the response stream to complete the HTTP request
    res.end();
  } catch (error) {
    // =============================================================================
    // ERROR HANDLING SECTION
    // =============================================================================
   }
});In your Express server endpoint, configure AG-Ui protocol lifecycle events in order mark the start or end of the agent’s task execution, as shown below.
app.post("/mastra-agent", async (req: Request, res: Response) => {
  try {
    // ...

    // STEP 3: Initialize Event Encoder
    // Create encoder instance to format events for SSE transmission
    const encoder = new EventEncoder();

    // STEP 4: Send Run Started Event
    // Notify the client that the agent run has begun processing
    const runStarted = {
      type: EventType.RUN_STARTED,
      threadId: input.threadId,
      runId: input.runId,
    };
    res.write(encoder.encode(runStarted));

    // ...

    // STEP 12: Finalize Agent Run
    // Send final event to indicate the entire agent run is complete
    const runFinished = {
      type: EventType.RUN_FINISHED,
      threadId: input.threadId, // Reference the conversation thread
      runId: input.runId, // Reference this specific run
    };
    res.write(encoder.encode(runFinished));

    // STEP 13: Close SSE Connection
    // End the response stream to complete the HTTP request
    res.end();
  } catch (error) {
    // =============================================================================
    // ERROR HANDLING SECTION
    // =============================================================================
   }
});In your Mastra AI agent workflow file, configure AG-UI protocol state management STATE_DELTA event in your workflow steps that emits UI state update to show processing status, as shown below.
import { EventType } from "@ag-ui/core"; // Event types for UI state updates

/**
 * STEP 1: Extract Investment Parameters from User Query
 *
 * This step uses an LLM to parse the user's natural language query and extract
 * structured investment parameters like tickers, amounts, dates, etc.
 */
const fetchInformationFromUserQuery = createStep({
  id: "fetch-information-from-user-query",
  description: "Fetches information from user query",
  // Define input schema - what data this step expects to receive

  ...

  // Define output schema - what data this step will produce

  ...

  execute: async ({ inputData }) => {
    try {
      // Step 1.1: Initialize data and prepare the analysis prompt
      let data = inputData;
      await new Promise((resolve) => setTimeout(resolve, 0)); // Small delay for async processing

      // Step 1.2: Inject portfolio context into the stock analyst prompt
      data.messages[0].content = STOCK_ANALYST_PROMPT.replace(
        "{{PORTFOLIO_DATA_CONTEXT}}",
        JSON.stringify(inputData.investmentPortfolio)
      );

      // Step 1.3: Emit UI state update to show processing status
      if (inputData?.emitEvent && typeof inputData.emitEvent === "function") {
        inputData.emitEvent({
          type: EventType.STATE_DELTA,
          delta: [
            {
              op: "add",
              path: "/toolLogs/-",
              value: {
                message: "Fetching information from user query",
                status: "processing",
              },
            },
          ],
        });
        inputData.toolLogs.push({
          message: "Fetching information from user query",
          status: "processing",
        });
        await new Promise((resolve) => setTimeout(resolve, 0));
      }

      // ...

       return {
          skip: true, // Skip further analysis steps
          availableCash: inputData.availableCash,
          emitEvent: inputData.emitEvent,
          textMessage: response.choices[0].message.content,
        };
      } else {
        // Step 1.7: Parse extracted investment parameters from tool call
        let toolResult;

        // ...

        // Step 1.9: Update UI status to completed
        if (inputData?.emitEvent && typeof inputData.emitEvent === "function") {
          let index = inputData.toolLogs.length - 1;
          inputData.emitEvent({
            type: EventType.STATE_DELTA,
            delta: [
              {
                op: "replace",
                path: `/toolLogs/${index}/status`,
                value: "completed",
              },
            ],
          });
          await new Promise((resolve) => setTimeout(resolve, 0));
        }

        // Step 1.10: Return extracted parameters for next step
        return {
          ...toolResult,
          skip: false, // Continue with analysis
          availableCash: inputData.availableCash,
          investmentPortfolio: inputData.investmentPortfolio,
          emitEvent: inputData.emitEvent,
          textMessage: "",
          toolLogs: inputData.toolLogs,
        };
      }
    } catch (error) {
      console.log(error);
      throw error;
    }
  },
});
Then in the Express endpoint, initialize your agent state using STATE_SNAPSHOT AG-UI protocol state management event, as shown below.
app.post("/mastra-agent", async (req: Request, res: Response) => {
  try {
    // ...

    // STEP 3: Initialize Event Encoder
    // Create encoder instance to format events for SSE transmission
    const encoder = new EventEncoder();

    // ...

    // STEP 5: Initialize Agent State
    // Send initial state snapshot with default values for financial data
    // This provides the UI with the current state of the investment portfolio
    const stateSnapshot = {
      type: EventType.STATE_SNAPSHOT,
      snapshot: {
        availableCash: input.state?.availableCash || 100000, // Default $100k if not provided
        investmentSummary: input.state?.investmentSummary || {}, // Empty summary object
        investmentPortfolio: input.state?.investmentPortfolio || [], // Empty portfolio array
        toolLogs: [], // Initialize empty tool logs array
      },
    };
    res.write(encoder.encode(stateSnapshot));
    await new Promise((resolve) => setTimeout(resolve, 0)); // Allow event loop to process

    // ...

    // STEP 13: Close SSE Connection
    // End the response stream to complete the HTTP request
    res.end();
  } catch (error) {
    // =============================================================================
    // ERROR HANDLING SECTION
    // =============================================================================
   }
});In your Express server endpoint, integrate your Mastra AI agent workflow from the Mastra instance with AG-UI protocol, as shown below.
app.post("/mastra-agent", async (req: Request, res: Response) => {
  try {
    // ...

    // STEP 3: Initialize Event Encoder
    // Create encoder instance to format events for SSE transmission
    const encoder = new EventEncoder();

    // ...

    // STEP 6: Get Stock Analysis Workflow
    // Retrieve the pre-configured stock analysis workflow from Mastra
    const stockAnalysis = mastra.getWorkflow("stockAnalysisWorkflow");

    // STEP 7: Define Event Emission Helper
    // Create a helper function to emit events to the SSE stream
    function emitEvent(data: any) {
      res.write(encoder.encode(data));
    }

    // STEP 8: Create and Start Workflow Execution
    // Initialize a new workflow run instance and start processing
    const workflow = await stockAnalysis.createRunAsync();
    const result = await workflow.start({
      inputData: {
        messages: input.messages, // User messages from the conversation
        availableCash: input.state?.availableCash || 1000000, // Available investment funds
        emitEvent: emitEvent, // Event emission callback
        investmentPortfolio: input.state?.investmentPortfolio || [], // Current portfolio
        toolLogs: [], // Initialize tool logs
      },
    });

    // STEP 9: Reset Tool Logs State
    // Clear any previous tool logs to start fresh for this run
    emitEvent({
      type: EventType.STATE_DELTA,
      delta: [{ op: "replace", path: "/toolLogs", value: [] }],
    });
    await new Promise((resolve) => setTimeout(resolve, 0)); // Allow processing

    // ...

    // STEP 13: Close SSE Connection
    // End the response stream to complete the HTTP request
    res.end();
  } catch (error) {
    // =============================================================================
    // ERROR HANDLING SECTION
    // =============================================================================
   }
});In your Express server endpoint, define AG-UI protocol tool call events that an agent can use to trigger frontend actions by calling the frontend action using a tool name in order to request user feedback, as shown below.
app.post("/mastra-agent", async (req: Request, res: Response) => {
  try {
    // ...

    // STEP 3: Initialize Event Encoder
    // Create encoder instance to format events for SSE transmission
    const encoder = new EventEncoder();

    // ...

    // STEP 11: Process Workflow Results
    // Check if the workflow executed successfully and produced chart data
    if (result?.status === "success" && result?.result?.result?.length > 0) {
      // STEP 11A: Handle Chart/Table Rendering Response
      // The workflow has produced data suitable for rendering charts and tables

      // STEP 11A.1: Start Tool Call for Chart Rendering
      // Notify the client that a tool call is beginning
      const toolcallStart = {
        type: EventType.TOOL_CALL_START,
        toolCallId: uuidv4(), // Unique identifier for this tool call
        toolCallName: "render_standard_charts_and_table", // Name of the tool being called
      };
      emitEvent(toolcallStart);
      await new Promise((resolve) => setTimeout(resolve, 0)); // Allow processing

      // STEP 11A.2: Send Tool Call Arguments
      // Transmit the chart/table data as arguments to the rendering tool
      const toolcallArgs = {
        type: EventType.TOOL_CALL_ARGS,
        toolCallId: toolcallStart.toolCallId, // Reference the tool call
        delta: JSON.stringify(result.result), // Serialize the result data
      };
      emitEvent(toolcallArgs);
      await new Promise((resolve) => setTimeout(resolve, 0)); // Allow processing

      // STEP 11A.3: End Tool Call
      // Signal that the tool call has completed
      const toolcallEnd = {
        type: EventType.TOOL_CALL_END,
        toolCallId: toolcallStart.toolCallId, // Reference the tool call
      };
      emitEvent(toolcallEnd);
      await new Promise((resolve) => setTimeout(resolve, 0)); // Allow processing
    } else {

      // ...

    }

    // ...

    // STEP 13: Close SSE Connection
    // End the response stream to complete the HTTP request
    res.end();
  } catch (error) {
    // =============================================================================
    // ERROR HANDLING SECTION
    // =============================================================================
   }
});Once your have configured AG-UI protocol tool events, define AG-UI protocol text message events in order to handle streaming agent responses to the frontend, as shown below.
app.post("/mastra-agent", async (req: Request, res: Response) => {
  try {
    // ...

    // STEP 3: Initialize Event Encoder
    // Create encoder instance to format events for SSE transmission
    const encoder = new EventEncoder();

    // ...

    // STEP 11: Process Workflow Results
    // Check if the workflow executed successfully and produced chart data
    if (result?.status === "success" && result?.result?.result?.length > 0) {

      // ...

    } else {
      // STEP 11B: Handle Text Response
      // The workflow produced a text message instead of chart data

      // STEP 11B.1: Start Text Message Stream
      // Begin streaming a text response to the client
      const textMessageStart = {
        type: EventType.TEXT_MESSAGE_START,
        messageId, // Use the generated message ID
        role: "assistant", // Indicate this is an assistant response
      };
      res.write(encoder.encode(textMessageStart));
      await new Promise((resolve) => setTimeout(resolve, 0)); // Allow processing

      // STEP 11B.2: Extract Response Content
      // Get the text message from the workflow result, with fallback to empty string
      const response =
        result?.status === "success" ? result.result.textMessage : "";

      // STEP 11B.3: Stream Response in Chunks
      // Break the response into smaller chunks for smooth streaming experience
      const chunkSize = 100; // Number of characters per chunk
      for (let i = 0; i < response.length; i += chunkSize) {
        const chunk = response.slice(i, i + chunkSize); // Extract chunk

        // Send the chunk to the client
        const textMessageContent = {
          type: EventType.TEXT_MESSAGE_CONTENT,
          messageId, // Reference the message
          delta: chunk, // The text chunk
        };
        res.write(encoder.encode(textMessageContent));

        // Add small delay between chunks for smooth streaming effect
        await new Promise((resolve) => setTimeout(resolve, 50));
      }

      // STEP 11B.4: End Text Message Stream
      // Signal that the text message is complete
      const textMessageEnd = {
        type: EventType.TEXT_MESSAGE_END,
        messageId, // Reference the message
      };
      res.write(encoder.encode(textMessageEnd));
    }

    // ...

    // STEP 13: Close SSE Connection
    // End the response stream to complete the HTTP request
    res.end();
  } catch (error) {
    // =============================================================================
    // ERROR HANDLING SECTION
    // =============================================================================
   }
});
Congratulations! You have integrated a Mastra AI agent with AG-UI protocol. Let’s now see how to add a frontend to the AG-UI + Mastra AI agent.
In this section, you will learn how to create a connection between your AG-UI + Mastra AI agent and a frontend using CopilotKit.
Let’s get started.
First, navigate to the frontend directory:
cd frontendNext create a .env file with OpenAI API Key API key:
OPENAI_API_KEY=<<your-OpenAI-key-here>>Then install the dependencies:
pnpm installAfter that, start the development server:
pnpm run devNavigate to http://localhost:3000, and you should see the AG-UI + Mastra AI agent frontend up and running.
Let’s now see how to build the frontend UI for the AG-UI + Mastra AI agent using CopilotKit.
Before creating an HttpAgent instance, first, let’s understand what is HttpAgent.
HttpAgent is a client from the AG-UI Library that bridges your frontend application with any AG-UI-compatible AI agent’s server.
To create an HttpAgent instance, define it in an API route as shown in the src/app/api/copilotkit/route.ts file.
// Import the HttpAgent for making HTTP requests to the backend
import { HttpAgent } from "@ag-ui/client";

// Import CopilotKit runtime components for setting up the API endpoint
import {
  CopilotRuntime,
  OpenAIAdapter,
  copilotRuntimeNextJSAppRouterEndpoint,
} from "@copilotkit/runtime";

// Import NextRequest type for handling Next.js API requests
import { NextRequest } from "next/server";

// Create a new HttpAgent instance that connects to the LangGraph research backend running locally
const mastraAgent = new HttpAgent({
  url: process.env.NEXT_PUBLIC_MASTRA_URL || "http://localhost:8000/mastra-agent",
});

// Initialize the CopilotKit runtime with our research agent
const runtime = new CopilotRuntime({
  agents: {
    mastraAgent : mastraAgent, // Register the research agent with the runtime
  },
});

/**
 * Define the POST handler for the API endpoint
 * This function handles incoming POST requests to the /api/copilotkit endpoint
 */
export const POST = async (req: NextRequest) => {
  // Configure the CopilotKit endpoint for the Next.js app router
  const { handleRequest } = copilotRuntimeNextJSAppRouterEndpoint({
    runtime, // Use the runtime with our research agent
    serviceAdapter: new OpenAIAdapter(), // Use the experimental adapter
    endpoint: "/api/copilotkit", // Define the API endpoint path
  });

  // Process the incoming request with the CopilotKit handler
  return handleRequest(req);
};To set up the CopilotKit Provider, the CopilotKit component must wrap the Copilot-aware parts of your application.
For most use cases, it's appropriate to wrap the CopilotKit provider around the entire app, e.g., in your layout.tsx, as shown below in the src/app/layout.tsx file.
// Next.js imports for metadata and font handling
import type { Metadata } from "next";
import { Geist, Geist_Mono } from "next/font/google";
// Global styles for the application
import "./globals.css";
// CopilotKit UI styles for AI components
import "@copilotkit/react-ui/styles.css";
// CopilotKit core component for AI functionality
import { CopilotKit } from "@copilotkit/react-core";

// Configure Geist Sans font with CSS variables for consistent typography
const geistSans = Geist({
  variable: "--font-geist-sans",
  subsets: ["latin"],
});

// Configure Geist Mono font for code and monospace text
const geistMono = Geist_Mono({
  variable: "--font-geist-mono",
  subsets: ["latin"],
});

// Metadata configuration for SEO and page information
export const metadata: Metadata = {
  title: "AI Stock Portfolio",
  description: "AI Stock Portfolio",
};

// Root layout component that wraps all pages in the application
export default function RootLayout({
  children,
}: Readonly<{
  children: React.ReactNode;
}>) {
  return (
    <html lang="en">
      <body className={`${geistSans.variable} ${geistMono.variable} antialiased`}>
        {/* CopilotKit wrapper that enables AI functionality throughout the app */}
        {/* runtimeUrl points to the API endpoint for AI backend communication */}
        {/* agent specifies which AI agent to use (stockAgent for stock analysis) */}
        <CopilotKit runtimeUrl="/api/copilotkit" agent="stockAgent">
          {children}
        </CopilotKit>
      </body>
    </html>
  );
}CopilotKit ships with a number of built-in chat components which include CopilotPopup, CopilotSidebar, and CopilotChat.
To set up a Copilot chat component, define it as shown in the src/app/components/prompt-panel.tsx file.
// Client-side component directive for Next.js
"use client";

import type React from "react";
// CopilotKit chat component for AI interactions
import { CopilotChat } from "@copilotkit/react-ui";

// Props interface for the PromptPanel component
interface PromptPanelProps {
  // Amount of available cash for investment, displayed in the panel
  availableCash: number;
}

// Main component for the AI chat interface panel
export function PromptPanel({ availableCash }: PromptPanelProps) {
  // Utility function to format numbers as USD currency
  // Removes decimal places for cleaner display of large amounts
  const formatCurrency = (amount: number) => {
    return new Intl.NumberFormat("en-US", {
      style: "currency",
      currency: "USD",
      minimumFractionDigits: 0,
      maximumFractionDigits: 0,
    }).format(amount);
  };

  return (
    <div className="h-full flex flex-col bg-white">
      {/* Header section with title, description, and cash display */}
      <div className="p-4 border-b border-[#D8D8E5] bg-[#FAFCFA]">
        {/* Title section with icon and branding */}
        <div className="flex items-center gap-2 mb-2">
          <span className="text-xl">🪁</span>
          <div>
            <h1 className="text-lg font-semibold text-[#030507] font-['Roobert']">
              Portfolio Chat
            </h1>
            {/* Pro badge indicator */}
            <div className="inline-block px-2 py-0.5 bg-[#BEC9FF] text-[#030507] text-xs font-semibold uppercase rounded">
              PRO
            </div>
          </div>
        </div>
        {/* Description of the AI agent's capabilities */}
        <p className="text-xs text-[#575758]">
          Interact with the LangGraph-powered AI agent for portfolio
          visualization and analysis
        </p>

        {/* Available Cash Display section */}
        <div className="mt-3 p-2 bg-[#86ECE4]/10 rounded-lg">
          <div className="text-xs text-[#575758] font-medium">
            Available Cash
          </div>
          <div className="text-sm font-semibold text-[#030507] font-['Roobert']">
            {formatCurrency(availableCash)}
          </div>
        </div>
      </div>
      {/* CopilotKit chat interface with custom styling and initial message */}
      {/* Takes up majority of the panel height for conversation */}
      <CopilotChat
        className="h-[78vh] p-2"
        labels={{
          // Initial welcome message explaining the AI agent's capabilities and limitations
          initial: `I am a LangGraph AI agent designed to analyze investment opportunities and track stock performance over time. How can I help you with your investment query? For example, you can ask me to analyze a stock like "Invest in Apple with 10k dollars since Jan 2023". \n\nNote: The AI agent has access to stock data from the past 4 years only`,
        }}
      />
    </div>
  );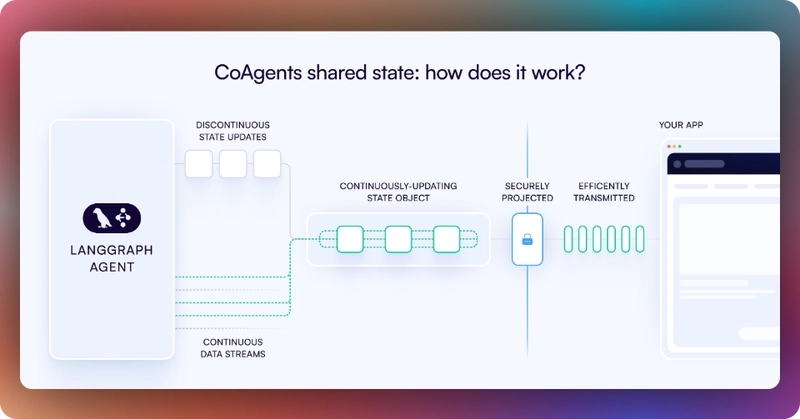
}In CopilotKit, CoAgents maintain a shared state that seamlessly connects your frontend UI with the agent's execution. This shared state system allows you to:
You can learn more about CoAgents’ shared state here on the CopilotKit docs.
To sync your AG-UI + Mastra AI agent state with the frontend, use the CopilotKit useCoAgent hook to share the AG-UI + Mastra AI agent state with your frontend, as shown in the src/app/page.tsx file.
"use client";
import {
useCoAgent,
} from "@copilotkit/react-core";
// ...
export interface SandBoxPortfolioState {
performanceData: Array<{
date: string;
portfolio: number;
spy: number;
}>;
}
export interface InvestmentPortfolio {
ticker: string;
amount: number;
}
export default function OpenStocksCanvas() {
// ...
const [totalCash, setTotalCash] = useState(1000000);
const { state, setState } = useCoAgent({
name: "stockAgent",
initialState: {
available_cash: totalCash,
investment_summary: {} as any,
investment_portfolio: [] as InvestmentPortfolio[],
},
});
// ...
return (
<div className="h-screen bg-[#FAFCFA] flex overflow-hidden">
{/* ... */}
</div>
);
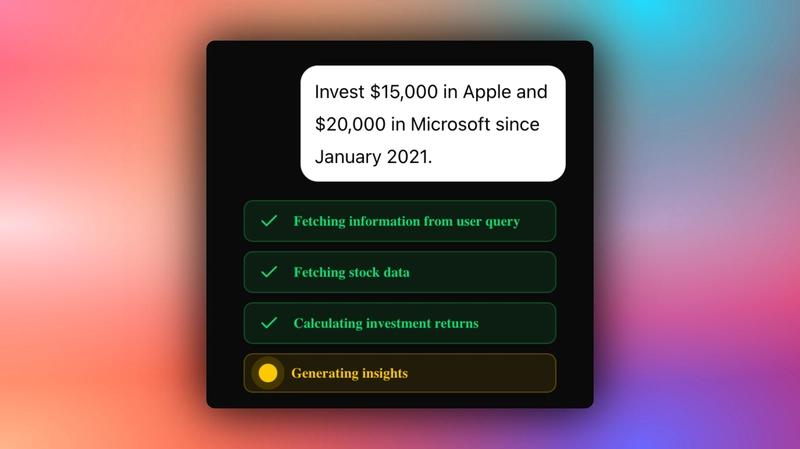
}Then render the AG-UI + Mastra AI agent's state in the chat UI which is useful for informing the user about the agent's state in a more in-context way.
To render the AG-UI + Mastra AI agent's state in the chat UI, you can use the useCoAgentStateRender hook, as shown in the src/app/page.tsx file.
"use client";

import {
  useCoAgentStateRender,
} from "@copilotkit/react-core";

import { ToolLogs } from "./components/tool-logs";

// ...

export default function OpenStocksCanvas() {

  // ...

  useCoAgentStateRender({
    name: "stockAgent",
    render: ({ state }) => <ToolLogs logs={state.tool_logs} />,
  });

  // ...

  return (
    <div className="h-screen bg-[#FAFCFA] flex overflow-hidden">
      {/* ... */}
    </div>
  );
}
If your execute a query in the chat, you should see the AG-UI + Mastra AI agent’s state task execution rendered in the chat UI, as shown below.
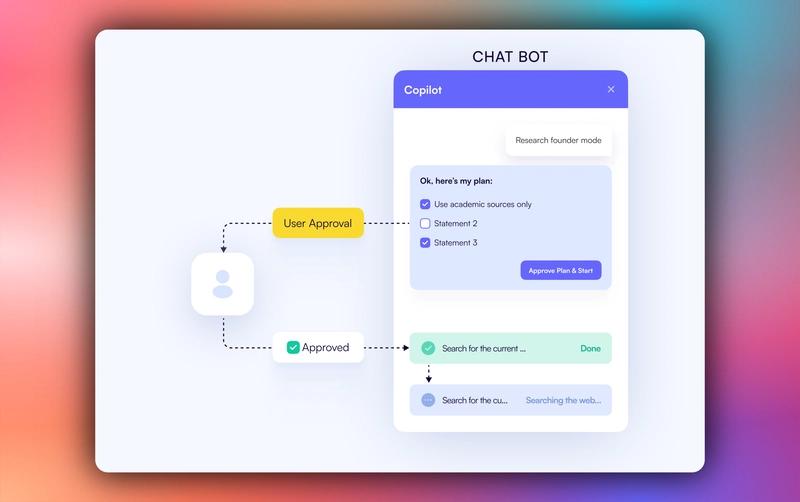
Human-in-the-loop (HITL) allows agents to request human input or approval during execution, making AI systems more reliable and trustworthy. This pattern is essential when building AI applications that need to handle complex decisions or actions that require human judgment.
You can learn more about Human in the Loop here on CopilotKit docs.
To implement Human-in-the-Loop (HITL) in the frontend, you need to use the CopilotKit useCopilotKitAction hook with the renderAndWaitForResponse method which allows returning values asynchronously from the render function, as shown in the src/app/page.tsx file.
"use client";

import {
  useCopilotAction,
} from "@copilotkit/react-core";

// ...

export default function OpenStocksCanvas() {

  // ...

  useCopilotAction({
    name: "render_standard_charts_and_table",
    description:
      "This is an action to render a standard chart and table. The chart can be a bar chart or a line chart. The table can be a table of data.",
    renderAndWaitForResponse: ({ args, respond, status }) => {
      useEffect(() => {
        console.log(args, "argsargsargsargsargsaaa");
      }, [args]);
      return (
        <>
          {args?.investment_summary?.percent_allocation_per_stock &&
            args?.investment_summary?.percent_return_per_stock &&
            args?.investment_summary?.performanceData && (
              <>
                <div className="flex flex-col gap-4">
                  <LineChartComponent
                    data={args?.investment_summary?.performanceData}
                    size="small"
                  />
                  <BarChartComponent
                    data={Object.entries(
                      args?.investment_summary?.percent_return_per_stock
                    ).map(([ticker, return1]) => ({
                      ticker,
                      return: return1 as number,
                    }))}
                    size="small"
                  />
                  <AllocationTableComponent
                    allocations={Object.entries(
                      args?.investment_summary?.percent_allocation_per_stock
                    ).map(([ticker, allocation]) => ({
                      ticker,
                      allocation: allocation as number,
                      currentValue:
                        args?.investment_summary.final_prices[ticker] *
                        args?.investment_summary.holdings[ticker],
                      totalReturn:
                        args?.investment_summary.percent_return_per_stock[
                          ticker
                        ],
                    }))}
                    size="small"
                  />
                </div>

                <button
                  hidden={status == "complete"}
                  className="mt-4 rounded-full px-6 py-2 bg-green-50 text-green-700 border border-green-200 shadow-sm hover:bg-green-100 transition-colors font-semibold text-sm"
                  onClick={() => {
                    debugger;
                    if (respond) {
                      setTotalCash(args?.investment_summary?.cash);
                      setCurrentState({
                        ...currentState,
                        returnsData: Object.entries(
                          args?.investment_summary?.percent_return_per_stock
                        ).map(([ticker, return1]) => ({
                          ticker,
                          return: return1 as number,
                        })),
                        allocations: Object.entries(
                          args?.investment_summary?.percent_allocation_per_stock
                        ).map(([ticker, allocation]) => ({
                          ticker,
                          allocation: allocation as number,
                          currentValue:
                            args?.investment_summary?.final_prices[ticker] *
                            args?.investment_summary?.holdings[ticker],
                          totalReturn:
                            args?.investment_summary?.percent_return_per_stock[
                              ticker
                            ],
                        })),
                        performanceData:
                          args?.investment_summary?.performanceData,
                        bullInsights: args?.insights?.bullInsights || [],
                        bearInsights: args?.insights?.bearInsights || [],
                        currentPortfolioValue:
                          args?.investment_summary?.total_value,
                        totalReturns: (
                          Object.values(
                            args?.investment_summary?.returns
                          ) as number[]
                        ).reduce((acc, val) => acc + val, 0),
                      });
                      setInvestedAmount(
                        (
                          Object.values(
                            args?.investment_summary?.total_invested_per_stock
                          ) as number[]
                        ).reduce((acc, val) => acc + val, 0)
                      );
                      setState({
                        ...state,
                        available_cash: totalCash,
                      });
                      respond(
                        "Data rendered successfully. Provide summary of the investments by not making any tool calls"
                      );
                    }
                  }}>
                  Accept
                </button>
                <button
                  hidden={status == "complete"}
                  className="rounded-full px-6 py-2 bg-red-50 text-red-700 border border-red-200 shadow-sm hover:bg-red-100 transition-colors font-semibold text-sm ml-2"
                  onClick={() => {
                    debugger;
                    if (respond) {
                      respond(
                        "Data rendering rejected. Just give a summary of the rejected investments by not making any tool calls"
                      );
                    }
                  }}>
                  Reject
                </button>
              </>
            )}
        </>
      );
    },
  });

  // ...

  return (
    <div className="h-screen bg-[#FAFCFA] flex overflow-hidden">
      {/* ... */}
    </div>
  );
}
When an agent triggers frontend actions by tool/action name to request human input or feedback during execution, the end-user is prompted with a choice (rendered inside the chat UI). Then the user can choose by pressing a button in the chat UI, as shown below.
To stream your AG-UI + Mastra AI agent responses or results in the frontend, pass the agent’s state field values to the frontend components, as shown in the src/app/page.tsx file.
"use client";
import { useEffect, useState } from "react";
import { PromptPanel } from "./components/prompt-panel";
import { GenerativeCanvas } from "./components/generative-canvas";
import { ComponentTree } from "./components/component-tree";
import { CashPanel } from "./components/cash-panel";
// ...
export default function OpenStocksCanvas() {
const [currentState, setCurrentState] = useState<PortfolioState>({
id: "",
trigger: "",
performanceData: [],
allocations: [],
returnsData: [],
bullInsights: [],
bearInsights: [],
currentPortfolioValue: 0,
totalReturns: 0,
});
const [sandBoxPortfolio, setSandBoxPortfolio] = useState<
SandBoxPortfolioState[]
>([]);
const [selectedStock, setSelectedStock] = useState<string | null>(null);
return (
<div className="h-screen bg-[#FAFCFA] flex overflow-hidden">
{/* Left Panel - Prompt Input */}
<div className="w-85 border-r border-[#D8D8E5] bg-white flex-shrink-0">
<PromptPanel availableCash={totalCash} />
</div>
{/* Center Panel - Generative Canvas */}
<div className="flex-1 relative min-w-0">
{/* Top Bar with Cash Info */}
<div className="absolute top-0 left-0 right-0 bg-white border-b border-[#D8D8E5] p-4 z-10">
<CashPanel
totalCash={totalCash}
investedAmount={investedAmount}
currentPortfolioValue={
totalCash + investedAmount + currentState.totalReturns || 0
}
onTotalCashChange={setTotalCash}
onStateCashChange={setState}
/>
</div>
<div className="pt-20 h-full">
<GenerativeCanvas
setSelectedStock={setSelectedStock}
portfolioState={currentState}
sandBoxPortfolio={sandBoxPortfolio}
setSandBoxPortfolio={setSandBoxPortfolio}
/>
</div>
</div>
{/* Right Panel - Component Tree (Optional) */}
{showComponentTree && (
<div className="w-64 border-l border-[#D8D8E5] bg-white flex-shrink-0">
<ComponentTree portfolioState={currentState} />
</div>
)}
</div>
);
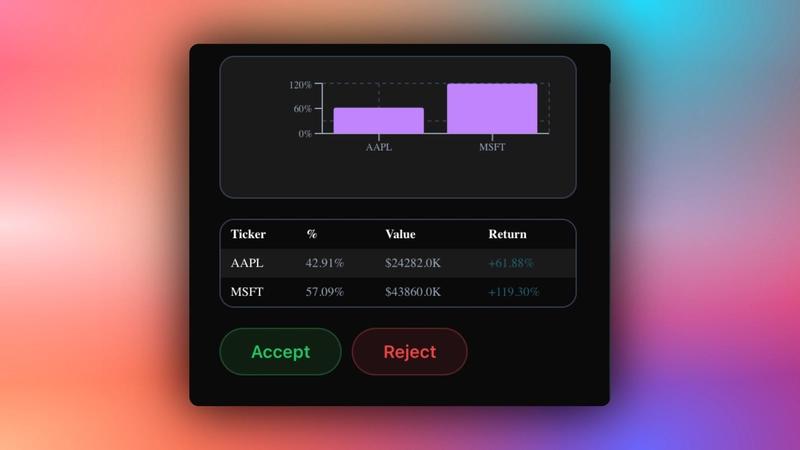
}If you query your agent and approve its feedback request, you should see the agent’s response or results streaming in the UI, as shown below.
In this guide, we have walked through the steps of integrating Mastra AI agents with AG-UI protocol and then adding a frontend to the agents using CopilotKit.
While we’ve explored a couple of features, we have barely scratched the surface of the countless use cases for CopilotKit, ranging from building interactive AI chatbots to building agentic solutions—in essence, CopilotKit lets you add a ton of useful AI capabilities to your products in minutes.
Hopefully, this guide makes it easier for you to integrate AI-powered Copilots into your existing application.
Follow CopilotKit on Twitter and say hi, and if you'd like to build something cool, join the Discord community.
Subscribe to our blog and get updates on CopilotKit in your inbox.
