
Get early access

In this tutorial, we’ll walk you through the process of building a Copilot for leveraging RAG for your product knowledge base using OpenAI API, MongoDB Atlas Vector Search, and CopilotKit.
Here’s what we’ll cover:
Here’s a preview of the implementation:
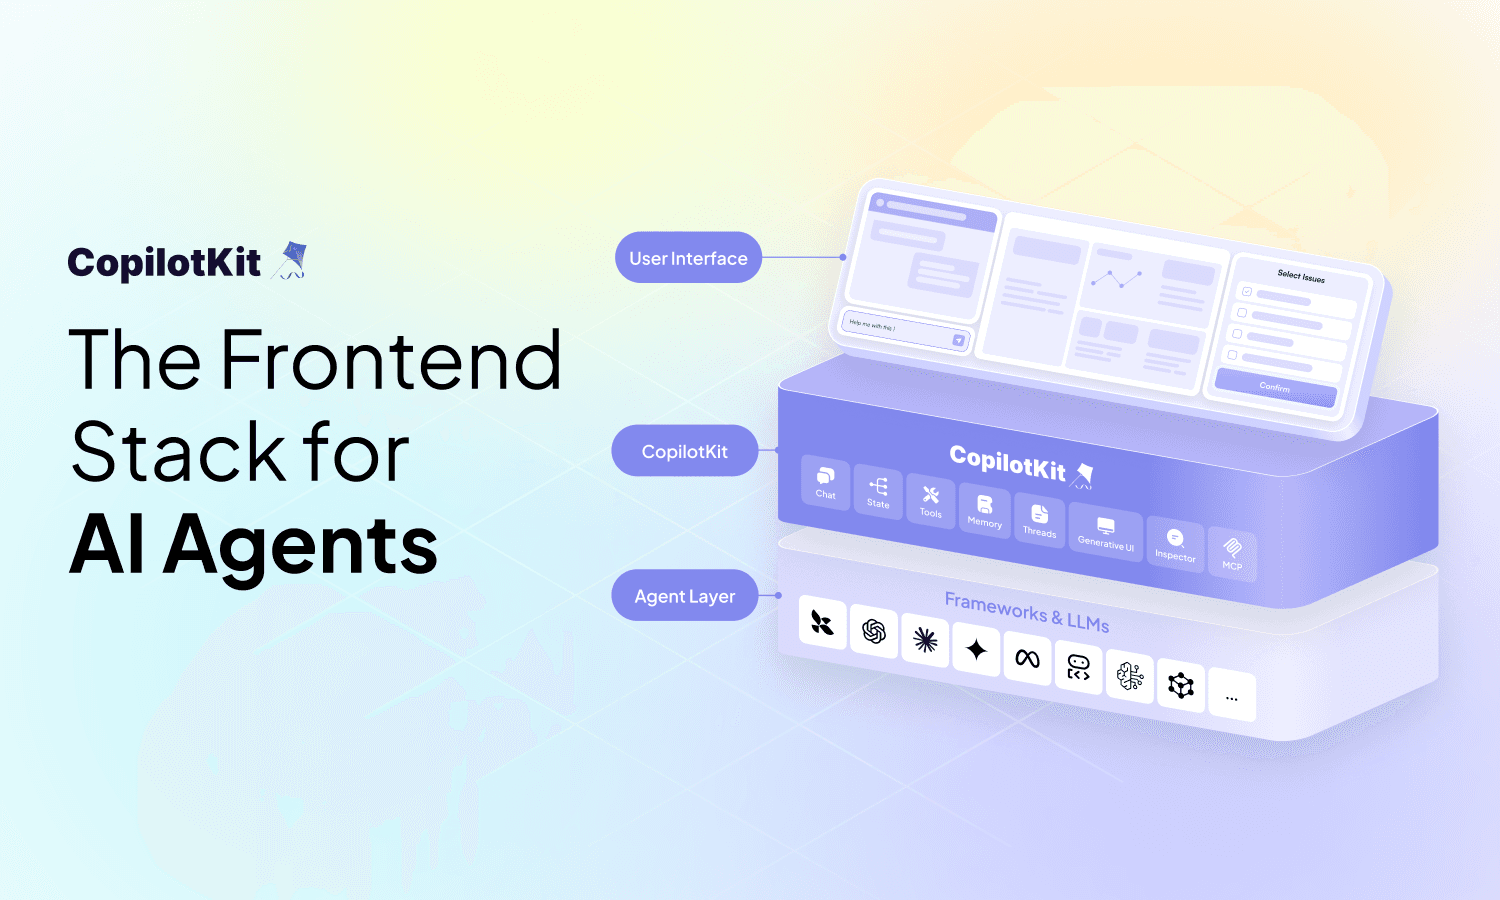
CopilotKit is an open-source framework for integrating production-ready AI-powered copilots into your applications. It provides a feature-rich SDK that supports various AI copilot use cases, including context awareness, copilot actions, and generative UIs.
This means you can focus on defining what your copilot will do, rather than getting bogged down in the technicalities of building one from scratch or dealing with complex integrations.
MongoDB Atlas Vector Search delivers fast, relevance-based search on top of your data that is an integrated full-text search engine built on the Apache Lucene library.
Search operators are incorporated in the aggregation framework, and there is no infrastructure or middleware for you to deploy or manage.
One very interesting factor is large language models (LLMs) are information-rich but lack context to deliver competitive advantage. Retrieval-augmented generation (RAG) bridges this gap. With Vector Search built into MongoDB Atlas, you can store and search operational data alongside vectors, enabling RAG to access the most relevant data and provide accurate insights.
Now that we have our bases covered, let’s get started! 🏁
Before we get started, here are a few things you’ll need:
Once you’ve got these covered, we’ll move on to setting up the development environment we’ll be working in.
Here’s a quick preview of what we’ll be building:
To get started, run these commands to create a new directory for the project, and scaffold the Next.js application boilerplate source files and folders:
mkdir product-knowledge-base
&& cd product-knowledge-basenpx create-next-app product-knowledge-baseFollow the setup prompts. You can make your selections as shown below (adjust based on your project requirements).

Once the project is created, navigate to the project directory, and verify everything works by running the development server:
cd product-knowledge-baseyarn run devAt this stage, you should see your app running locally at http://localhost:3000.
Next, let’s install the necessary dependencies for this project. These include:
Run the following command to install them:
yarn add @mantine/hooks @copilotkit/react-core @copilotkit/react-ui @copilotkit/runtime lucide-react axios openai mongodbNow, let’s set up the file structure for the project. Here is an overview of the main files and directories you’ll need to create:
src/app/ui/service/index.ts: To handle API calls to the backend to fetch dummy posts.src/app/ui/components/KnowledgeBase.tsx: The main UI component for the knowledge base.src/app/lib/types/post.ts:src/app/lib/data/data.ts: dummy post data for the knowledge base.src/app/api/copilotkit/route.ts: CopilotKit API endpoint.src/app/api/posts/route.ts: dummy posts API endpoint.Here’s how your project structure will look:
product-knowledge-base/├── src/│ ├── app/│ │ ├── ui/│ │ │ ├── service/│ │ │ │ └── index.ts│ │ │ ├── components/│ │ │ │ └── KnowledgeBase.tsx│ │ ├── lib/│ │ │ ├── types/│ │ │ │ └── post.ts│ │ │ ├── data/│ │ │ │ └── data.ts│ │ ├── api/│ │ │ ├── copilotkit/│ │ │ │ └── route.ts│ │ │ ├── posts/│ │ │ │ └── route.ts
With this setup, you now have a working development environment for this tutorial.
First, import the CopilotKit and Mantine UI providers, then wrap your entire app with them so they're available globally. Here's how you can update your layout.tsx file:
import { MantineProvider } from "@mantine/core";
import "@mantine/core/styles.css";
import "@copilotkit/react-ui/styles.css";
import { CopilotKit } from "@copilotkit/react-core";

export default function RootLayout({
  children,
}: Readonly<{
  children: React.ReactNode;
}>) {
  return (
    <html lang="en">
      <body>
        <CopilotKit runtimeUrl="/api/copilotkit">
          <MantineProvider>{children}</MantineProvider>
        </CopilotKit>
      </body>
    </html>
  );
}When wrapping the app with these providers, remember to pass the runtimeUrl="<endpoint-url>" prop to the CopilotKit provider.
In this section, we’ll go over the code you need to build the knowledge base component. Let's start by defining the Post interface. Add the following code in your src/app/lib/types/post.ts:
export interface Post {
  id: number;
  title: string;
  summary: string;
  content: string;
  category: string;
  createdAt: string;
}
Next, navigate to the src/app/ui/service/index.ts file, and add the following code to handle API requests to fetch posts from the app’s backend:
import axios from 'axios';
import { Post } from '@/app/lib/types/post';

const API_BASE_URL = process.env.NEXT_PUBLIC_API_BASE_URL

export const fetchPosts = async (): Promise<Post[]> => {
  const response = await axios.get(`${API_BASE_URL}/api/posts`);
  return response.data;
};Ensure you create a .env file in the root directory of your project, and add the following base URL.
NEXT_PUBLIC_API_BASE_URL='<http://localhost:3000>'Now, let’s create the Knowledge Base UI component. Inside the src/app/ui/components/KnowledgeBase.tsx, start by adding the following imports:
"use client"

import { useState, useEffect } from "react";
import {
  Container,
  Title,
  Grid,
  Card,
  Text,
  Badge,
  Group,
  Stack,
  Box,
  Modal,
  List,
} from "@mantine/core";
import { BookOpen } from "lucide-react";
import { Post } from "@/app/lib/types/post";
import { fetchPosts } from "@/app/ui/service";
Next, define the KnowledgeBase functional component and initialize the following states:
export function KnowledgeBase() {
  const [posts, setPosts] = useState<Post[]>([]);
  const [loading, setLoading] = useState(true);
  const [selectedPost, setSelectedPost] = useState<Post | null>(null);

  if (loading) {
    return <Text>Loading...</Text>;
  }

  return (
    <Container size="md" py="xl" ml="xl">
      <Stack gap="xl">
        <Group justify="center" align="center">
          <BookOpen size={32} />
          <Title order={1}>CopilotKit Product Knowledge Base</Title>
        </Group>
      </Stack>
    </Container>
  );
}Now, let’s define a function to fetch the list of posts from the API:
useEffect(() => {
  const loadPosts = async () => {
    try {
      const data = await fetchPosts();
      setPosts(data);
    } catch (error) {
      console.error("Error loading posts:", error);
    } finally {
      setLoading(false);
    }
  };

  loadPosts();
}, []);
To display the posts fetched from the app’s backend, add the following code. We will render the list of posts in a grid layout with cards:
{/* Display posts */}
<Grid>
  {posts.map((post) => (
    <Grid.Col key={post.id} span={{ base: 12, sm: 6, md: 4 }}>
      <Card
        shadow="sm"
        padding="lg"
        radius="md"
        withBorder
        onClick={() => setSelectedPost(post)}
        style={{ cursor: "pointer" }}
      >
        <Stack gap="md">
          <Title order={3}>{post.title}</Title>
          <Badge color="blue" variant="light">
            {post.category}
          </Badge>
          <Text size="sm" c="dimmed">
            {post.summary}
          </Text>
          <Text size="xs" c="dimmed">
            Posted on: {new Date(post.createdAt).toLocaleDateString()}
          </Text>
        </Stack>
      </Card>
    </Grid.Col>
  ))}
</Grid>To show the content of a single post, in this case, we’ll keep things straightforward by displaying dummy content in a modal component when an article card is clicked. To do that, add the following code:
{/* Modal for displaying selected post */}
{selectedPost && (
  <Modal
    opened={!!selectedPost}
    onClose={() => setSelectedPost(null)}
    title={selectedPost.title}
    centered
    size="xl"
  >
    <Stack gap="md">
      <List>
        {selectedPost.content
          .split("")
          .filter((item) => item.trim() !== "")
          .map((item, index) => (
            <List.Item key={index}>{item}</List.Item>
          ))}
      </List>
    </Stack>
  </Modal>
)}
Next, define the following function to update the selected post state when users click on the post’s card.
const handlePostClick = (post: Post) => {
    setSelectedPost(post);
};Finally, to render this component in the browser, import it in your src/app/page.tsx file with the following code (make sure to delete all the boilerplate Next.js code):
import KnowledgeBase from "@/app/ui/components/KnowledgeBase";

export default function Home() {
  return (
    <div>
      <KnowledgeBase />
    </div>
  );
}
The next step involves adding CopilotKit UI components into the knowledge base interface. CopilotKit’s React SDK provides neatly designed and easily customizable UI components. These include sidebars, pop-ups, text areas, and a headless UI component. For this example, we will use the **CopilotSidebar** component to render an in-app chatbot interface.
To add CopilotKit’s UI sidebar component, in your src/app/ui/components/KnowledgeBase.tsx, add the following import:
import { CopilotSidebar } from "@copilotkit/react-ui";Once imported, add the component in the JSX return statement:
<Group justify="center" style={{ width: "100%" }}>
  <Box style={{ flex: 1, maxWidth: "350px" }}>
    <CopilotSidebar
      instructions="Help the user get the right knowledge base articles for their query"
      labels={{
        initial: "Welcome! Describe the query you need assistance with.",
      }}
      defaultOpen={true}
      clickOutsideToClose={false}
    />
  </Box>
</Group>The component accepts various props, including instructions, labels, defaultOpen, and clickOutsideToClose. Importantly, the instructions prop allows you to provide additional context to help the underlying Copilot AI LLM better understand and respond to user queries.
The React CopilotKit SDK also provides a set of useful hooks that enable you to define custom actions for your app’s AI Copilot. For this example, we will use the useCopilotAction hook to define the intended action, that is, to retrieve knowledge base articles based on a user query.
To do that, start by importing the useCopilotAction hook in your KnowledgeBase component file as follows:
import { useCopilotAction } from "@copilotkit/react-core";After importing, you can initialize the hook, and specify the action you want the copilot to perform. In this case, we’ll define an action named “FetchKnowledgebaseArticles” to retrieve relevant articles based on the supplied user query. Here’s how to code for it:
useCopilotAction({
  name: "FetchKnowledgebaseArticles",
  description: "Fetch relevant knowledge base articles based on a user query",
  parameters: [
    {
      name: "query",
      type: "string",
      description: "User query for the knowledge base",
      required: true,
    },
  ],
  render: "Getting relevant answers to your query...",
});
This action setup includes several important elements. The name attribute provides a unique identifier for the action, while the description explains its purpose and when it should be used.
Additionally, the parameters array defines the inputs required for the action, such as the user’s query in this case. And lastly, the render property allows you to specify what will be displayed while the action is being executed. For this example, we’ll display a simple status message to keep the user informed about the ongoing process.
To complete the entire app’s workflow, let’s build the backend by adding endpoints for fetching posts, integrating CopilotKit functionality, and OpenAI’s API, as well as MongoDB Atlas Vector Search API to create searchable indexes for the knowledge base articles.
To do that, first, go to this GitHub repository file containing the dummy posts data, copy, and paste it into your local src/app/lib/data/data.ts file.
Next, in the src/app/api/posts/route.ts file, add the following code to set up the dummy posts API endpoint:
import { NextResponse } from 'next/server';
import { posts } from '@/app/lib/data/data';
export async function GET() {
return NextResponse.json(posts);
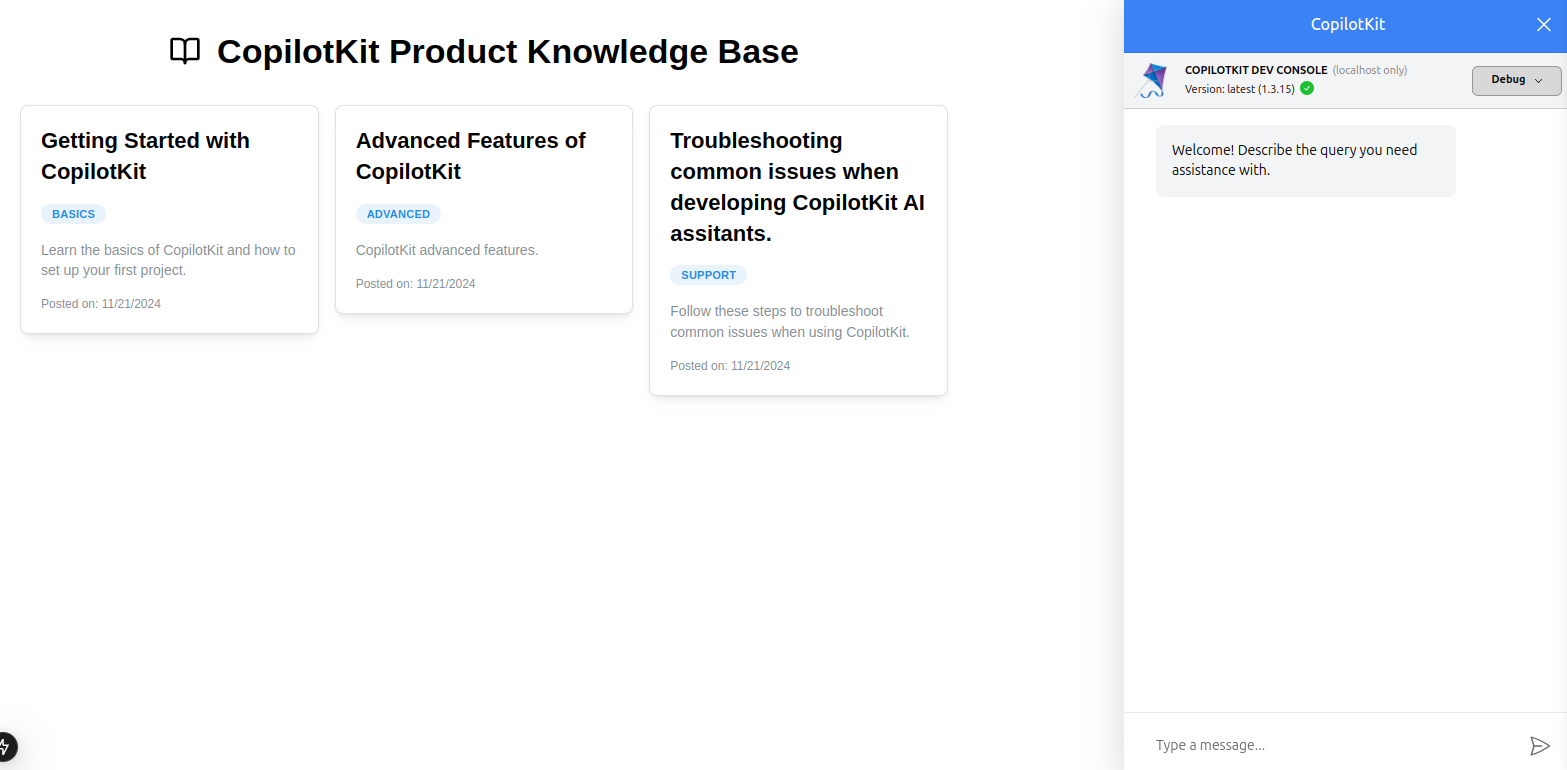
}At this point, start your dev server and head over to your app’s localhost URL. You should see the list of posts displayed, along with the CopilotKit sidebar component.
Going back to the main intent of the guide, that is, integrating an AI Copilot for product knowledge bases. Typically, most product knowledge bases are loaded with all sorts of content—blog articles, FAQs, internal SOPs, API documentation, and more. That’s a lot more than the three dummy posts we’re working with in this example.
Normally, these knowledge bases have integrated Algolia Search API to let users quickly search through resources. Now for the AI copilot, we want to go beyond just “search-show”.Essentially, we want to take advantage of LLMs’ ability to understand natural language to implement “conversational-like” search functionality for knowledge bases’ resources.
Instead of simply returning static search results, the Copilot will allow users to “chat” about the resources, ask follow-up questions, and get answers in a much more user-friendly way. This is arguably more intuitive.
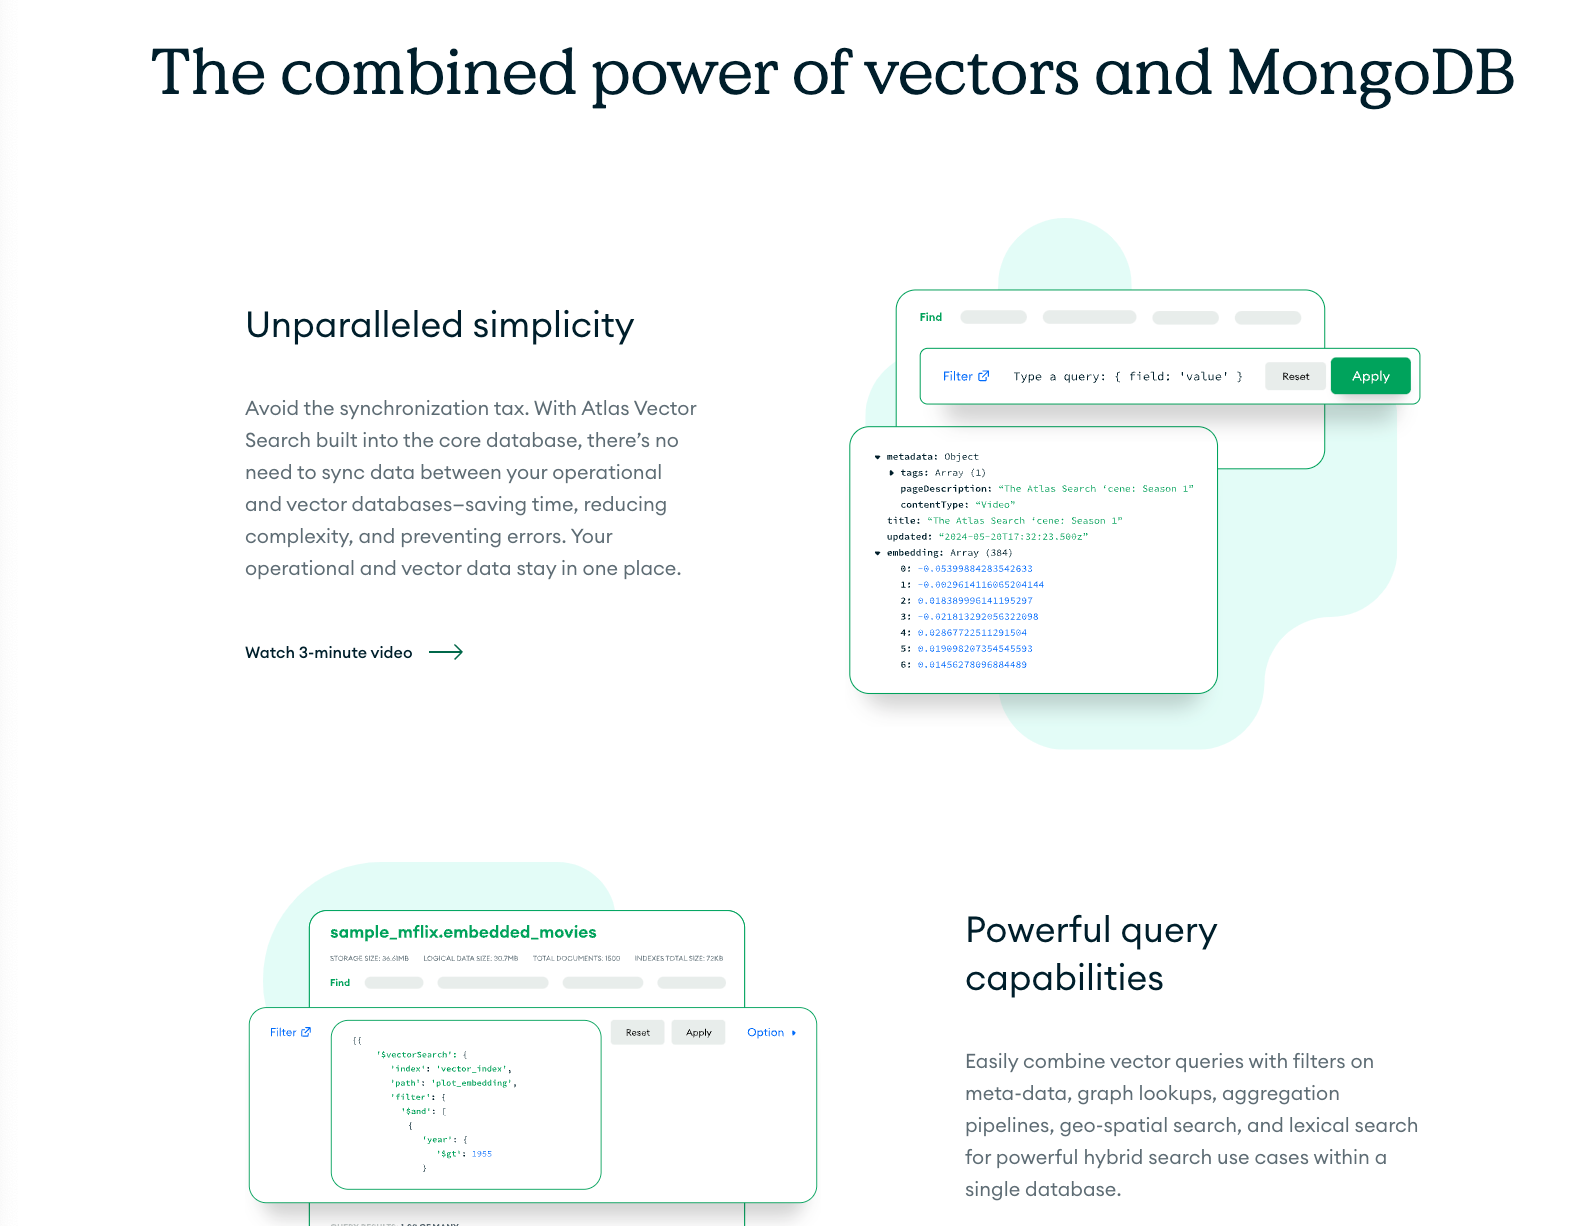
To make this happen, we need to create LLM-searchable indexes—essentially, data sources that the AI can query to fetch the right information. For this, we’ll use MongoDB's Atlas Vector Search to create a searchable index for the dummy data.
As we covered earlier, MongoDB Atlas Vector Search is a vector search solution built into MongoDB Atlas, allowing you to efficiently perform semantic searches on your data. Unlike traditional keyword-based search, vector search works by converting text into numerical vector representations, allowing for more intelligent and context-aware queries—perfect for applications like recommendation systems and AI-driven search.
What this means is that instead of relying solely on an OpenAI LLM powering the Copilot to generate responses based on preexisting training knowledge, you can customize and contextualize the LLM so that your Copilot can address user queries and generate responses based on your app’s data. Ideally, this is why Atlas Vector Search API becomes extremely powerful—it allows you to create vector databases for your data that are easily searchable with large language models.
Now, in this guide’s example, we will simply integrate MongoDB Atlas Vector Search API to create indexes for our RAG knowledge base data. This way, the Copilot can first search through the data and generate more relevant, contextualized responses, along with accurately addressing follow-up questions based on the same knowledge base data.
And before we get to the actual implementation, it’s important to note that Atlas Vector Search is different from Atlas Search. While both are built into MongoDB Atlas, Atlas Search is optimized for full-text search, whereas Atlas Vector Search is designed for semantic search using AI-powered embeddings.
Here’s a quick overview of what we’ll do:
In the src/app/api/copilotkit/route.ts file, let’s start by making the following imports:
import OpenAI from 'openai';
import { MongoClient } from 'mongodb';
import {posts} from "@/app/lib/data/data";Next, define your environment variables for OpenAI’s API key and MongoDB connection URI:
const OPENAI_API_KEY = process.env.OPENAI_API_KEY;
const MONGODB_URI = process.env.MONGODB_CONNECTION_URI;It’s a good practice to add a check to ensure these keys are provided Don’t worry—we’ll cover the steps for getting the OpenAI API key as well as the MongoDB Atlas connection URI later on.
if (!OPENAI_API_KEY || !MONGODB_URI) {
  console.error('Missing required API keys or MongoDB URI.');
  process.exit(1);
}Now, initialize the MongoDB client:
const client = new MongoClient(MONGODB_URI);
const database = client.db("knowledge_base");
const collection = database.collection("articles");We can now create the vector index. An index is essentially a structured storage(numerical representations of data), that allows you to efficiently search and retrieve data based on vector similarity.
Ideally, for a production app, you would typically make API calls to retrieve your posts’ data dynamically. However, in this case, we will use the dummy data to simulate this process.
To create a vector database for our knowledge base data, we need to create a vector index for the data.
Here’s the function to achieve this:
// Function to create the mongodb's vector search index
const createVectorIndex = async () => {
  try {
    const index = {
      name: "vector_index",
      type: "vectorSearch",
      definition: {
        fields: [{
          type: "vector",
          numDimensions: 1536,
          path: "embedding",
          similarity: "cosine"
        }]
      }
    }

    const result = await collection.createSearchIndex(index);
    console.log(`Vector index created: ${result}`);

    interface SearchIndex {
      name: string;
      queryable: boolean;
    }
    let isQueryable = false;
    while (!isQueryable) {
      const cursor = collection.listSearchIndexes();
      for await (const index of cursor as unknown as SearchIndex[]) {
        if (index.name === result) {
          if (index.queryable) {
            console.log(`${result} is ready for querying`);
            isQueryable = true;
          } else {
            await new Promise(resolve => setTimeout(resolve, 5000));
          }
        }
      }
    }
  } catch (error) {
    console.error('Error creating vector index:', error);
    throw error;
  }
};There are a couple of things happening in this code. First, the function creates a vector search index named "vector_index". We pass a few key properties, including the "embedding" field, which specifies that the stored documents must include vector representations of their content, the cosine similarity property, which determines how similar two vectors are based on their directional alignment rather than their magnitude.And finally, the 1,536 dimensions property—this ensures that the stored vectors are compatible with the embedding model being used. In this case, the text-embedding-ada-002 model from OpenAI generates embeddings with exactly 1,536 dimensions.
Next, we need to generate embeddings for your knowledge base.
Embedding your knowledge base content is simply converting the raw data—typically text—into vectors that represent the semantic meaning of that data.
With the index in place, your application can perform operations like similarity search, allowing it to retrieve the most relevant data quickly based on the vector similarity between your queries and stored content.
To do that, add the following function:
// Function to create and store embeddings
const initializeData = async () => {
  try {
    await client.connect();
    const embeddings = await openai.embeddings.create({
      model: "text-embedding-ada-002",
      input: posts.map(d => d.content)
    });

    // Store documents with embeddings
    for (let i = 0; i < posts.length; i++) {
      await collection.updateOne(
        { id: posts[i].id.toString() },
        {
          $set: {
            content: posts[i].content,
            embedding: embeddings.data[i].embedding
          }
        },
        { upsert: true }
      );
    }

    await createVectorIndex();
    console.log('success....');
  } catch (error) {
    console.error('error...', error);
    throw error;
  }
};

initializeData().catch(console.error);
There are a few things to note in this code. For starters, the function generates embeddings for the given posts using OpenAI’s API model, "text-embedding-ada-002", which takes the text content and converts it into vector representations. These vectors capture the semantic meaning of the text, enabling efficient search and retrieval based on similarity.
Once the embeddings are generated, they will be stored in the database. Each post’s content, along with its corresponding vector representation, is stored using the updateOne operation. The { upsert: true } option ensures that if a post already exists, it’s updated with the new embedding—otherwise, a new entry is created.
You're not limited to "text-embedding-ada-002"—you can also use alternative models like "text-embedding-3-small" or "text-embedding-3-large", depending on your requirements. Each model varies in terms of accuracy, performance, and cost, so choosing the right one depends on the complexity of your data and how precise you need your similarity searches to be. You can read more about them in the official OpenAI documentation.
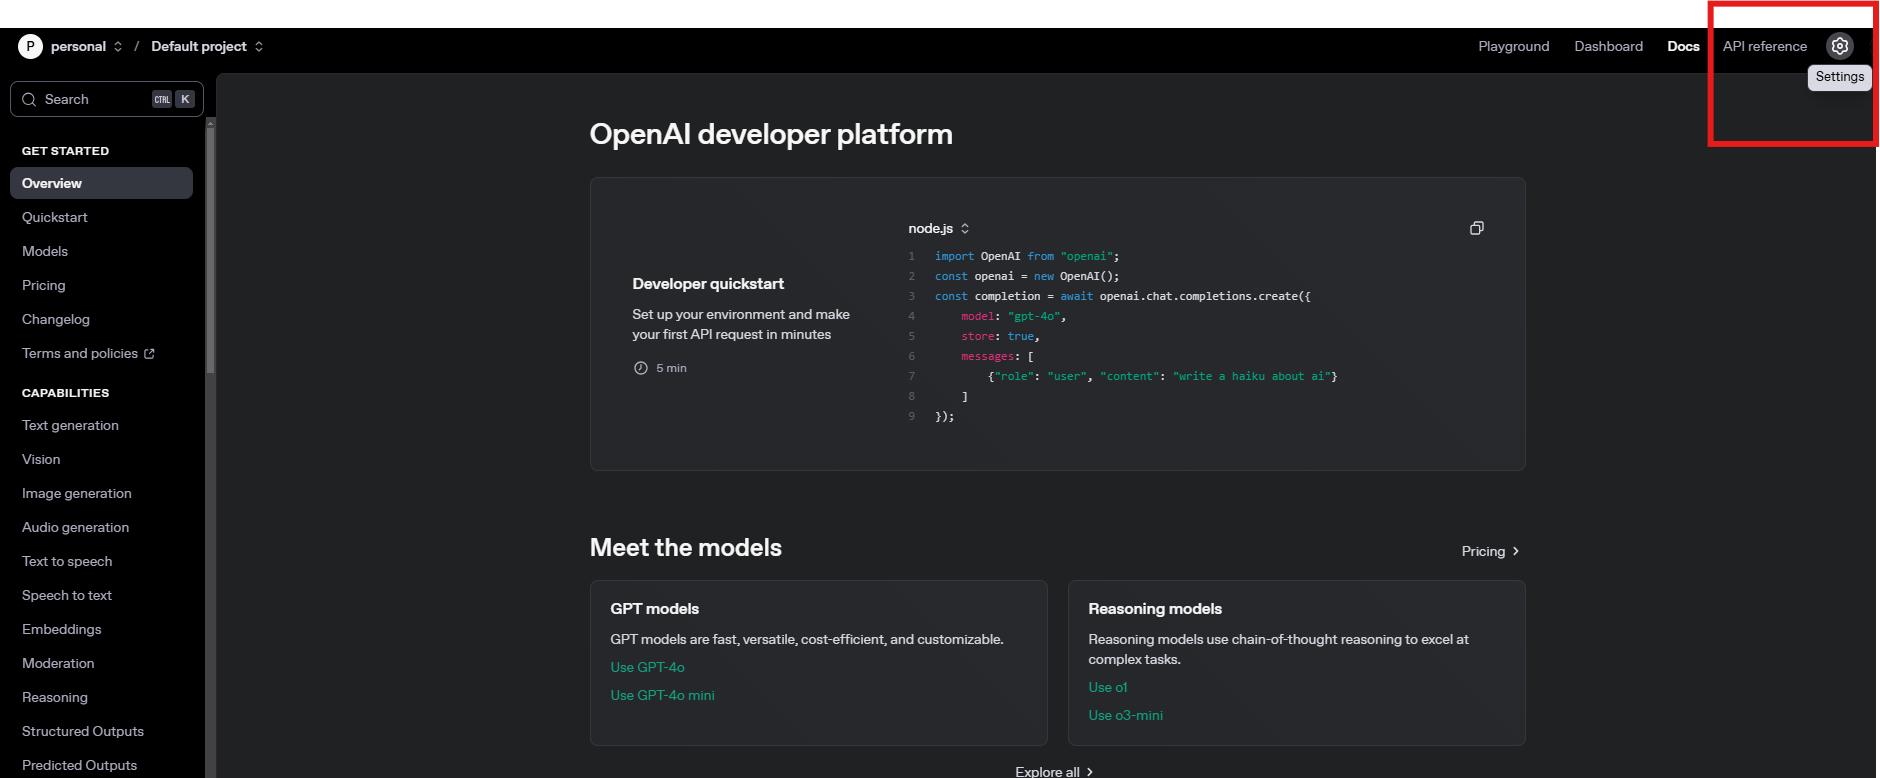
Now, to finalize this setup, you need to get your API key, as well as the connection URI.
To get your OpenAI API key, follow these steps:
.env file as follows:OPENAI_API_KEY=<your_key>The final step in this integration is setting up the CopilotKit Node.js endpoint to handle requests from the frontend. Before proceeding, you'll need to configure your MongoDB Atlas, as it's where our vector embeddings will be stored and queried. To do this, follow these steps:
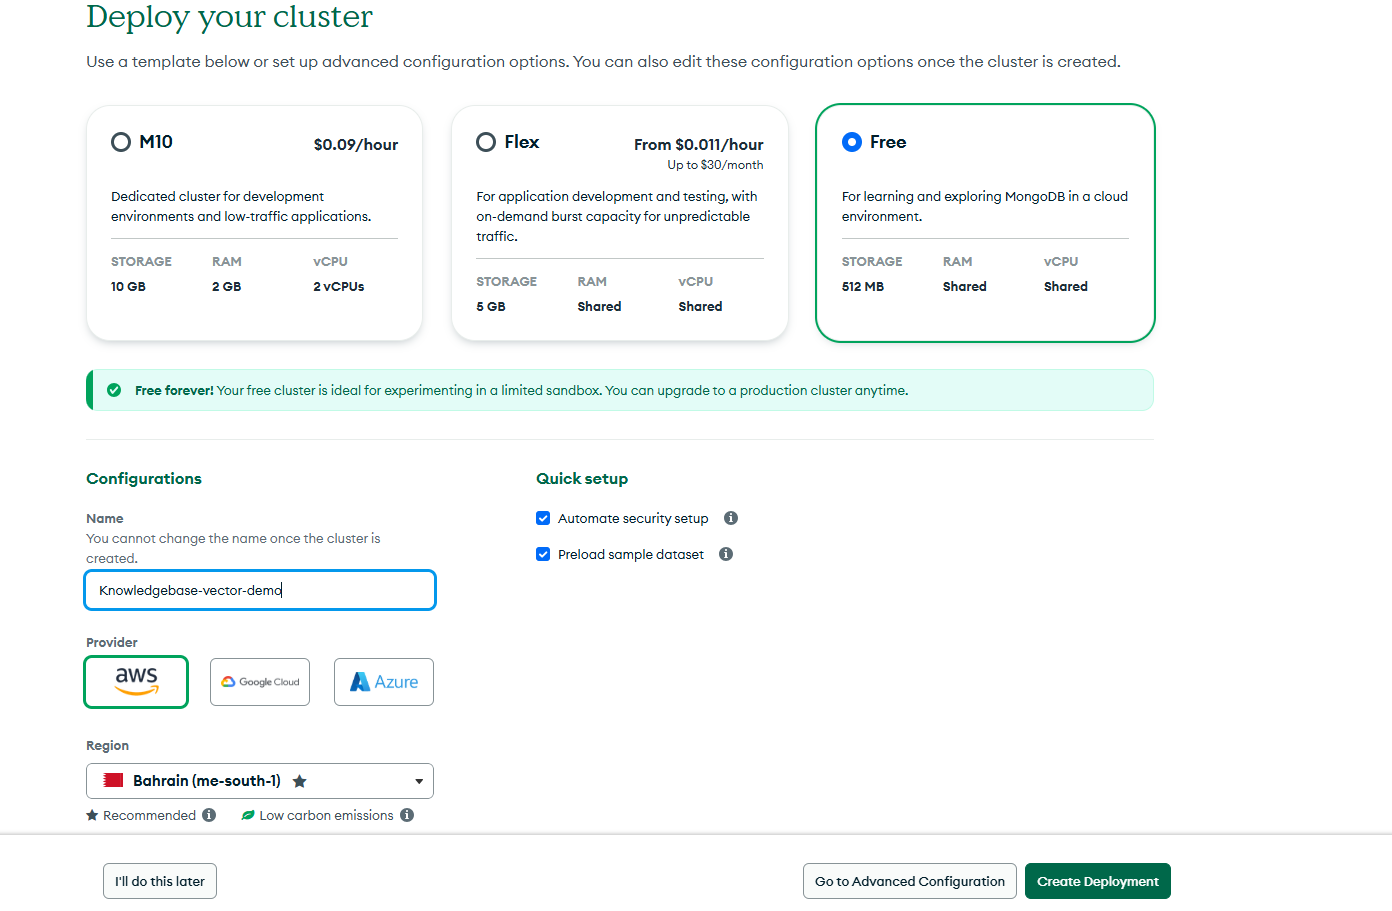
MONGODB_CONNECTION_URI=<your_uri>Once the cluster is set up, we can move on to defining the CopilotKit API endpoint that will handle requests from the frontend. Earlier, we provided the CopilotKit API URL in the client code, now, we need to implement the actual backend logic that will process those requests. To do this, start by importing these dependencies in the src/app/api/copilotkit/route.ts file:
import { CopilotRuntime, OpenAIAdapter, copilotRuntimeNextJSAppRouterEndpoint } from "@copilotkit/runtime";
import { NextRequest } from 'next/server';The CopilotRuntime at its core, is the engine powering the entire workflow, allowing applications to interact with LLMs and execute backend actions for their copilots.
With this setup, you can define various backend tasks, such as querying databases, managing processes, or handling business logic. In this specific case, we’ll define an action that queries a MongoDB vector index for relevant knowledge base articles based on a user’s search query using the backend action handler as follows:
const runtime = new CopilotRuntime({
  actions: () => [
    {
      name: 'FetchKnowledgebaseArticles',
      description: 'Fetch relevant knowledge base articles based on a user query',
      parameters: [
        {
          name: 'query',
          type: 'string',
          description: 'The user query for the knowledge base index search to perform',
          required: true,
        },
      ],
      handler: async ({ query }: { query: string }) => {
        try {
          const queryEmbedding = await openai.embeddings.create({
            model: "text-embedding-ada-002",
            input: query,
          });

          const database = client.db("knowledge_base");
          const collection = database.collection("articles");

          const articles = await collection.aggregate([
            {
              $vectorSearch: {
                index: "vector_index",
                queryVector: queryEmbedding.data[0].embedding,
                path: "embedding",
                numCandidates: 100,
                limit: 3
              }
            },
            {
              $project: {
                _id: 0,
                content: 1,
                score: { $meta: "vectorSearchScore" }
              }
            }
          ]).toArray();

          return { articles };
        } catch (error) {
          console.error('Error fetching knowledge base articles:', error);
          throw new Error('Failed to fetch knowledge base articles.');
        }
      },
    },
  ],
});This action handler will process incoming queries from the frontend and retrieve the most relevant articles, returning the relevant responses to the client.
Ideally, the handler does two major tasks: one, it converts the user’s query into a vector embedding using OpenAI’s text-embedding-ada-002 API. And two, once the query is transformed into a vector representation, it will perform the search—comparing the query vector against the indexed vectors stored in MongoDB Atlas to identify the most relevant articles to the specified user query.
A few key details to note here—the query results include vector similarity scores, which help determine how closely an article matches the query. Additionally:
Since most knowledge bases contain large volumes of articles—some covering similar topics while others are completely different—it makes sense to return multiple relevant matches instead of just one. If needed, you can tweak the limit value to control how many results are retrieved.
Finally, let’s define the CopilotKit API endpoint that will handle requests:
const openai = new OpenAI({ apiKey: OPENAI_API_KEY});
const serviceAdapter = new OpenAIAdapter({ openai });

export const POST = async (req: NextRequest) => {
  const { handleRequest } = copilotRuntimeNextJSAppRouterEndpoint({
    runtime,
    serviceAdapter,
    endpoint: '/api/copilotkit',
  });

  return handleRequest(req);
};
Ensure that the same URL (/api/copilotkit) is specified in your frontend to match this endpoint configuration.
To test the setup, navigate to your project directory in the terminal and run:
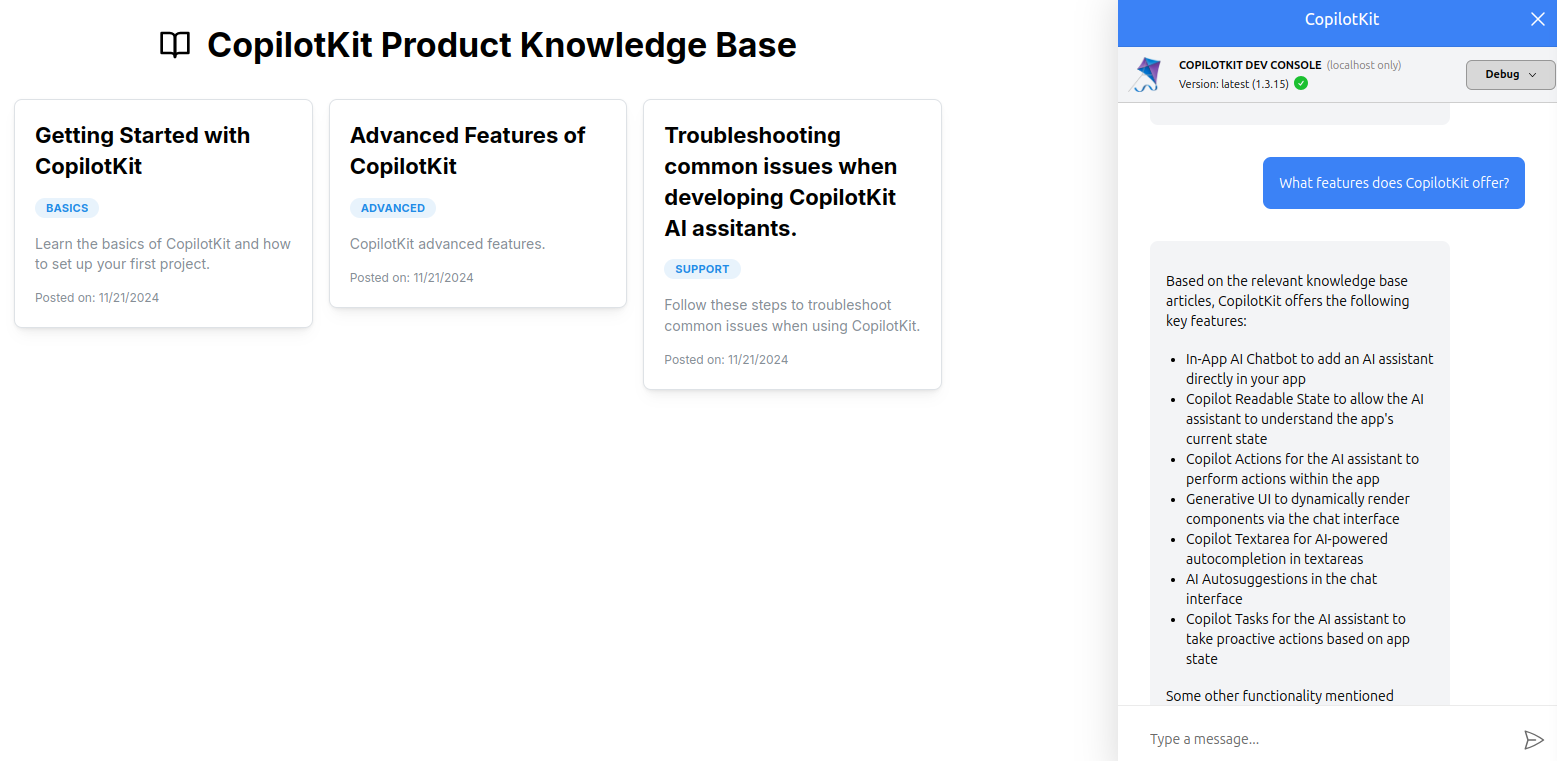
yarn run devThen, open localhost:3000 in your browser and keying a query like "What features does CopilotKit offer?" in the sidebar input field. Here is a preview of the implementation:
Congratulations! You are all done!
You have successfully built an AI-powered RAG copilot that retrieves stored data from your MongoDB Vector Search Knowledge Base🎉.
For reference, or if you'd like to build on top of what we’ve covered here, you can clone the full project from the GitHub repository.
In this guide, we have walked through the steps of building an AI-powered Copilot using CopilotKit, OpenAI API, and MongoDB Atlas Vector Search for RAG product knowledge bases.
While we’ve explored a couple of features, we have barely scratched the surface of the countless use cases for CopilotKit, ranging from building interactive AI chatbots to building agentic solutions—in essence, CopilotKit lets you add a ton of useful AI capabilities to your products in minutes.
Hopefully, this guide makes it easier for you to integrate AI-powered Copilots into your existing application.
Follow CopilotKit on Twitter and say hi, and if you'd like to build something cool, join the Discord community.
Subscribe to our blog and get updates on CopilotKit in your inbox.
