
Get early access

In this guide, you will learn how to build a full-stack AI shopping assistant using CrewAI Flows, paired with the Tavily Search API in the backend. We'll then walk through adding a frontend to the shopping agent using CopilotKit to interact with it.
The AI shopping assistant will be able to search products on commerce platforms such as Amazon, Target, or eBay- extract structured product data and provide tailored product recommendations.
Before we jump in, here is what we will cover:
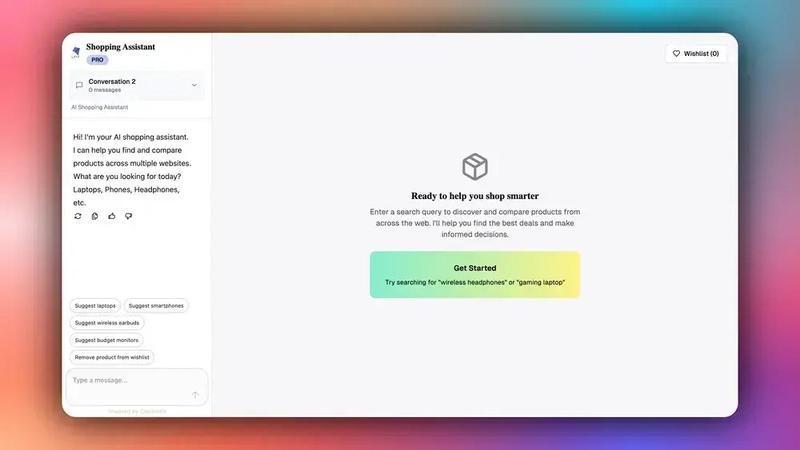
Here is a preview of what we will be building:
Flows are a flexible building block in CrewAI that lets you control things at a detailed level while keeping it simple overall. You can use them to automate tasks ranging from a basic call to an AI model all the way to a team of smart AI agents that work on their own.
With Flows, it's straightforward to create and set up step-by-step processes that make the most of what CrewAI can do.
Here are some key features:
You can learn more about CrewAI Flows here on CrewAI docs.

Now that we have learned what the CrewAI Flows are, let us see how to build the CrewAI shopping assistant from the backend to the frontend.
Let’s get started!
To fully understand this tutorial, you need to have a basic understanding of React or Next.js.
We'll also make use of the following:
To get started, clone the CrewAI-Shopping-Assistant repo that consists of a Python-based backend (agent) and a Next.js frontend (frontend).
Next, navigate to the backend directory:
cd agentThen install the dependencies using Poetry:
poetry installAfter that, create a .env file with OpenAI API Key and Tavily API Key:
OPENAI_API_KEY=>
TAVILY_API_KEY=>
Then run the agent using the command below:
poetry run python main.pyAfter that, navigate to the frontend directory:
cd frontendNext, create a .env file with OpenAI API Key API key:
OPENAI_API_KEY=>Then install the dependencies:
pnpm installAfter that, start the development server:
pnpm run devNavigate to http://localhost:3000, and you should see the AI shopping assistant UI up and running.
Let’s now see how to build the AI shopping assistant backend using CrewAI, Tavily, and CopilotKit.
In this section, you will learn how to build the AI shopping assistant backed using CrewAI for agent flows, Tavily for reliable web search, and CopilotKit for state management + UI updates.
Let’s jump in.
First, define the AgentState class that extends CopilotKitState in order to track the product data, user preferences, logs for UI updates, and more, as shown in the agent/shopping_assistant.py file.
from copilotkit.crewai import CopilotKitState
from typing import List, Dict, Any

class AgentState(CopilotKitState):
    """
    Manages the complete state of the shopping workflow.
    """
    # List of products currently displayed on the canvas
    products: List = []

    # List of users' favorite/saved products
    favorites: List = []

    # Temporary buffer to store products before confirmation
    buffer_products: List = []

    # User's wishlist of products
    wishlist: List = []

    # Activity logs to show processing status to the user
    logs: List = []

    # Generated comparison report for products
    report: Any | None = None

    # Flag to control when to show results in UI
    show_results: bool = False

    # Canvas logging information with title and subtitle for UI updates
canvas_logs: dict = { "title" : "", "subtitle" : "" }Once you have defined the agent state, define the ShoppingAgentFlow class that extends the Flow[AgentState]. Use the start() method to handle the entire flow, where it initializes state, validates environment variables, processes user queries, and emits state updates via CopilotKit, as shown in the ./agent/shopping_assistant.py file.
class ShoppingAgentFlow(Flow[AgentState]):

    @start()
    async def start(self):
        """
        Main entry point for the shopping assistant workflow.
        This method handles the entire flow from user request to product results.
        """
        try:
            # Step 1: Initialize the workflow
            print("Starting Shopping Agent Flow")

            # Update canvas with initial status
            self.state.canvas_logs = {
                "title" : f"Parsing your request",
                "subtitle" : "Deciding to run product search or not"
            }
            await copilotkit_emit_state(self.state)
            await asyncio.sleep(0)

            # Step 2: Validate required environment variables
            if not os.getenv("TAVILY_API_KEY"):
                raise RuntimeError("Missing TAVILY_API_KEY")
            if not os.getenv("OPENAI_API_KEY"):
                raise RuntimeError("Missing OPENAI_API_KEY")

            # Step 3: Check if this is a report generation request (assistant message)
            if self.state.messages[-1]['role'] == 'assistant':
                # Generate and return product comparison report
                result =await generate_report(self.state.products)
                print(result, "result")
                self.state.report = json.loads(result)
                await copilotkit_emit_state(self.state)
                return

            # Step 4: Add initial processing log
            self.state.logs.append({
                "message" : "Analyzing user query",
                "status" : "processing"
            })
            await copilotkit_emit_state(self.state)

            # Step 5: Mark analysis as completed
            self.state.logs[-1]["status"] = "completed"
            await copilotkit_emit_state(self.state)

// ...After creating the shopping agent flow, initialize the Tavily client and prepare for multi-retailer search, as shown below.
class ShoppingAgentFlow(Flow[AgentState]):

    @start()
    async def start(self):
        """
        Main entry point for the shopping assistant workflow.
        This method handles the entire flow from user request to product results.
        """
        try:
            // ...

            # Step 13: Set up Tavily search client and result containers
            tv = TavilyClient(api_key=os.getenv("TAVILY_API_KEY"))
            results_all: List[Dict[str, Any]] = []
            total_mappings_list = []

            # Step 14: Update user with search progress
            self.state.logs.append({
                "message" : "Identifying the sites to search",
                "status" : "processing"
            })
            self.state.canvas_logs={
                "title" : "Identifying the sites to search",
                "subtitle" : "Tavily search in progress...."
            }
            await copilotkit_emit_state(self.state)
            await asyncio.sleep(1)
            self.state.logs[-1]["status"] = "completed"
            await copilotkit_emit_state(self.state)

            // ...
Then search each major retailer using Tavily's domain-specific search capabilities to get relevant product URLs from each major retailer, as shown below.
class ShoppingAgentFlow(Flow[AgentState]):

    @start()
    async def start(self):
        """
        Main entry point for the shopping assistant workflow.
        This method handles the entire flow from user request to product results.
        """
        try:
            // ...

            # Step 15: Search across major retailers for product URLs
                        urls = {}
                        for retailer in RETAILERS:  # RETAILERS = ["target.com", "amazon.com", "ebay.com"]
                            # Search each retailer's domain for products matching the query
                            search = tv.search(
                                query=query,  # User's search query, e.g., "wireless headphones"
                                include_domains=[retailer],  # Limit search to specific retailer
                                include_answer=False,  # Don't include general answers
                                include_images=False,  # Don't include image results
                                include_raw_content=False,  # We'll extract content separately
                                search_depth="advanced",  # Use advanced search for better results
                                max_results=max_search_results,  # Typically 6 results per retailer
                            )

                            # Extract URLs from search results
                            urls[retailer] = [r["url"] for r in search.get("results", []) if r.get("url")]
                            if not urls[retailer]:
                                continue
            // ...
After gathering URLs, use Tavily's extraction capabilities to get detailed webpage content that includes images and metadata, as shown below.
class ShoppingAgentFlow(Flow[AgentState]):

    @start()
    async def start(self):
        """
        Main entry point for the shopping assistant workflow.
        This method handles the entire flow from user request to product results.
        """
        try:
            // ...

            # Step 17: Define a function for parallel URL content extraction
                        def extract_urls(urls: List[str], retailer: str) -> Dict[str, Any]:
                            """Extract content from URLs for a specific retailer"""
                            try:
                                print(f"Extracting urls for {retailer}. Started at {datetime.now()}")
                                ext1 = tv.extract(urls, extract_depth="advanced", include_images=True, timeout=120)
                                return [ext1, retailer]
                            except Exception as e:
                                print(f"Error extracting urls: {e}")
                                return None

                        # Step 18: Execute parallel extraction for all retailers
                        ext_results = {}
                        with ThreadPoolExecutor(max_workers=3) as executor:
                            # Submit extraction tasks for each retailer
                            futures = {executor.submit(extract_urls, urls[retailer], retailer) : retailer for retailer in RETAILERS}

                            # Collect results as they complete
                            for future in as_completed(futures):
                                result = future.result()
                                ext_results[result[1]] = result[0].get("results", [])
                                if result == None:
                                    print("Condition met! Cancelling remaining tasks...")
                                    # Cancel remaining futures if an error occurs
                                    for f in futures:
                                        f.cancel()
                                    break
            // ...
Finally, process the extracted product data with LLMs to extract product information, as shown below.
class ShoppingAgentFlow(Flow[AgentState]):

    @start()
    async def start(self):
        """
        Main entry point for the shopping assistant workflow.
        This method handles the entire flow from user request to product results.
        """
        try:
            // ...

            # Step 20: Initialize data structures for product processing
            target_listing_pdps: List[str] = []
            done = False
            self.state.logs.append({
                "message" : "Processing the data",
                "status" : "processing"
            })
            await copilotkit_emit_state(self.state)

            # Initialize product containers for each retailer
            products_from_each_site= {
                "target.com" : [],
                "amazon.com" : [],
                "ebay.com" : []
            }

            # Initialize URL replacement counters for each retailer
            retailer_counters = {
                "target.com": {"product": 0, "image": 0},
                "amazon.com": {"product": 0, "image": 0},
                "ebay.com": {"product": 0, "image": 0}
            }

            # Step 21: Define async function for processing extracted data
            async def process_data(ext_results1: Dict[str, Any], retailer: str, retailer_counters: Dict[str, Dict[str, int]]) -> str:
                """Process extracted web content and convert to structured product data"""
                print(f"Processing data for {retailer}. Started at {datetime.now()}")

                for item in ext_results1:
                    url = item["url"]
                    raw = item.get("raw_content") or ""
                    if not raw:
                        return None

                    # Set up URL replacement patterns for each retailer
                    product_base = ""
                    image_base = ""
                    if retailer == "target.com":
                        product_base = "https://tgt.com/url{}"
                        image_base = "https://tgt.com/img/url{}"
                    elif retailer == "amazon.com":
                        product_base = "https://amzn.com/url{}"
                        image_base = "https://amzn.com/img/url{}"
                    elif retailer == "ebay.com":
                        product_base = "https://ebay.com/url{}"
                        image_base = "https://ebay.com/img/url{}"

                    # Replace URLs with standardized product and image links
                    modiefied_text, mappings_list, updated_product_counter, updated_image_counter = replace_urls_with_product_and_image_links(text= raw, product_base= product_base, image_base=image_base, product_counter=retailer_counters[retailer]["product"], image_counter=retailer_counters[retailer]["image"])

                    # Update counters
                    retailer_counters[retailer]["product"] = updated_product_counter
                    retailer_counters[retailer]["image"] = updated_image_counter
                    total_mappings_list.extend(mappings_list)

                    # Determine retailer and page type
                    dom = retailer_of(url)
                    detail_hint = is_pdp(url)

                    # Get structured data assistance for Target specifically
                    assist = parse_target_structured(modified_text) if "target.com" in dom else None

                    # Build prompt for LLM product extraction
                    prompt = build_llm_prompt(modiefied_text, url, assist=assist, detail_hint=detail_hint)

                    try:
                        # Limit products per retailer to avoid overwhelming results
                        if len(products_from_each_site[retailer]) > 2:
                            break
                        print(f"Calling LLM for {url}")
                        data = await call_llm(prompt)
                        print(f"Completed extracting {url}")
                    except Exception as e:
                        # Skip this page if LLM extraction fails
                        print(f"LLM 1st-pass failed for {url}: {e}")
                        continue

                    # Add metadata to extracted data
                    data.setdefault("source_url", url)
                    data.setdefault("retailer", dom)
                    products_from_each_site[retailer] += data["products"]
                return "Completed"
// ...Once the products have been extracted and processed, present them to the user via a tool call to the frontend, as shown below, where the agent pauses to allow the user to review products and make decisions.
class ShoppingAgentFlow(Flow[AgentState]):

    @start()
    async def start(self):
        """
        Main entry point for the shopping assistant workflow.
        This method handles the entire flow from user request to product results.
        """
        try:
            // ...

             # Step 24: Combine and finalize product results
            results_all = combine_products_from_sites(products_from_each_site)
            print(len(results_all), "results_all here")

            # Add unique IDs to each product
            for item in results_all:
                item["id"] = str(uuid.uuid4())

            # Mark data processing as completed
            self.state.logs[-1]["status"] = "completed"
            await copilotkit_emit_state(self.state)

            # Step 25: Apply URL mappings and prepare final results
            updated_products = apply_url_mappings_to_products(results_all, total_mappings_list)
            print(len(updated_products), "updated_products here")
            self.state.buffer_products = updated_products

            print("HERE")
            # Generate a descriptive name for this chat session
            chat_name = await generate_name_for_chat(query)
            print(chat_name, "chat_name here")

            # Step 26: Send product list to user for confirmation
            self.state.messages.append({
                "role" : "assistant",
                "content" : "",
                "tool_calls" : [
                    {
                        "id" : str(uuid.uuid4()),
                        "function" : {
                            "name": "list_products",
                            "arguments": json.dumps({
                                "products": self.state.buffer_products[:5],  # Show first 5 products
                                "buffer_products" : self.state.buffer_products,  # Keep all products in buffer
                                "chat_name" : chat_name
                            })
                        }
                    }
                ]
            })

            # Step 27: Reset state for user interaction
            self.state.logs = []
            self.state.report = None
            self.state.canvas_logs = {
                "title" : "Awaiting confirmation from the user",
                "subtitle" : "Choose to accept, reject or show all products"
            }
            await copilotkit_emit_state(self.state)
            // ...
After that, when the user responds (via tool calls), handle different scenarios where the user might request more options, accept, or reject the product's recommendations.
class ShoppingAgentFlow(Flow[AgentState]):

    @start()
    async def start(self):
        """
        Main entry point for the shopping assistant workflow.
        This method handles the entire flow from user request to product results.
        """
        try:
            // ...

            # Step 7: Handle tool response messages
                        if(self.state.messages[-1]['role'] == 'tool'):
                            # Handle "Show more products" tool response
                            if(self.state.messages[-1]['content'] == "Show more products"):
                                self.state.messages.append({
                                    "role" : "assistant",
                                    "content" : "Some more products have also been added to be shown in the canvas",
                                    "id" : self.state.messages[-2]['tool_calls'][0]['id']
                                })
                                self.state.logs = []
                                self.state.show_results = True
                                await copilotkit_emit_state(self.state)
                                return self.state

                            # Handle "Rejected" tool response
                            if(self.state.messages[-1]['content'] == "Rejected"):
                                self.state.messages.append({
                                    "role" : "assistant",
                                    "content" : "You have rejected the products. Please try any other product search.",
                                    "id" : self.state.messages[-2]['tool_calls'][0]['id']
                                })
                                self.state.logs = []
                                await copilotkit_emit_state(self.state)
                                return self.state

                            # Handle "Accepted" tool response
                            if(self.state.messages[-1]['content'] == "Accepted"):
                                self.state.messages.append({
                                    "role" : "assistant",
                                    "content" : "The top 5 products have been added to the canvas.",
                                    "id" : self.state.messages[-2]['tool_calls'][0]['id']
                                })
                                self.state.logs = []
                                self.state.show_results = True
                                await copilotkit_emit_state(self.state)
                                return self.state
// ...After creating the ShoppingAgentFlow, set up a FastAPI server that serves as the bridge between our CrewAI shopping agent and the frontend.
To do that, use the CopilotKitRemoteEndpoint to manage the lifecycle of the agent and then use the add_fastapi_endpoint function to mount the CopilotKit's routes to our FastAPI application, as shown in the agent/main.py file.
# Step 1: Import required dependencies
from fastapi import FastAPI  # FastAPI framework for building the API server
import uvicorn  # ASGI server for running FastAPI applications

# Step 2: Import CopilotKit components for agent integration
from copilotkit.integrations.fastapi import add_fastapi_endpoint  # FastAPI integration
from copilotkit import CopilotKitRemoteEndpoint  # Remote endpoint for agent hosting
from copilotkit.crewai.crewai_agent import CrewAIAgent  # CrewAI agent wrapper

# Step 3: Import system dependencies
import os  # Operating system interface for environment variables

# Step 4: Import the shopping assistant flow
from shopping_assistant import ShoppingAgentFlow  # Custom shopping agent implementation

# Step 5: Initialize FastAPI application
app = FastAPI()

# Step 6: Configure CopilotKit Remote Endpoint with Shopping Agent
# This creates a remote endpoint that hosts the shopping assistant agent
sdk = CopilotKitRemoteEndpoint(
    agents=[
        # Step 7: Create CrewAI agent wrapper for the shopping flow
        CrewAIAgent(
            name="shopping_agent_crewai",  # Unique identifier for the agent
            description="A shopping agent that can help you find the best products for your needs by searching various retailers",  # Agent description for CopilotKit
            flow=ShoppingAgentFlow()  # The actual shopping assistant workflow implementation
        )
    ]
)

# Step 8: Add CopilotKit endpoint to FastAPI application
# This mounts the CopilotKit SDK at the "/copilotkit" path
add_fastapi_endpoint(app, sdk, "/copilotkit")

# Step 10: Main server configuration and startup function
def main():
    """
    Configure and run the uvicorn server with development-friendly settings.

    """
    # Step 11: Get server port from environment variable with fallback
    port = int(os.getenv("PORT", "8000"))  # Default to port 8000 if PORT not set

    # Step 12: Start uvicorn server with comprehensive configuration
    uvicorn.run(
        "main:app",  # Application module and instance
        host="0.0.0.0",  # Listen on all network interfaces
        port=port,  # Use configured port
        reload=True,  # Enable hot reload for development
        timeout_keep_alive=900,  # 15 minutes = 900 seconds (for long operations)
        timeout_graceful_shutdown=900,  # 15 minutes graceful shutdown
        reload_dirs=(
            # Step 13: Configure reload directories for development
            ["."] +  # Current directory (always included)
            (["../../../sdk-python/copilotkit"]  # CopilotKit SDK directory if exists
             if os.path.exists("../../../sdk-python/copilotkit")
             else []  # Empty list if SDK directory doesn't exist
             )
        )
    )


# Step 14: Entry point for running the server
if __name__ == "__main__":
    # This ensures the server only starts when the script is run directly
    # (not when imported as a module)
    main()
Congratulations! You have built an AI-powered shopping assistant backend using CrewAI for agent flows, Tavily for web search, and CopilotKit for state management.
In this section, you will learn how to build a frontend for the CrewAI shopping agent using CopilotKit.
Let’s get started!
To get started, set up the Copilot runtime instance that serves as the bridge between your frontend and the CrewAI shopping agent backend, as shown below in the frontend/app/api/copilotkit/route.ts file.
/**
 * CopilotKit API Route for Next.js App Router
 *
 * This file sets up the CopilotKit runtime endpoint for the AI Shopping Agent frontend.
 * It handles POST requests to integrate with the CopilotKit service.
 */

import {
  CopilotRuntime,
  copilotRuntimeNextJSAppRouterEndpoint,
  OpenAIAdapter,
} from "@copilotkit/runtime";
import { NextRequest } from "next/server";

// Create an OpenAI adapter for the CopilotKit service
const serviceAdapter = new OpenAIAdapter();

// Initialize the CopilotRuntime with remote endpoints
// This connects to the shopping assistant backend
const runtime = new CopilotRuntime({
  remoteEndpoints: [
    {
      url:
        process.env.NEXT_PUBLIC_SHOPPING_AGENT_URL ||
        "http://localhost:8000/copilotkit",
    },
  ],
});

// POST handler for the CopilotKit API endpoint
// This function processes incoming requests and delegates to the CopilotKit runtime
export const POST = async (req: NextRequest) => {
  const { handleRequest } = copilotRuntimeNextJSAppRouterEndpoint({
    runtime,
    serviceAdapter,
    endpoint: "/api/copilotkit",
  });

  return handleRequest(req);
};After setting up a Copilot Runtime instance, set up the CopilotKit provider component that manages your ADK agent sessions.
To set up the CopilotKit Provider, the CopilotKit component must wrap the Copilot-aware parts of your application.
For most use cases, it's appropriate to wrap the CopilotKit provider around the entire app, e.g., in your layout.tsx file.
/**

Root Layout Component for the AI Shopping Agent

This is the main layout component for the Next.js application.
It sets up the CopilotKit provider and global styles for the entire app.
*/

import type { Metadata } from "next";
import { GeistSans } from "geist/font/sans";
import { GeistMono } from "geist/font/mono";
import "./globals.css";
import "@copilotkit/react-ui/styles.css";
import { CopilotKit } from "@copilotkit/react-core";
// Metadata configuration for the application
export const metadata: Metadata = {
title: "Shopping Assistant",
description: "Powered by LangGraph and CopilotKit",
generator: "v0.app",
};
/**

Root Layout Component

This component wraps the entire application and provides:


CopilotKit context for AI-powered features


Global font configuration


Base HTML structure
*/
export default function RootLayout({
children,
}: Readonly<{
children: React.ReactNode;
}>) {
return (


     {/* Custom font configuration using Geist fonts */}
     {`


html {
font-family: ${GeistSans.style.fontFamily};
--font-sans: ${GeistSans.variable};
--font-mono: ${GeistMono.variable};
}
`}</style>
</head>
<body>
{/* CopilotKit Provider - enables AI chat and agent functionality /}
<CopilotKit
runtimeUrl="/api/copilotkit" // Points to our CopilotKit API route
showDevConsole={false} // Hide development console in production
agent="shopping_agent_crewai" // Specify which backend agent to use
>
{children}
</CopilotKit>
</body>
</html>
);CopilotKit ships with several built-in chat components, which include CopilotPopup, CopilotSidebar, and CopilotChat.
To set up a Copilot chat component, define it as shown in the frontend/components/sidebar.tsx file.
"use client";
import type React from "react";
import { Button } from "@/components/ui/button";
import { Input } from "@/components/ui/input";
import { Badge } from "@/components/ui/badge";
import { ScrollArea } from "@/components/ui/scroll-area";
import { CopilotChat } from "@copilotkit/react-ui";
import { useCopilotChat } from "@copilotkit/react-core";
// ...
/**

Main Sidebar Component

Features:


Chat session management (create, switch, rename, delete)


View switching between products, wishlist, and reports


Integrated CopilotChat for AI interactions


Product comparison analysis generation
*/
export function Sidebar({
setQuery,
isLoading,
clearState,
onSearch,
suggestions,
currentQuery,
isSearching,
currentView,
wishlistCount,
goToProducts,
currentChatId,
chatSessions,
onSwitchChat,
onCreateNewChat,
onRenameChat,
onDeleteChat,
}: SidebarProps) {


// ...
return (

{/* Header */}


🪁


Shopping Assistant


PRO


            // ...

   <div className="flex-1 overflow-auto">
    <CopilotChat
      className="h-full"
      labels={{
        initial:
          "Hi! I'm your AI shopping assistant. I can help you find and compare products across multiple websites. What are you looking for today? Laptops, Phones, Headphones, etc.",
      }}
    />
  </div>
</div>

);
}


);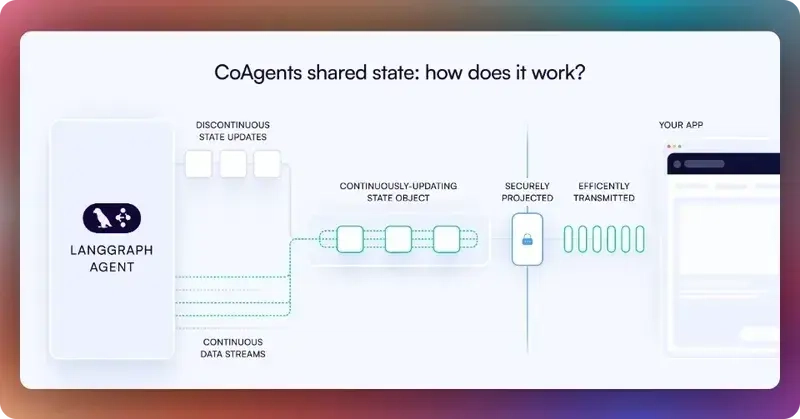
}In CopilotKit, CoAgents maintain a shared state that seamlessly connects your frontend UI with the agent's execution. This shared state system allows you to:
You can learn more about CoAgents’ shared state here on the CopilotKit docs.
To sync your CrewAI shopping agent state with the frontend, use the CopilotKit useCoAgent hook, as shown in the frontend/components/shopping-assistant.tsx file.
"use client"
import { useCoAgent } from "@copilotkit/react-core"
export function ShoppingAssistant() {
// ...
const { state, setState, start, run } = useCoAgent({
name: "shopping_agent_crewai",
initialState: conversationHistory.length > 0 ? { ...conversationHistory[0]?.state, show_results: (conversationHistory[0]?.state?.products?.length > 0 ? true : false) } : {
products: [],
favorites: typeof window !== 'undefined' && window.localStorage.getItem("wishlist") ? JSON.parse(window.localStorage.getItem("wishlist") || "[]") : [],
wishlist: typeof window !== 'undefined' && window.localStorage.getItem("wishlist") ? JSON.parse(window.localStorage.getItem("wishlist") || "[]") : [],
buffer_products: [],
logs: [] as ToolLog[],
report: null,
show_results: false,
canvas_logs: {
title: "",
subtitle: ""
}
}
})
return (

  // ...

  <div className="flex-1 flex flex-col min-w-0">
    {currentView === "report" ? (
      <ReportView isLoading={isLoading} products={state?.products} onExit={exitToProducts} searchQuery={query} report={state?.report} />
    ) : currentView === "wishlist" ? (

      // ...

    ) : (

      // ...

    )}
  </div>
</div>

)
}
Then render the CrewAI shopping agent's state in the chat UI, which is useful for informing the user about the agent's state in a more in-context way.
To render the CrewAI shopping agent's state in the chat UI, you can use the useCoAgentStateRender hook in the frontend/components/shopping-assistant.tsx file.
"use client"
import { useCoAgentStateRender} from "@copilotkit/react-core"
import { ToolLog, ToolLogs } from "./tool-logs"
export function ShoppingAssistant() {
// ...
useCoAgentStateRender({
name: "shopping_agent_crewai",
render: (state1: any) => {
// useEffect(() => {
// console.log(state1, "state1")
// }, [state1])
return <ToolLogs logs={state1?.state?.logs || []} />
}
})
return (
// ...
<div className="flex-1 flex flex-col min-w-0">
{currentView === "report" ? (
<ReportView isLoading={isLoading} products={state?.products} onExit={exitToProducts} searchQuery={query} report={state?.report} />
) : currentView === "wishlist" ? (
// ...
) : (
// ...
)}
</div>
</div>
)
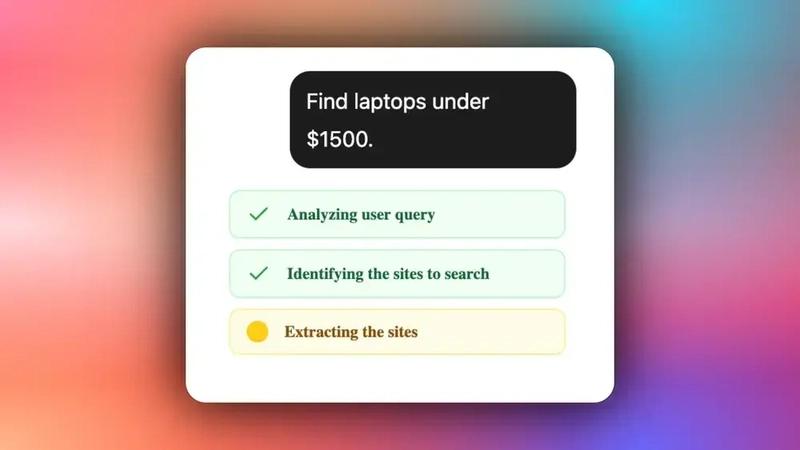
}If you execute a query in the chat, you should see the CrewAI shopping agent’s state task execution rendered in the chat UI, as shown below.
Human-in-the-loop (HITL) allows agents to request human input or approval during execution, making AI systems more reliable and trustworthy. This pattern is essential when building AI applications that need to handle complex decisions or actions that require human judgment.
You can learn more about Human in the Loop here on CopilotKit docs.
To implement Human-in-the-Loop (HITL) in the frontend, you need to use the CopilotKit useCopilotKitAction hook with the renderAndWaitForResponse method, which allows returning values asynchronously from the render function, as shown in the frontend/components/shopping-assistant.tsx file.
"use client"
import { useCopilotAction } from "@copilotkit/react-core"
import DialogBox from "./tool-response"
export function ShoppingAssistant() {
// ...
useCopilotAction({
name: "list_products",
description: "A list of products that are scraped from the web",
renderAndWaitForResponse: ({ status, respond, args }) => {
// console.log(args, "argsargsargsargs")
return <DialogBox isDisabled={respond == undefined} contentList={args?.products?.map((product: any) => ({ title: product.title, url: product.product_url }))}
onAccept={() => {
debugger
if (respond) {
respond("Accepted")
setState({
...state,
products: args?.products,
buffer_products: args?.buffer_products.slice(5, args?.buffer_products.length),
logs: []
})
let conversations = conversationHistory
conversations.forEach((conversation: any) => {
if (conversation.conversationId == currentChatId) {
conversation.chatName = args?.chat_name
}
})
setConversationHistory(conversations)
setCurrentChatId(currentChatId)
console.log(currentChatId, "currentChatId");
// setConversationHistory((prev: any) => prev.map((conversation: any) => conversation.conversationId === currentChatId ? { ...conversation, chatName: args?.chat_name } : conversation))
// setProducts(args?.products)
}
}}
onReject={() => {
if (respond) {
respond("Rejected")
setState({
...state,
logs: []
})
}
}}
onNeedInfo={() => {
debugger
if (respond) {
respond("Show more products")
setState({
...state,
products: args?.buffer_products?.slice(0, 10),
buffer_products: args?.buffer_products.slice(10, args?.buffer_products.length),
logs: []
})
let conversations = conversationHistory
conversations.forEach((conversation: any) => {
if (conversation.conversationId === currentChatId) {
conversation.chatName = args?.chat_name
}
})
console.log(currentChatId, "currentChatId");
setConversationHistory(conversations)
setCurrentChatId(currentChatId)
// setConversationHistory((prev: any) => prev.map((conversation: any) => conversation.conversationId === currentChatId ? { ...conversation, chatName: args?.chat_name } : conversation))
// setProducts(args?.buffer_products?.slice(0, 10))
}
}} />
}
})
return (
// ...
<div className="flex-1 flex flex-col min-w-0">
{currentView === "report" ? (
<ReportView isLoading={isLoading} products={state?.products} onExit={exitToProducts} searchQuery={query} report={state?.report} />
) : currentView === "wishlist" ? (
// ...
) : (
// ...
)}
</div>
</div>
)
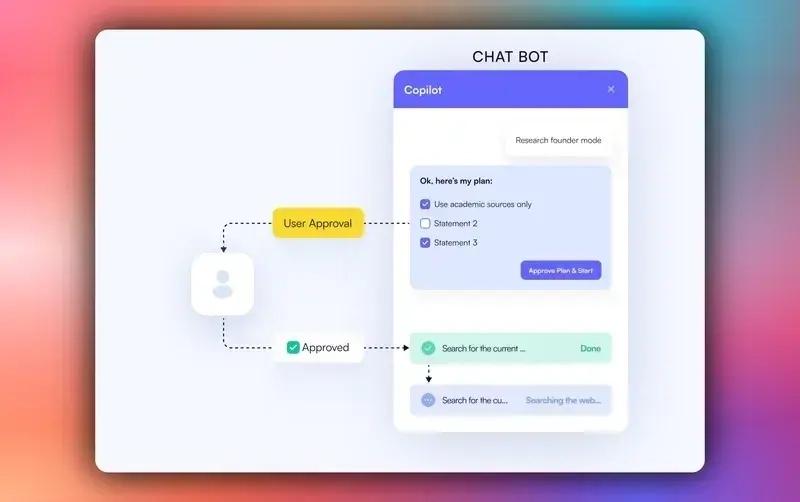
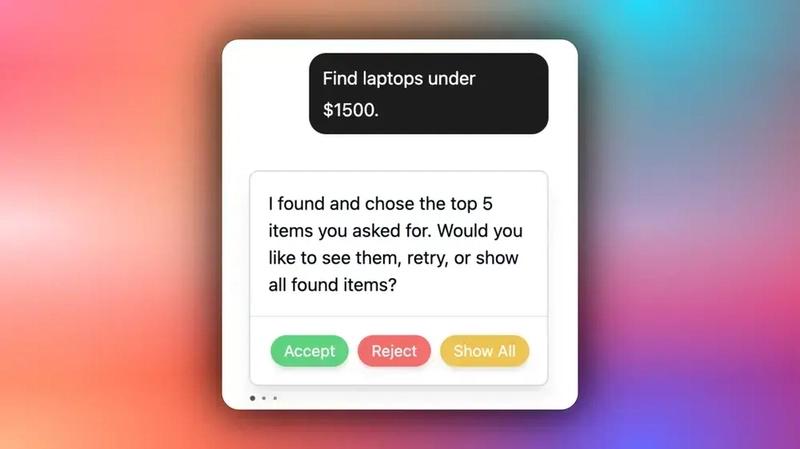
}When an agent triggers frontend actions by tool/action name to request human input or feedback during execution, the end-user is prompted with a choice (rendered inside the chat UI). Then the user can choose by pressing a button in the chat UI, as shown below.
To stream your CrewAI shopping agent responses or results in the frontend, pass the agent’s state field values to the frontend components, as shown in the frontend/components/shopping-assistant.tsx file.
"use client"
import { useCoAgent } from "@copilotkit/react-core"
export function ShoppingAssistant() {
// ...
const { state, setState, start, run } = useCoAgent({
name: "shopping_agent_crewai",
initialState: conversationHistory.length > 0 ? { ...conversationHistory[0]?.state, show_results: (conversationHistory[0]?.state?.products?.length > 0 ? true : false) } : {
products: [],
favorites: typeof window !== 'undefined' && window.localStorage.getItem("wishlist") ? JSON.parse(window.localStorage.getItem("wishlist") || "[]") : [],
wishlist: typeof window !== 'undefined' && window.localStorage.getItem("wishlist") ? JSON.parse(window.localStorage.getItem("wishlist") || "[]") : [],
buffer_products: [],
logs: [] as ToolLog[],
report: null,
show_results: false,
canvas_logs: {
title: "",
subtitle: ""
}
}
})
return (

  // ...

  <div className="flex-1 flex flex-col min-w-0">
    {currentView === "report" ? (
      <ReportView isLoading={isLoading} products={state?.products} onExit={exitToProducts} searchQuery={query} report={state?.report} />
    ) : currentView === "wishlist" ? (

      <WishlistView
        clearAllWishlist={() => {
          debugger
          setState({
            ...state,
            favorites: []
          })
          setConversationHistory((prev: any) => prev.map((conversation: any) => conversation.conversationId === currentChatId ? { ...conversation, state: { ...conversation.state, favorites: [] } } : conversation))
          if (typeof window !== 'undefined') {
            window.localStorage.setItem("wishlist", JSON.stringify([]))
          }
        }}
        products={state?.favorites}
        onExit={exitToProducts}
        onToggleWishlist={toggleWishlist}
        onDeleteProduct={deleteProduct}
      />

    ) : (
      <Canvas
        canvasLogs={state?.canvas_logs}
        start={run}
        show_results={state?.show_results}
        report={state?.report}
        products={state?.products}
        isLoading={isLoading && !state?.show_results}
        query={query}
        wishlistLength={state?.favorites?.length}
        wishlist={state?.favorites}
        onToggleWishlist={toggleWishlist}
        onDeleteProduct={deleteProduct}
        onGoToWishlist={goToWishlist}
        onGoToReport={goToReport}
      />
    )}
  </div>
</div>

)
}
If you query your agent and approve its feedback request, you should see the agent’s response or results streaming in the UI, as shown below.
In this guide, we have walked through the steps of building a full-stack shopping assistant using CrewAI and then adding a frontend to the agents using CopilotKit.
While we’ve explored a couple of features, we have barely scratched the surface of the countless use cases for CopilotKit, ranging from building interactive AI chatbots to building agentic solutions—in essence, CopilotKit lets you add a ton of useful AI capabilities to your products in minutes.
Hopefully, this guide makes it easier for you to integrate AI-powered Copilots into your existing application.
Follow CopilotKit on Twitter and say hi, and if you'd like to build something cool, join the Discord community.
Subscribe to our blog and get updates on CopilotKit in your inbox.
