
Get early access
In this article, you will learn how to add a frontend to any AG2 agent using the Agent User Interaction Protocol (AG-UI) developed by CopilotKit.
Before we jump in, here is what we will cover:
The Agent User Interaction Protocol (AG-UI), developed by CopilotKit, is an open-source, lightweight, event-based protocol that facilitates rich, real-time interactions between the frontend and AI agents.
The AG-UI protocol enables event-driven communication, state management, tool usage, and streaming AI agent responses.
To send information between the frontend and your AI agent, AG-UI uses events such as:
RUN_STARTED) or “The agent is done” (RUN_FINISHED).TEXT_MESSAGE_START), “Here’s a piece of the response” (TEXT_MESSAGE_CONTENT), or “The message is complete” (TEXT_MESSAGE_END).TOOL_CALL_START) or “Here’s the weather data” (TOOL_CALL_END).STATE_SNAPSHOT) or “Here’s a small update to the state” (STATE_DELTA).You can learn more about the AG-UI protocol and its architecture here on AG-UI docs.

Now that we have learned what the AG-UI protocol is, let us see how to integrate it with different AI agent frameworks
In this section, you will learn how to build a full-stack application demonstrating the integration of AutoGen agents with the AG-UI protocol to create an interactive AI travel assistant with human-in-the-loop capabilities.
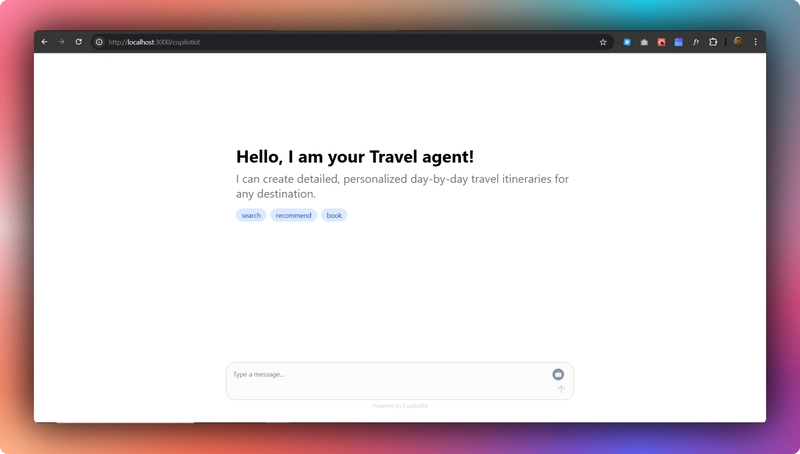
The system allows users to interact with an AI travel assistant that can create custom travel plans, recommend destinations, and adjust itineraries based on user feedback - all with real-time streaming responses and interactive tool execution.
Here’s a preview of what we will be building:
Let’s jump in.
To get started, make sure you have Python and Poetry installed on your machine. Then clone the AG-UI-AG2 repository that consists of a Python-based backend (ag-ui-travel-agent) and a Next.js/React frontend (ag-ui-travel-frontend).
Next, navigate to the backend directory:
cd ag-ui-travel-agentThen install the dependencies using Poetry:
poetry installAfter that, create a .env file with your OpenAI API key:
OPENAI_API_KEY=your-openai-keyThen run the agent using the command below:
poetry run uvicorn src.ag_ui_ag2.hitl_workflow:appTo test the AG-UI AG2 integration, run the curl command below on https://reqbin.com/curl.
curl -X POST http://localhost:8000/langgraph-research/fastagency/agui \
-H "Content-Type: application/json" \
-d '{
"thread_id": "test_thread_123",
"run_id": "test_run_456",
"messages": [
{
  "id": "msg_1",
  "role": "user",
  "content": "Hello there"
}
],
"tools": [],
"context": [],
"forwarded_props": {},
"state": {}
}'
Let us now see how the AG-UI AG2 integration works.
First, an AGUIAdapter class that bridges and connects the AG2 agents’ workflow with the AG-UI protocol is defined as shown in the src/ag_ui_ag2/ag_ui_adapter.py file.
class AGUIAdapter(MessageProcessorMixin, CreateWorkflowUIMixin):
    def __init__(
        self,
        provider: ProviderProtocol,
        *,
        discovery_path: str = "/fastagency/discovery",
        agui_path: str = "/fastagency/agui",
        wf_name: Optional[str] = None,
        get_user_id: Optional[Callable[..., Optional[str]]] = None,
        filter: Optional[Callable[[BaseMessage], bool]] = None,
    ) -> None:
        """Provider for AG-UI.

        This adapter connects FastAgency workflows with AG-UI interfaces, handling
        message routing, thread management, and real-time communication between
        agents and the frontend UI.

        Args:
            provider (ProviderProtocol): The workflow provider that executes agent workflows
            discovery_path (str, optional): API path for workflow discovery endpoint. Defaults to "/fastagency/discovery".
            agui_path (str, optional): API path for AG-UI communication endpoint. Defaults to "/fastagency/agui".
            wf_name (str, optional): Name of the default workflow to run. If None, uses the first available workflow.
            get_user_id (Optional[Callable[..., Optional[str]]], optional): Function to extract user ID from requests. Defaults to None.
            filter (Optional[Callable[[BaseMessage], bool]], optional): Optional filter function for messages. Defaults to None.
        """
The adapter handles message routing, state management, Server-Sent events streaming and tool execution.
After that, a hitl_workflow function that manages the travel planning workflow is defined as shown in the src/ag_ui_ag2/hitl_workflow.py file.
# Initialize the workflow manager
wf = Workflow()

@wf.register(name="hitl_workflow", description="A simple travel itenarary generator workflow")
def hitl_workflow(ui: UI, params: dict[str, Any]) -> str:
    """Main workflow function that orchestrates the travel planning conversation

    This function:
    1. Initializes the conversation with a welcome message
    2. Creates the AI travel agent with system instructions
    3. Creates a customer agent that proxies for human input
    4. Registers tool functions that the travel agent can call
    5. Starts the conversation between agents
    6. Processes and returns the conversation results

    Args:
        ui: User interface object for handling user interactions
        params: Additional parameters passed to the workflow

    Returns:
        Processed conversation results as string
    """
Then the AGUIAdapter defined earlier is used to connect the hitl_workflow to the AG_UI protocol, as shown below.
# Create an adapter that connects our workflow to the AG-UI protocol
adapter = AGUIAdapter(
    provider=wf,                          # The workflow provider
    wf_name="hitl_workflow",              # The name of the workflow to expose
    filter=without_customer_messages      # Filter to apply to messages
)
Finally, a FastAPI application that receives requests and sends responses to the frontend is created , as shown below.
# Create FastAPI application and include the adapter's router
app = FastAPI()
app.include_router(adapter.router)
# This adds all required endpointsIn this section, you will learn how to create a connection between your AG-UI AG2 backend and your app frontend using CopilotKit.
Let’s get started.
First, navigate to the frontend directory:
cd ag-ui-travel-frontendThen install the dependencies:
npm installAfter that, start the development server:
npm run devNavigate to http://localhost:3000/copilotkit, and you should see the AG-UI LangGraph agent frontend up and running.
Let’s now see how to build the frontend UI for the AG-UI AG2 agent using CopilotKit.
First, create a bridge that connects your frontend and the AG-UI LangGraph backend, as shown in the src/app/api/copilotkit/route.ts file.
// Import the HttpAgent for making HTTP requests to the backend
import { HttpAgent } from "@ag-ui/client";

// Import CopilotKit runtime components for setting up the API endpoint
import {
  CopilotRuntime,
  ExperimentalEmptyAdapter,
  copilotRuntimeNextJSAppRouterEndpoint,
} from "@copilotkit/runtime";

// Import NextRequest type for handling Next.js API requests
import { NextRequest } from "next/server";

// Create a new HttpAgent instance that connects to the LangGraph research backend running locally
const travelAgent = new HttpAgent({
  url: "http://127.0.0.1:8000/fastagency/agui"});

// Initialize the CopilotKit runtime with our research agent
const runtime = new CopilotRuntime({
  agents: {
    travelAgent, // Register the research agent with the runtime
  },
});

/**
 * Define the POST handler for the API endpoint
 * This function handles incoming POST requests to the /api/copilotkit endpoint
 */
export const POST = async (req: NextRequest) => {
  // Configure the CopilotKit endpoint for the Next.js app router
  const { handleRequest } = copilotRuntimeNextJSAppRouterEndpoint({
    runtime, // Use the runtime with our research agent
    serviceAdapter: new ExperimentalEmptyAdapter(), // Use the experimental adapter
    endpoint: "/api/copilotkit", // Define the API endpoint path
  });

  // Process the incoming request with the CopilotKit handler
  return handleRequest(req);
};To set up the CopilotKit Provider, the <CopilotKit> component must wrap the Copilot-aware parts of your application. For most use cases, it's appropriate to wrap the CopilotKit provider around the entire app, e.g., in your layout.tsx, as shown below in the src/app/copilotkit/layout.tsx file.
// Import the CSS styles for CopilotKit UI components
import "@copilotkit/react-ui/styles.css";
// Import React and ReactNode type for typing children prop
import React, { ReactNode } from "react";
// Import the CopilotKit provider component from the core package
import { CopilotKit } from "@copilotkit/react-core";

// Get the runtime URL from environment variables
// This URL points to the CopilotKit runtime API endpoint
const runtimeUrl = process.env.NEXT_PUBLIC_COPILOTKIT_RUNTIME_URL;

export default function Layout({ children }: { children: ReactNode }) {
  return (
    <CopilotKit
      runtimeUrl={runtimeUrl} // URL for the CopilotKit runtime API
      agent="researchAgent" // Specify which agent to use (matches the one defined in route.ts)
      showDevConsole={false} // Hide the development console in production
    >
      {children}{' '}
      {/* Render the child components inside the CopilotKit provider */}
    </CopilotKit>
  );
}To set up your Copilot UI, first import the default styles in your root component (typically layout.tsx).
import "@copilotkit/react-ui/styles.css";Copilot UI ships with a number of built-in UI patterns; choose whichever one you like from CopilotPopup, CopilotSidebar, CopilotChat, or Headless UI.
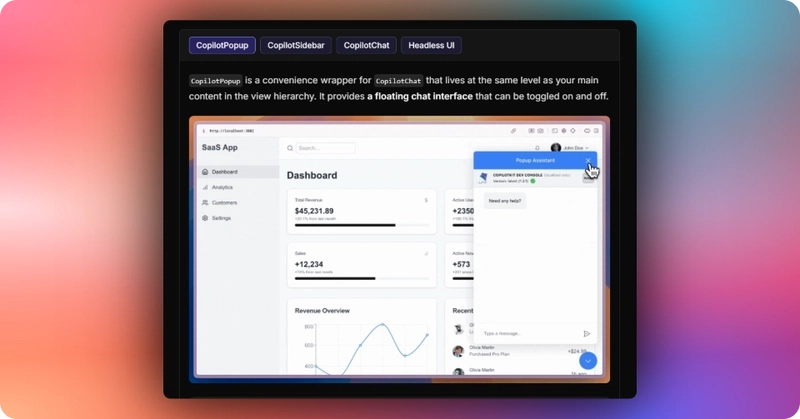
In this case, we will use CopilotChat defined in the src/app/components/Chat.tsxfile.
import React from "react";
import { CopilotChat } from "@copilotkit/react-ui";

function Chat() {
  return (
    <div className="flex-1 flex justify-center items-center bg-white overflow-y-auto">
      <CopilotChat className="w-full max-w-3xl flex flex-col h-full py-6" />
    </div>
  );
}

export default Chat;First, you need to define the agent state and emit it to the front end using the **STATE_SNAPSHOT** state management event to create a shared state between the frontend and AG-UI AG2 agent backend.
# Then send initial state snapshot
initial_state = {
    "status": {
        "phase": "initialized",
        "error": None,
        "timestamp": datetime.now().isoformat()
    },

    "conversation": {
        "stage": "starting",
        "messages": [
            {
                "id": "placeholder",
                "role": "assistant",
                "content": "",
                "timestamp": datetime.now().isoformat()
            }
        ],
        "tools": [],
        "completed": False
    },
    "agent": {
        "name": "Travel Assistant",
        "capabilities": ["search", "recommend", "book"],
        "current_task": None
    },
    "ui": {
        "showProgress": True,
        "activeTab": "chat",
        "loading": False,
        "showInput": False
    }
}

state_snapshot = StateSnapshotEvent(
    type=EventType.STATE_SNAPSHOT,
    snapshot=initial_state
)
yield self._sse_send(state_snapshot, thread_info)
Then use the CopilotKit useCoAgent hook to share the AG-UI AG2 agent backend state with your frontend, as shown in the src/app/components/Travel.tsx file.
import { useCoAgent } from "@copilotkit/react-core";

//...

function Travel() {

  // Connect to the travel agent's state using CopilotKit's useCoAgent hook
  const { state, stop: stopTravelAgent } = useCoAgent<TravelAgentState>({
    name: "travelAgent",
    initialState: {
      status: {
        phase: "initialized",
        error: null,
        timestamp: new Date().toISOString(),
      },
      conversation: {
        stage: "starting",
        messages: [
          {
            id: "placeholder",
            role: "assistant",
            content: "",
            timestamp: new Date().toISOString(),
          },
        ],
        tools: [],
        completed: false,
      },
      agent: {
        name: "Travel Assistant",
        capabilities: ["search", "recommend", "book"],
        current_task: null,
      },
      ui: {
        showProgress: false,
        showInput: false,
        activeTab: "chat",
        loading: false,
      },
    },
  });
}
Next, render the AG-UI AG2 agent's state in the chat UI. This is useful for informing the user about the agent's state in a more in-context way. To do this, you can use the useCoAgentStateRender hook.
import { useCoAgentStateRender } from "@copilotkit/react-core";

//...

function Travel() {

  // Implement useCoAgentStateRender hook
  useCoAgentStateRender({
    name: "travelAgent",
    handler: ({ nodeName }) => {
      // Stop the travel agent when the "__end__" node is reached
      if (nodeName === "__end__") {
        setTimeout(() => {
          isTravelInProgress.current = false;
          stopTravelAgent();
        }, 1000);
      }
    },
    render: ({ status }) => {
      if (status === "inProgress") {
        isTravelInProgress.current = true;
        return (
          <div className="travel-in-progress bg-white p-4 rounded-lg shadow-sm border border-gray-200">
            <div className="flex items-center gap-2 mb-3">
              <div className="animate-spin h-4 w-4 border-2 border-blue-500 rounded-full border-t-transparent"></div>
              <p className="font-medium text-gray-800">{getStatusText()}</p>
            </div>

            {state?.ui?.showProgress && (
              <div className="status-container mb-3">
                <div className="flex items-center justify-between mb-1.5">
                  <div className="text-sm font-medium text-gray-700">
                    {state.agent.current_task || "Processing your request..."}
                  </div>
                </div>
              </div>
            )}

            {state?.conversation?.tools?.length > 0 && (
              <div className="text-xs text-gray-500 flex items-center gap-1.5">
                <svg
                  xmlns="http://www.w3.org/2000/svg"
                  width="12"
                  height="12"
                  viewBox="0 0 24 24"
                  fill="none"
                  stroke="currentColor"
                  strokeWidth="2"
                  strokeLinecap="round"
                  strokeLinejoin="round">
                  <path d="M15 3h4a2 2 0 0 1 2 2v14a2 2 0 0 1-2 2h-4M10 17l5-5-5-5M13 12H3"></path>
                </svg>
                {state?.conversation?.tools?.length ?? 0} tool
                {(state?.conversation?.tools?.length ?? 0) !== 1 ? "s" : ""} used
              </div>
            )}
          </div>
        );
      }

      if (status === "complete") {
        isTravelInProgress.current = false;
        return null;
      }

      return null;
    },
  });
}To add the human-in-the-loop breakpoint in AG-UI protocol, you need to use tool call events that an agent can use to trigger frontend actions that request user input.
When the AG-UI AG2 travel agent needs to ask for user input on travel itineraries, it makes a standardized sequence of tool events, as shown below.
# Step 4: Send a sequence of events for the tool call
            # Step 4.1: Signal the beginning of a tool call
            tool_call_id = f"call_{str(uuid4())[:8]}"
            tool_call_start = ToolCallStartEvent(
                message_id=uuid,
                toolCallId=tool_call_id,
                toolCallName=tool_name,
                tool=tool_name,
                delta=""
            )
            out_queue.put_nowait(tool_call_start)

            # Step 4.2: Send the tool call arguments
            # Parse the JSON string into a Python dictionary
            import json
            args_dict = json.loads(content.tool_calls[0].function.arguments)

            tool_call_args = ToolCallArgsEvent(
                message_id=uuid,
                toolCallId=tool_call_id,
                toolCallName=tool_name,
                args=args_dict,  # Now it's a dictionary instead of a string
                delta=""
            )
            out_queue.put_nowait(tool_call_args)

            # Step 4.3: Mark the completion of the tool call
            tool_call_end = ToolCallEndEvent(
                message_id=uuid,
                toolCallId=tool_call_id,
                toolCallName=tool_name,
                delta=""
            )
            out_queue.put_nowait(tool_call_end)
To allow the AG-UI AG2 agent to request human input or feedback during execution in the frontend, you need to use the CopilotKit’s useCopilotKitAction hook, as shown below.
import { useCopilotAction } from "@copilotkit/react-core";

  // Add useCopilotAction for creating a travel itinerary
  useCopilotAction({
    name: "create_itinerary",
    description:
      "Create a new travel itinerary with details like destination, dates, and activities",
    parameters: [
      {
        name: "message",
        type: "string",
        description: "A message to display when asking for confirmation",
        required: true,
      },
    ],
    renderAndWaitForResponse: ({ args, respond }) => {
      console.log("create_itinerary action called with args:", args);

      const message =
        args?.message ||
        "I am about to create your travel itinerary. Reply with 'continue' to proceed or 'exit' to end the conversation.";

      if (!respond) {
        return (
          <div className="itinerary-creation mt-6 pt-4 border-t border-b border-gray-200">
            <div className="mb-4">
              {" "}
              <div className="flex items-center gap-2 mb-2">
                <span className="text-blue-500 text-xl">👤</span>
                <span className="font-medium text-blue-600">
                  Travel Assistant
                </span>
              </div>
              <h3 className="text-lg font-medium mb-3">{message}</h3>
            </div>{" "}
          </div>
        );
      }

      return (
        <div className="itinerary-creation mt-6 pt-4 border-t border-gray-200">
          <div className="mb-4">
            {" "}
            <div className="flex items-center gap-2 mb-2">
              <span className="text-blue-500 text-xl">📋</span>
              <span className="font-medium text-blue-600">
                Travel Assistant
              </span>
            </div>
            <h3 className="text-lg font-medium mb-3">{message}</h3>
          </div>{" "}
          <div className="flex gap-3">
            <button
              className="px-4 py-2 bg-green-600 hover:bg-green-700 text-white rounded-md transition-colors"
              onClick={() => {
                respond("continue");
              }}>
              Continue
            </button>
            <button
              className="px-4 py-2 bg-red-600 hover:bg-red-700 text-white rounded-md transition-colors"
              onClick={() => {
                respond("exit");
              }}>
              Exit
            </button>
          </div>
        </div>
      );
    },
  });
Then navigate to http://localhost:3000/copilotkit, and start a conversation with the AG2 agents, as shown below.
In this guide, we have walked through the steps of adding a frontend to any AI agents framework using AG-UI protocol and CopilotKit.
While we’ve explored a couple of features, we have barely scratched the surface of the countless use cases for CopilotKit, ranging from building interactive AI chatbots to building agentic solutions—in essence, CopilotKit lets you add a ton of useful AI capabilities to your products in minutes.
Hopefully, this guide makes it easier for you to integrate AI-powered Copilots into your existing application.
Follow CopilotKit on Twitter and say hi, and if you'd like to build something cool, join the Discord community.
Subscribe to our blog and get updates on CopilotKit in your inbox.
