
Get early access
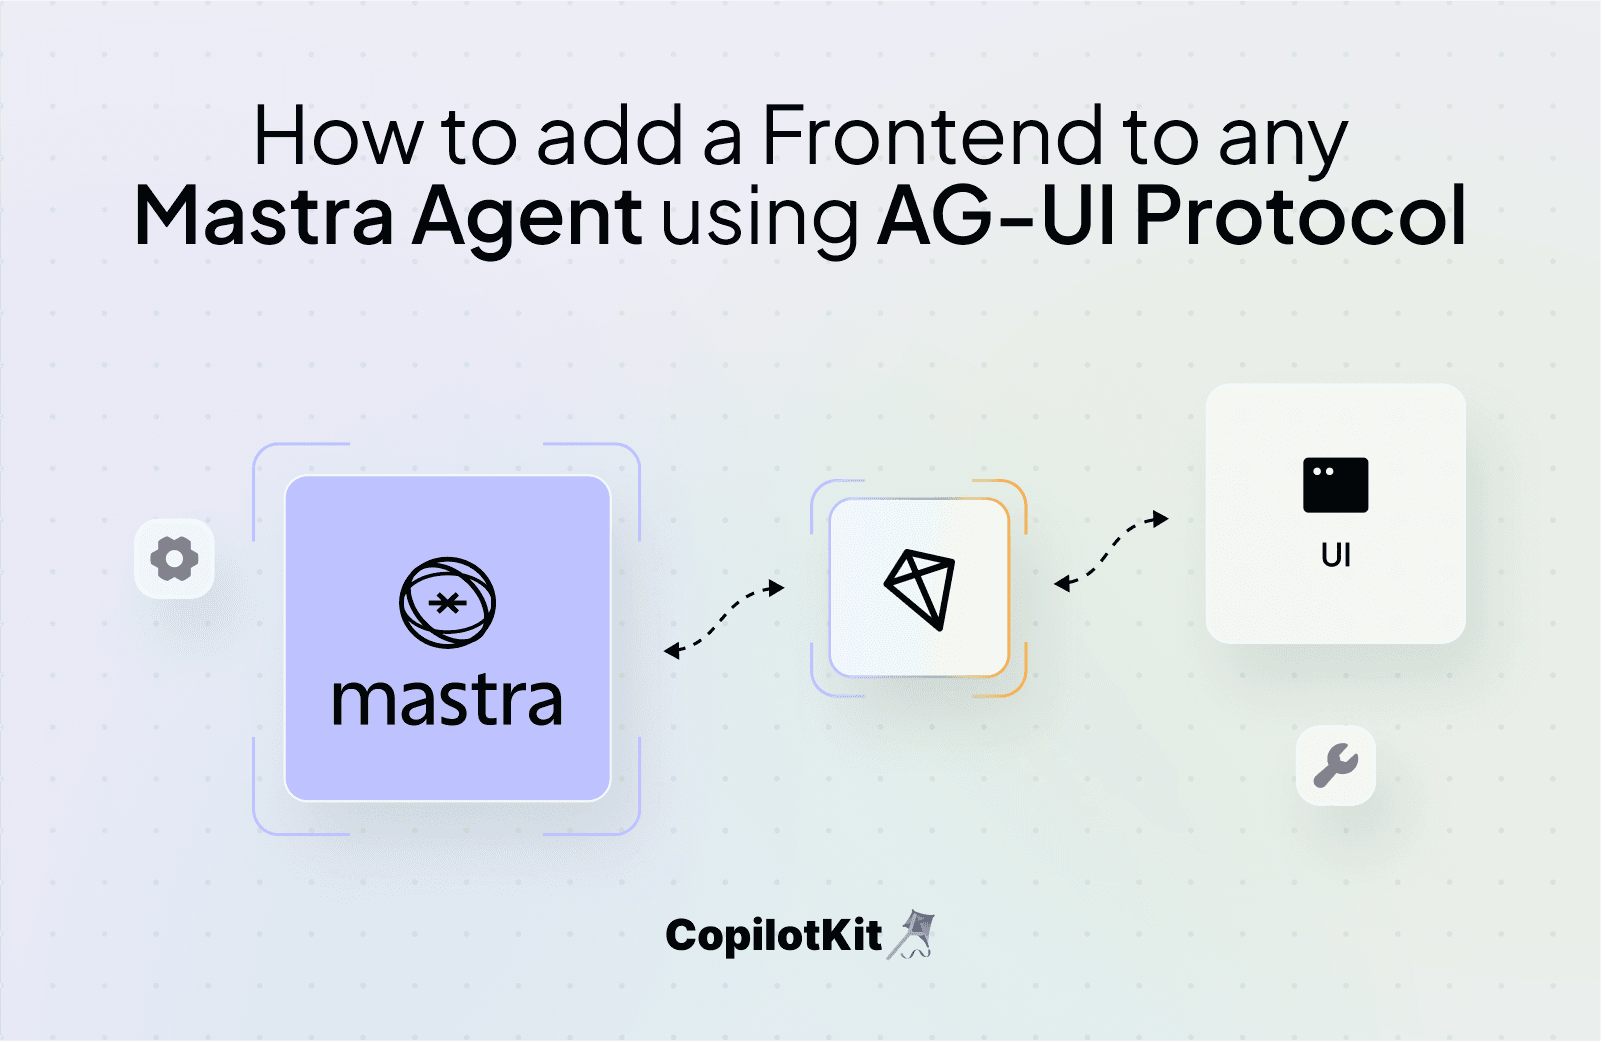
In this article, you will learn how to add a frontend to any Mastra agent using the Agent User Interaction Protocol (AG-UI) developed by CopilotKit.
Before we jump in, here is what we will cover:
The Agent User Interaction Protocol (AG-UI), developed by CopilotKit, is an open-source, lightweight, event-based protocol that facilitates rich, real-time interactions between the frontend and AI agents.
The AG-UI protocol enables event-driven communication, state management, tool usage, and streaming AI agent responses.
To send information between the frontend and your AI agent, AG-UI uses events such as:
RUN_STARTED) or “The agent is done” (RUN_FINISHED).TEXT_MESSAGE_START), “Here’s a piece of the response” (TEXT_MESSAGE_CONTENT), or “The message is complete” (TEXT_MESSAGE_END).TOOL_CALL_START) or “Here’s the weather data” (TOOL_CALL_END).STATE_SNAPSHOT) or “Here’s a small update to the state” (STATE_DELTA).You can learn more about the AG-UI protocol and its architecture here on AG-UI docs.

Now that we have learned what the AG-UI protocol is, let us see how to integrate it with different AI agent frameworks
In this section, you will learn how to build a weather assistant using the AG-UI protocol with Mastra AI agents framework and CopilotKit’s frontend framework.
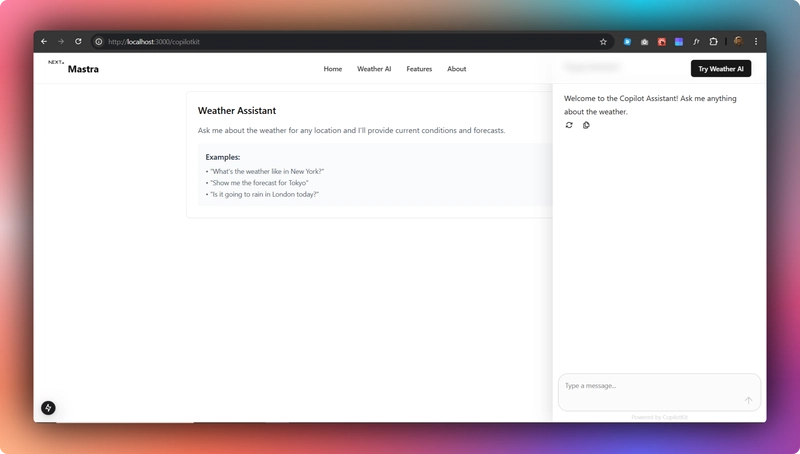
Here’s a preview of what we will be building:
Let’s jump in.
To get started, make sure you have Node.js 18+, npm, yarn, or pnpm installed on your machine. Then clone the AG-UI-Mastra repository that consists of a Node-based backend (awp-endpoint) and a Next.js/React frontend (mastra-frontend).
Next, navigate to the backend directory:
cd awp-endpointThen install the dependencies using NPM:
npm installAfter that, create a .env file with OpenAI API key:
OPENAI_API_KEY=your-openai-keyThen run the agent using the command below:
OPENAI_API_KEY=your-openai-keyTo test the AG-UI Mastra integration, run the curl command below on https://reqbin.com/curl.
curl -X POST [http://localhost:8000/](http://localhost:8000/langgraph-research)awp \
-H "Content-Type: application/json" \
-d '{
"threadId": "test_thread_123",
"runId": "test_run_456",
"messages": [
{
"id": "msg_1",
"role": "user",
"content": "What is the weather in London?"
}
],
"tools": [],
"context": [],
"forwarded_props": {},
"state": {}
}'Let us now see how the AG-UI Mastra integration works.
First, an endpoint with Express that handles frontend requests and responses to the frontend is defined.
// awp-endpoint/src/ag-ui-mastra.ts

// Create Express application instance
const app = express();

// Enable JSON body parsing middleware for incoming requests
app.use(express.json());

// Define the main AWP (Agent Workflow Protocol) endpoint
// This endpoint handles streaming communication with AG-UI agents
app.post("/awp", async (req: Request, res: Response) => {

})
Then input validation, response headers configuration and event encoder are defined, as shown below.
// awp-endpoint/src/ag-ui-mastra.ts

// STEP 1: Input Validation
// Parse and validate the incoming request body against the expected schema
// This ensures we have all required fields (threadId, runId, messages, etc.)
const input: RunAgentInput = RunAgentInputSchema.parse(req.body);

// STEP 2: Setup Server-Sent Events (SSE) Stream
// Configure response headers for real-time streaming communication
res.setHeader("Content-Type", "text/event-stream"); // Enable SSE
res.setHeader("Cache-Control", "no-cache"); // Prevent caching
res.setHeader("Connection", "keep-alive"); // Keep connection open

// STEP 3: Initialize Event Encoder
// Create encoder to format events according to AG-UI protocol
const encoder = new EventEncoder();
After that, a run start event is sent using the RUN_STARTED lifecycle event.
// awp-endpoint/src/ag-ui-mastra.ts

// STEP 4: Send Run Started Event
// Notify the client that agent execution has begun
const runStarted = {
  type: EventType.RUN_STARTED,
  threadId: input.threadId,
  runId: input.runId,
};
res.write(encoder.encode(runStarted));
Then a weather query is processed using a Mastra agent, as shown below.
// awp-endpoint/src/ag-ui-mastra.ts

// STEP 7: Retrieve Weather Agent from Mastra
// Get the configured weather agent that will handle the weather queries
const weatherAgent = mastra.getAgent("weatherAgent");

// STEP 8: Validate Agent Availability
// Ensure the weather agent is properly configured and available
if (!weatherAgent) {
  throw new Error("Weather agent not found");
}

// STEP 9: Convert Message Format
// Transform AG-UI message format to Mastra-compatible format
// Filter out unsupported message roles and ensure proper structure
const mastraMessages = input.messages
  .filter((msg: Message) =>
    ["user", "system", "assistant"].includes(msg.role)
  )
  .map((msg: Message) => ({
    role: msg.role as "user" | "system" | "assistant",
    content: msg.content || "",
  }));

// STEP 10: Extract Location Information
// Parse the user's message to identify the location for weather query
// This helps with state tracking and provides context to the user
const userMessage = input.messages.find((msg) => msg.role === "user");
const extractedLocation = extractLocationFromMessage(
  userMessage?.content || ""
);

// STEP 13: Execute Weather Agent
// Call Mastra's weather agent with the processed messages
// This will use the configured tools and models to generate a response
const result = await weatherAgent.generate(mastraMessages);
After that, text message events are sent to the frontend with the weather report content, as shown below.
// awp-endpoint/src/ag-ui-mastra.ts

// STEP 15: Generate Unique Message ID
// Create a unique identifier for the assistant's response message
const messageId = uuidv4();

// STEP 16: Start Text Message Stream
// Signal the beginning of the assistant's text response
const textMessageStart = {
  type: EventType.TEXT_MESSAGE_START,
  messageId,
  role: "assistant",
};
res.write(encoder.encode(textMessageStart));

// STEP 17: Prepare Response Content
// Extract the generated text from Mastra's response
const response = result.text;

// STEP 18: Stream Response in Chunks
// Split the response into smaller chunks for smoother streaming experience
// This simulates real-time generation and provides better UX
const chunkSize = 10;

// Number of characters per chunk
for (let i = 0; i < response.length; i += chunkSize) {
  const chunk = response.slice(i, i + chunkSize);

  // Send each chunk as a separate content event
  const textMessageContent = {
    type: EventType.TEXT_MESSAGE_CONTENT,
    messageId,
    delta: chunk,
  };
  res.write(encoder.encode(textMessageContent));

  // Add small delay between chunks to simulate natural typing
  await new Promise((resolve) => setTimeout(resolve, 50));
}

// STEP 19: End Text Message Stream
// Signal that the assistant's message is complete
const textMessageEnd = {
  type: EventType.TEXT_MESSAGE_END,
  messageId,
};
res.write(encoder.encode(textMessageEnd));
Finally, a run-finished event is sent using the RUN_FINISHED lifecycle event.
// awp-endpoint/src/ag-ui-mastra.ts

// STEP 20: Finalize Agent Run
// Send final event to indicate the entire agent run is complete
const runFinished = {
  type: EventType.RUN_FINISHED,
  threadId: input.threadId,
  runId: input.runId,
};
res.write(encoder.encode(runFinished));In this section, you will learn how to create a connection between your AG-UI Mastra backend and your app frontend using CopilotKit.
Let’s get started.
First, navigate to the frontend directory:
cd mastra-frontendThen install the dependencies:
npm installAfter that, start the development server:
npm run devNavigate to http://localhost:3000/copilotkit, and you should see the AG-UI Mastra agent frontend up and running.
Let’s now see how to build the frontend UI for the AG-UI Mastra agent using CopilotKit.
First, create a bridge that connects your frontend and the AG-UI Mastra backend, as shown in the src/app/api/copilotkit/route.ts file.
// Import the HttpAgent for making HTTP requests to the backend
import { HttpAgent } from "@ag-ui/client";

// Import CopilotKit runtime components for setting up the API endpoint
import {
  CopilotRuntime,
  ExperimentalEmptyAdapter,
  copilotRuntimeNextJSAppRouterEndpoint,
} from "@copilotkit/runtime";

// Import NextRequest type for handling Next.js API requests
import { NextRequest } from "next/server";

// Create a new HttpAgent instance that connects to the Mastra backend running locally
const weatherAgent = new HttpAgent({
  url: "http://127.0.0.1:8000/awp",
});

// Initialize the CopilotKit runtime with our research agent
const runtime = new CopilotRuntime({
  agents: {
    weatherAgent, // Register the weather agent with the runtime
  },
});

/**
 * Define the POST handler for the API endpoint
 * This function handles incoming POST requests to the /api/copilotkit endpoint
 */
export const POST = async (req: NextRequest) => {
  // Configure the CopilotKit endpoint for the Next.js app router
  const { handleRequest } = copilotRuntimeNextJSAppRouterEndpoint({
    runtime, // Use the runtime with our research agent
    serviceAdapter: new ExperimentalEmptyAdapter(), // Use the experimental adapter
    endpoint: "/api/copilotkit", // Define the API endpoint path
  });

  // Process the incoming request with the CopilotKit handler
  return handleRequest(req);
};To set up the CopilotKit Provider, the <CopilotKit> component must wrap the Copilot-aware parts of your application. For most use cases, it's appropriate to wrap the CopilotKit provider around the entire app, e.g., in your layout.tsx, as shown below in the src/app/copilotkit/layout.tsx file.
// Import the CSS styles for CopilotKit UI components
import "@copilotkit/react-ui/styles.css";
// Import React and ReactNode type for typing children prop
import React, { ReactNode } from "react";
// Import the CopilotKit provider component from the core package
import { CopilotKit } from "@copilotkit/react-core";

// Get the runtime URL from environment variables
// This URL points to the CopilotKit runtime API endpoint
const runtimeUrl = process.env.NEXT_PUBLIC_COPILOTKIT_RUNTIME_URL;

export default function Layout({ children }: { children: ReactNode }) {
  return (
    <CopilotKit
      runtimeUrl={runtimeUrl} // URL for the CopilotKit runtime API
      agent="weatherAgent" // Specify which agent to use (matches the one defined in route.ts)
      showDevConsole={false} // Hide the development console in production
    >
      {children}{" "}
      {/* Render the child components inside the CopilotKit provider */}
    </CopilotKit>
  );
}To set up your Copilot UI, first import the default styles in your root component (typically layout.tsx).
import "@copilotkit/react-ui/styles.css";Copilot UI ships with a number of built-in UI patterns; choose whichever one you like from CopilotPopup, CopilotSidebar, CopilotChat, or Headless UI.
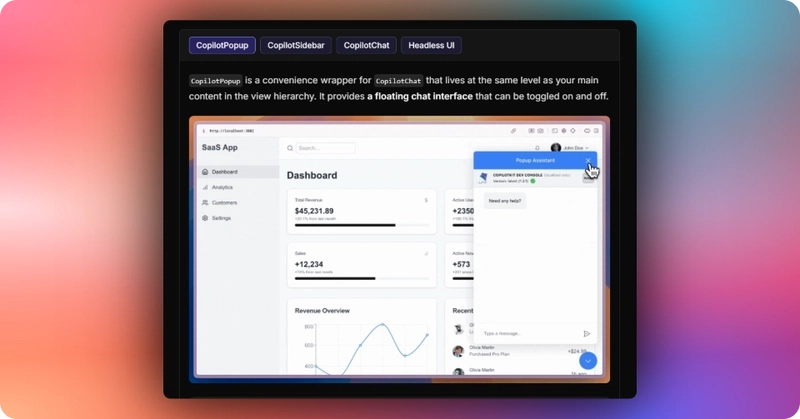
In this case, we will use CopilotSidebar defined in the src/app/copilotkit/page.tsxfile.
// mastra-frontend/src/app/copilotkit/page.tsx

"use client";

import { CopilotSidebar } from "@copilotkit/react-ui";
import Weather from "../components/Weather";

export default function CopilotKitPage() {
  return (
    <main>
      <Weather />
      <CopilotSidebar
        clickOutsideToClose={true}
        defaultOpen={false}
        labels={{
          title: "Popup Assistant",
          initial:
            "Welcome to the Copilot Assistant! Ask me anything about the weather.",
        }}
      />
    </main>
  );
}First, you need to define the agent state and emit it to the front end using the **STATE_SNAPSHOT** state management event to create a shared state between the frontend and AG-UI & Mastra agent backend.
// awp-endpoint/src/ag-ui-mastra.ts

// STEP 5: Initialize Agent State
// Create initial state object to track the weather analysis process
// This state will be updated throughout the agent's execution
const initialState = {
  status: "initializing", // Current execution status
  currentStep: "weather_analysis", // What the agent is currently doing
  location: null, // Location for weather query (to be extracted)
  timestamp: new Date().toISOString(), // When the process started
  processingStage: "starting", // Detailed stage information
  weatherReport: null, // Final weather report (populated later)
};

// STEP 6: Send Initial State Snapshot
// Provide the client with the initial state of the agent
const stateSnapshot = {
  type: EventType.STATE_SNAPSHOT,
  snapshot: initialState,
};
res.write(encoder.encode(stateSnapshot));
Then use the CopilotKit useCoAgent hook to share the AG-UI Mastra agent backend state with your frontend, as shown in the src/app/components/Weather.tsx file.
// mastra-frontend/src/app/components/Weather.tsx

import { useCoAgent } from "@copilotkit/react-core";

//...

function Weather() {
  //...

  // Connect to the weather agent's state using CopilotKit's useCoAgent hook
  const { state, stop: stopWeatherAgent } = useCoAgent<WeatherAgentState>({
    name: "weatherAgent",
    initialState: {
      status: "initializing",
      currentStep: "weather_analysis",
      processingStage: "starting",
      weatherReport: null,
      location: null,
      timestamp: new Date().toISOString(),
    },
  });
Next, render the AG-UI Mastra agent's state in the chat UI. This is useful for informing the user about the agent's state in a more in-context way. To do this, you can use the useCoAgentStateRender hook.
// mastra-frontend/src/app/components/Weather.tsx

import { useCoAgentStateRender } from "@copilotkit/react-core";

// Implement useCoAgentStateRender hook
useCoAgentStateRender({
  name: "weatherAgent",
  handler: ({ nodeName }) => {
    // Handle completion when the weather agent finishes
    if (nodeName === "__end__" || state?.status === "completed") {
      setTimeout(() => {
        isWeatherInProgress.current = false;
        stopWeatherAgent();
      }, 1000);
    }
  },
  render: ({ status }) => {
    if (status === "inProgress") {
      isWeatherInProgress.current = true;
      return (
        <div className="weather-in-progress bg-white p-4 rounded-lg shadow-sm border border-gray-200">
          <div className="flex items-center gap-2 mb-3">
            <div className="animate-spin h-4 w-4 border-2 border-blue-500 rounded-full border-t-transparent"></div>
            <p className="font-medium text-gray-800">
              Getting weather information...
            </p>
          </div>

          <div className="status-container mb-3">
            <div className="flex items-center justify-between mb-1.5">
              <div className="text-sm font-medium text-gray-700">
                {getStatusText()}
              </div>
            </div>
          </div>

          {state?.location && (
            <div className="text-xs text-gray-500 flex items-center gap-1.5">
              <svg
                xmlns="http://www.w3.org/2000/svg"
                width="12"
                height="12"
                viewBox="0 0 24 24"
                fill="none"
                stroke="currentColor"
                strokeWidth="2"
                strokeLinecap="round"
                strokeLinejoin="round">
                <path d="M21 10c0 7-9 13-9 13s-9-6-9-13a9 9 0 0 1 18 0z"></path>
                <circle cx="12" cy="10" r="3"></circle>
              </svg>
              Location: {state.location}
            </div>
          )}
        </div>
      );
    }

    if (status === "complete") {
      isWeatherInProgress.current = false;
      return null;
    }

    return null;
  },
});To stream the weather report content, use a component with conditional rendering, as shown below.
// mastra-frontend/src/app/components/Weather.tsx

// When weather report is available, show it
if (state?.status === "completed" && state?.weatherReport) {
  return (
    <div className="flex flex-col gap-4 h-full max-w-4xl mt-4 mx-auto">
      {/*...*/}
    </div>
  );
}
Then navigate to http://localhost:3000/copilotkit, add “What is the weather in London?” to the chat, and press “Enter.” You should see the AG-UI Mastra agent state rendered in the chat UI and the weather report streamed in the UI, as shown below.
Congratulations! You have successfully added a frontend to any AI agents framework using AG-UI protocol and CopilotKit.
In this guide, we have walked through the steps of adding a frontend to any AI agents framework using AG-UI protocol and CopilotKit.
While we’ve explored a couple of features, we have barely scratched the surface of the countless use cases for CopilotKit, ranging from building interactive AI chatbots to building agentic solutions—in essence, CopilotKit lets you add a ton of useful AI capabilities to your products in minutes.
Hopefully, this guide makes it easier for you to integrate AI-powered Copilots into your existing application.
Follow CopilotKit on Twitter and say hi, and if you'd like to build something cool, join the Discord community.
Subscribe to our blog and get updates on CopilotKit in your inbox.
