
Get early access
In this article, you will learn how to add a frontend to any CrewAI agent using the Agent User Interaction Protocol (AG-UI) developed by CopilotKit.
Before we jump in, here is what we will cover:
The Agent User Interaction Protocol (AG-UI), developed by CopilotKit, is an open-source, lightweight, event-based protocol that facilitates rich, real-time interactions between the frontend and AI agents.
The AG-UI protocol enables event-driven communication, state management, tool usage, and streaming AI agent responses.
To send information between the frontend and your AI agent, AG-UI uses events such as:
RUN_STARTED) or “The agent is done” (RUN_FINISHED).TEXT_MESSAGE_START), “Here’s a piece of the response” (TEXT_MESSAGE_CONTENT), or “The message is complete” (TEXT_MESSAGE_END).TOOL_CALL_START) or “Here’s the weather data” (TOOL_CALL_END).STATE_SNAPSHOT) or “Here’s a small update to the state” (STATE_DELTA).You can learn more about the AG-UI protocol and its architecture here on AG-UI docs.

Now that we have learned what the AG-UI protocol is, let us see how to integrate it with different AI agent frameworks
In this section, you will learn how to integrate CrewAI with the AG-UI protocol to create interactive, human-in-the-loop AI applications.
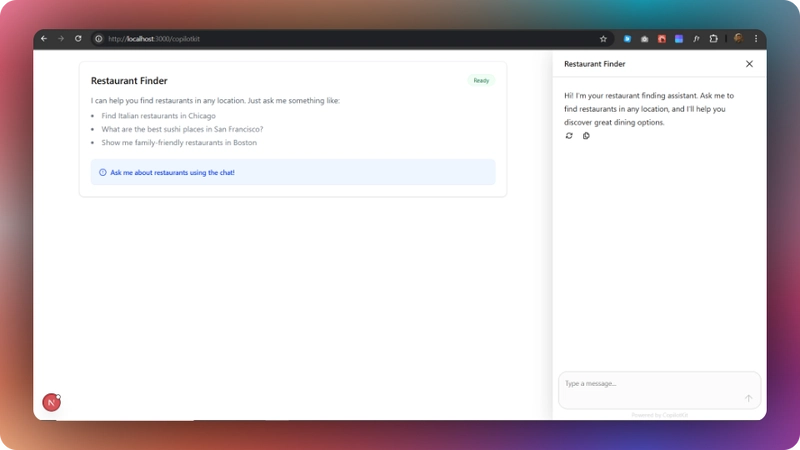
Here’s a preview of what we will be building:
Let’s jump in.
To get started, make sure you have Python and Poetry installed on your machine. Then clone the AG-UI-CrewAI repository that consists of a Python-based backend (ag-ui-restaurant-agent) and a Next.js/React frontend (ag-ui-restaurant-frontend).
Next, navigate to the backend directory:
cd ag-ui-restaurant-agentThen install the dependencies using Poetry:
poetry installAfter that, create a .env file with OpenAI and Serper API keys:
OPENAI_API_KEY=your-openai-key
SERPER_API_KEY=your-serper-key
Then run the agent using the command below:
poetry run uvicorn src.restaurant_finder_agent.api:appTo test the AG-UI LangGraph integration, run the curl command below on https://reqbin.com/curl.
curl -X POST [http://localhost:8000/](http://localhost:8000/langgraph-research)agent \
-H "Content-Type: application/json" \
-d '{
"thread_id": "test_thread_123",
"run_id": "test_run_456",
"messages": [
{
"id": "msg_1",
"role": "user",
"content": "San Francisco, CA"
}
],
"tools": [],
"context": [],
"forwarded_props": {},
"state": {}
}'
Let us now see how the AG-UI CrewAI integration works.
First, an endpoint with FastAPI that receives requests from the frontend using the RunAgentInput Pydantic model is created as shown in the src/restaurant_finder_agent/api.py file.
@app.post("/agent")
async def agent_endpoint(input_data: RunAgentInput):
    """
    Main API endpoint following the AG-UI protocol for restaurant recommendations.

    This endpoint handles both initial restaurant search queries and feedback requests on
    recommendations. It works with Server-Sent Events (SSE) to provide real-time updates
    to the client.

    The endpoint can handle two primary workflows:
    1. Initial restaurant search: When a user submits a location to search for restaurants
    2. Feedback processing: When a user responds to recommendations with feedback

    Args:
        input_data (RunAgentInput): Input data containing either the initial query or feedback
                                    on previous recommendations

    Returns:
        StreamingResponse: A stream of AG-UI protocol events for real-time UI updates
    """
Then, an event encoder is created to properly format Server-Sent Events (SSE) according to the AG-UI protocol.
async def event_generator():
    # Create an event encoder to properly format SSE events for AG-UI protocol
    encoder = EventEncoder()
After that, logic for handling new search queries and feedback processing for the human-in-the-loop feature is implemented.
# Determine whether this request is for feedback processing or a new search
        # Feedback requests will have the feedback field populated
        is_feedback_request = input_data.feedback is not None

        # Generate a unique debug ID for tracking this request through logs
        import uuid
        debug_id = str(uuid.uuid4())[:8]

        # Check if feedback is embedded within message content (alternative way clients can send feedback)
        # Some frontend implementations might send feedback as JSON in the message content
        # rather than using the dedicated feedback field
        if not is_feedback_request and input_data.messages and len(input_data.messages) > 0:
            message_content = input_data.messages[-1].content
            try:
                # Attempt to parse the message content as JSON to extract feedback data
                import json
                feedback_data = json.loads(message_content)
                # Check if this JSON has the signature of a feedback request
                if isinstance(feedback_data, dict) and ("feedbackText" in feedback_data or "originalLocation" in feedback_data):
                    # Log that we detected feedback in an alternative format
                    print(f"[{debug_id}] Detected feedback in message content: {message_content}")
                    # Mark this as a feedback request for proper routing
                    is_feedback_request = True
                    # Promote the message content to be the feedback field
                    input_data.feedback = message_content
                    # Preserve the original location if provided
                    if "originalLocation" in feedback_data:
                        input_data.original_location = feedback_data["originalLocation"]
                        print(f"[{debug_id}] Set original_location from message JSON: {input_data.original_location}")
            except (json.JSONDecodeError, TypeError):
                # If we can't parse as JSON, this is a regular search query, not feedback
                pass

        if is_feedback_request:
            # For feedback requests, use the provided message_id
            message_id = input_data.thread_id  # Using thread_id as message_id
            feedback = input_data.feedback
            print(f"[{debug_id}] DETECTED FEEDBACK REQUEST - Will use Recommendation Specialist")
            print(f"Received feedback request with feedback: '{feedback}'")

            # Initialize query
            query = ""

            # Try to extract original location from feedback if it's JSON
            try:
                import json
                feedback_data = json.loads(feedback)
                if isinstance(feedback_data, dict) and "originalLocation" in feedback_data:
                    query = feedback_data["originalLocation"]
                    print(f"Extracted original location from feedback JSON: '{query}'")

                    # Also update the input_data.original_location for downstream handlers
                    input_data.original_location = query
            except (json.JSONDecodeError, TypeError):
                print("Feedback is not in JSON format")

            # If we couldn't get location from JSON, try the direct field
            if not query:
                query = input_data.original_location if input_data.original_location else ""
                print(f"Original location from input_data: '{query}'")

            # If still not available, try thread_state
            if not query and hasattr(input_data, 'thread_state') and input_data.thread_state:
                if 'search' in input_data.thread_state and 'location' in input_data.thread_state['search']:
                    query = input_data.thread_state['search']['location']
                    print(f"Retrieved original location from thread_state: '{query}'")

            print(f"FINAL DECISION: Using location '{query}' for feedback processing")

        else:
            # For initial requests, extract query and create a new message_id
            query = input_data.messages[-1].content
            message_id = str(uuid.uuid4())
            print(f"[{debug_id}] Received initial search query: '{query}' - Will use Research Specialist")
Then, a run start event is sent using the RUN_STARTED lifecycle event.
# Send run started event
        yield encoder.encode(
            RunStartedEvent(
                type=EventType.RUN_STARTED,
                thread_id=input_data.thread_id,
                run_id=input_data.run_id
            )
)Next, the state is initialized using the STATE_SNAPSHOT state management event.
yield encoder.encode(
            StateSnapshotEvent(
                message_id=message_id,
                snapshot={
                    "status": {
                        //...
                    },
                    "search": {
                        //...
                    },
                    "processing": {
                        //...                    },
                    "ui": {
                        "showRestaurants": False,
                        "showProgress": True,
                        "activeTab": "chat",
                        "showFeedbackPrompt": False,
                        "feedbackOptions": [
                            "Thanks, these look great!",
                            "Can you show me more options?",
                            "Do you have any cheaper restaurants?",
                            "I'd like more fine dining options"
                        ]
                    }
                }
            )
        )
Then the agent state is updated using the STATE_DELTA state management event.
yield encoder.encode(
            StateDeltaEvent(
                message_id=message_id,
                delta=[
                    {
                        "op": "replace",
                        "path": "/status/phase",
                        "value": "searching_restaurants"
                    },
                    {
                        "op": "replace",
                        "path": "/search/stage",
                        "value": "searching"
                    },
                    {
                        "op": "replace",
                        "path": "/processing/inProgress",
                        "value": True
                    },                    {
                        "op": "replace",
                        "path": "/processing/currentPhase",
                        "value": "search"
                    },
                    {
                        "op": "replace",
                        "path": "/processing/progress",
                        "value": 0.1
                    }
                ]
            )
        )
After that, a location query is processed using a CrewAGUIWrapper imported from the src/restaurant_finder_agent/agui_crew.py file.
# Import our CrewAGUIWrapper
        from restaurant_finder_agent.agui_crew import CrewAGUIWrapper

                # Create a wrapper for the crew with our event callback
        crew_wrapper = CrewAGUIWrapper(crew_instance.crew(), event_callback)

        # Run the restaurant finder crew with AG-UI integration
        result = await crew_wrapper.run_with_agui({"location": query})

        # Parse the results from the crew
        restaurants = crew_wrapper._parse_restaurants(result)
Next, a run-finished event is sent using the RUN_FINISHED lifecycle event.
# Complete the run
        yield encoder.encode(
            RunFinishedEvent(
                type=EventType.RUN_FINISHED,
                thread_id=input_data.thread_id,
                run_id=input_data.run_id
            )
)Finally, a streaming response containing SSE events from the event generator is returned.
# Return the streaming response with the generated events outside the generator function
    return StreamingResponse(
        event_generator(),
        media_type="text/event-stream"
)In this section, you will learn how to create a connection between your AG-UI CrewAI backend and your app frontend using CopilotKit.
Let’s get started.
First, navigate to the frontend directory:
cd ag-ui-restaurant-frontendThen install the dependencies:
npm installAfter that, start the development server:
npm run devNavigate to http://localhost:3000/copilotkit, and you should see the AG-UI CrewAI agent frontend up and running.
Let’s now see how to build the frontend UI for the AG-UI LangGraph agent using CopilotKit.
First, create a bridge that connects your frontend and the AG-UI LangGraph backend, as shown in the src/app/api/copilotkit/route.ts file.
/**
 * API Route Handler for CopilotKit Integration
 *
 * This file creates a Next.js API route that serves as a bridge between the frontend and the
 * restaurant finder agent running on a separate Python backend service.
 *
 * The route exposes a POST endpoint that handles requests from CopilotKit components in the UI
 * and forwards them to the appropriate agent for processing.
 */

// Import HttpAgent from AG-UI client library for making HTTP requests to our Python backend
import { HttpAgent } from "@ag-ui/client";

// Import necessary components from CopilotKit runtime
import {
  CopilotRuntime, // Core runtime for managing copilot interactions
  ExperimentalEmptyAdapter, // Adapter for handling service integration (experimental)
  copilotRuntimeNextJSAppRouterEndpoint, // Helper for creating Next.js API endpoints
} from "@copilotkit/runtime";

// Import NextRequest type from Next.js for typed request handling
import { NextRequest } from "next/server";

// Create an HTTP agent that points to our restaurant finder Python backend
// This agent will handle communication with the Python CrewAI service
const restaurantFinderAgent = new HttpAgent({
  url: "http://127.0.0.1:8000/agent", // Local development URL for the Python backend
});

// Initialize the CopilotRuntime with our agent
// This runtime will coordinate sending user queries to the appropriate agents
const runtime = new CopilotRuntime({
  agents: {
    restaurantFinderAgent, // Register our restaurant finder agent with the runtime
  },
});

// Export a POST handler function for the Next.js API route
export const POST = async (req: NextRequest) => {
  // Create a request handler using CopilotKit's helper function
  const { handleRequest } = copilotRuntimeNextJSAppRouterEndpoint({
    runtime, // Pass our configured runtime
    serviceAdapter: new ExperimentalEmptyAdapter(), // Using experimental adapter for now
    endpoint: "/api/copilotkit", // The endpoint path for this API route
  });

  // Process the incoming request and return the response
  return handleRequest(req);
};To set up the CopilotKit Provider, the <CopilotKit> component must wrap the Copilot-aware parts of your application. For most use cases, it's appropriate to wrap the CopilotKit provider around the entire app, e.g., in your layout.tsx, as shown below in the src/app/copilotkit/layout.tsx file.
import "@copilotkit/react-ui/styles.css";
import React, { ReactNode } from "react";
import { CopilotKit } from "@copilotkit/react-core";

const runtimeUrl = process.env.NEXT_PUBLIC_COPILOTKIT_RUNTIME_URL;

export default function Layout({ children }: { children: ReactNode }) {
  return (
    <CopilotKit
      runtimeUrl={runtimeUrl}
      agent="restaurantFinderAgent"
      showDevConsole={false}>
      {children}
    </CopilotKit>
  );
}To set up your Copilot UI, first import the default styles in your root component (typically layout.tsx).
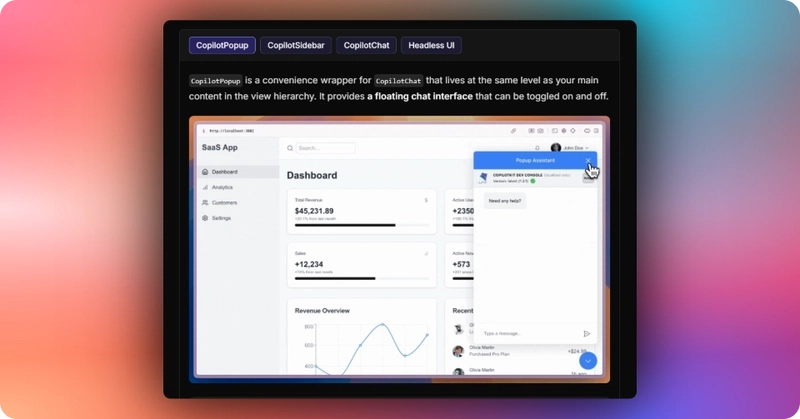
import "@copilotkit/react-ui/styles.css";Copilot UI ships with a number of built-in UI patterns; choose whichever one you like from CopilotPopup, CopilotSidebar, CopilotChat, or Headless UI.
In this case, we will use CopilotChat defined in the src/app/copilotkit/page.tsxfile.
"use client";

import { CopilotSidebar } from "@copilotkit/react-ui";
import RestaurantFinder from "../components/RestaurantFinder";

/**
 * CopilotKitPage component that serves as the main page with the CopilotSidebar
 * and includes the RestaurantFinder for all Generative UI capabilities
 */
export default function CopilotKitPage() {
  return (
    <main className="flex h-screen">
      <div className="flex-1 p-6 overflow-auto">
        <RestaurantFinder />
      </div>

      <CopilotSidebar
        clickOutsideToClose={false}
        defaultOpen={true}
        labels={{
          title: "Restaurant Finder",
          initial:
            "Hi! I'm your restaurant finding assistant. Ask me to find restaurants in any location, and I'll help you discover great dining options.",
        }}
      />
    </main>
  );
}To create a shared state between the frontend and AG-UI CrewAI agent backend, first, you need to define the agent state and emit it to the frontend using **STATE_SNAPSHOT** state management event.
yield encoder.encode(
                StateSnapshotEvent(
                    message_id=message_id,
                    snapshot={
                        "status": {
                            "phase": "initialized",
                            "error": None,
                            "timestamp": datetime.now().isoformat()
                        },
                        "search": {
                            "query": query,
                            "location": query,  # Assuming the query is the location
                            "stage": "not_started",
                            "restaurants_found": 0,
                            "restaurants": [],  # Initialize with empty array
                            "completed": False
                        },                        "processing": {
                            "progress": 0,
                            "phases": ["search", "recommend", "feedback"],  # Task-based workflow
                            "currentPhase": "",
                            "recommendations": None,
                            "completed": False,
                            "inProgress": False,
                            "feedback": None
                        },
                        "ui": {
                            "showRestaurants": False,
                            "showProgress": True,
                            "activeTab": "chat",
                            "showFeedbackPrompt": False,
                            "feedbackOptions": [
                                "Thanks, these look great!",
                                "Can you show me more options?",
                                "Do you have any cheaper restaurants?",
                                "I'd like more fine dining options"
                            ]
                        }
                    }
                )
            )
Then use the CopilotKit useCoAgent hook to share the AG-UI CrewAI agent backend state with your frontend, as shown in the src/app/components/RestaurantFinder.tsx file.
import { useCoAgent} from "@copilotkit/react-core";

    function RestaurantFinder() {

    // Connect to the agent's state using CopilotKit's useCoAgent hook
  const {
    state,
    stop: stopRestaurantAgent,
    setState,
  } = useCoAgent<RestaurantFinderAgentState>({
    name: "restaurantFinderAgent",
    initialState: {
      status: { phase: "idle", error: null },
      search: {
        query: "",
        location: "",
        stage: "not_started",
        restaurants_found: 0,
        restaurants: [],
        completed: false,
      },
      processing: {
        progress: 0,
        recommendations: null,
        completed: false,
        inProgress: false,
        currentPhase: "",
        phases: ["search", "recommend", "feedback"],
      },
      ui: {
        showRestaurants: false,
        showProgress: false,
        activeTab: "chat",
        showFeedbackPrompt: false,
        feedbackOptions: [
          "Thanks for the recommendations! These look perfect.",
          "Can you suggest more restaurants with different cuisines?",
          "I'm looking for more budget-friendly dining options.",
          "I prefer upscale fine dining experiences. Any suggestions?",
          "Are there any restaurants with unique dining experiences?",
        ],
      },
    },
  });
Next, render the AG-UI CrewAI agent's state in the chat UI. This is useful for informing the user about the agent's state in a more in-context way. To do this, you can use the useCoAgentStateRender hook.
// Implement useCoAgentStateRender hook for real-time UI updates
useCoAgentStateRender({
name: "restaurantFinderAgent",
handler: ({ nodeName }) => {
// Stop the agent when the "__end__" node is reached
if (nodeName === "__end__") {
setTimeout(() => {
isProcessingInProgress.current = false;
stopRestaurantAgent();
}, 1000);
}
},
render: ({ status }) => {
if (status === "inProgress") {
isProcessingInProgress.current = true;
return (
<div className="restaurant-search-in-progress bg-white p-4 rounded-lg shadow-sm border border-gray-200">
<div className="flex items-center gap-2 mb-3">
<div className="animate-spin h-4 w-4 border-2 border-blue-500 border-t-transparent rounded-full"></div>
<span className="font-medium">{getStatusText()}</span>
</div>
<div className="status-container mb-3">
<div className="w-full bg-gray-200 rounded-full h-2.5">
<div
className="bg-blue-600 h-2.5 rounded-full transition-all duration-500"
style={{
width: `${(state?.processing?.progress || 0) * 100}%`,
}}></div>
</div>
</div>
{state?.search?.restaurants_found > 0 && (
<div className="text-xs text-gray-500 flex items-center gap-1.5">
<span className="text-blue-500">🔎</span>
Found {state.search.restaurants_found} restaurant
{state.search.restaurants_found !== 1 ? "s" : ""}
</div>
)}
</div>
);
}
// When processing is complete, don't return any UI from this render function
// The main component will handle showing results
if (status === "complete") {
isProcessingInProgress.current = false;
return null;
}
return null;
},
});To add the human-in-the-loop breakpoint in AG-UI protocol, you need to use tool call events that an agent can use to trigger frontend actions that request user feedback.
When the AG-UI CrewAI restaurant agent needs to ask for user feedback on restaurant recommendations, it makes a standardized sequence of tool events, as shown below.
# Emit provideFeedback tool call to trigger feedback UI
        tool_call_id = f"call_{str(uuid.uuid4())[:8]}"
        print("Starting provideFeedback tool call with ID:", tool_call_id)

        yield encoder.encode(
            ToolCallStartEvent(
                message_id=message_id,
                tool="provideFeedback",
                toolCallId=tool_call_id,
                toolCallName="provideFeedback",
                delta=""
            )
        )

        # Create feedback arguments
        feedback_args = {
            "feedbackOptions": [
                "Thanks, these look great!",
                "Can you show me more options?",
                "Do you have any cheaper restaurants?",
                "I'd like more fine dining options"
            ],
            "message": "How do you feel about these recommendations?"
        }

        print("Sending provideFeedback tool call args:", feedback_args)

        # Send tool call args event with feedback options
        yield encoder.encode(
            ToolCallArgsEvent(
                message_id=message_id,
                toolCallId=tool_call_id,
                toolCallName="provideFeedback",
                args=feedback_args,
                delta=""
            )
        )

        # End the tool call before finishing the run
        yield encoder.encode(
            ToolCallEndEvent(
                message_id=message_id,
                toolCallId=tool_call_id,
                toolCallName="provideFeedback",
                delta=""
            )
        )
To allow the AG-UI CrewAI restaurant agent to request human input or feedback during execution in the frontend, you need to use the CopilotKit useCopilotKitAction hook. The renderAndWaitForResponse method allows returning values asynchronously from the render function, as shown in the src/app/components/RestaurantFinder.tsx file
This is great for Human-in-the-Loop flows, where the AI assistant can prompt the end-user with a choice (rendered inside the chat UI), and the user can choose by pressing a button in the chat UI.
import { useCopilotAction } from "@copilotkit/react-core";

    // Implement useCopilotAction for human-in-the-loop feedback
  useCopilotAction({
    name: "provideFeedback",
    description:
      "Allow the user to provide feedback on restaurant recommendations",
    parameters: [
      {
        name: "feedbackOptions",
        type: "string[]",
        description: "List of feedback options for the user to choose from",
        required: true,
      },
      {
        name: "message",
        type: "string",
        description:
          "A message to display to the user when asking for feedback",
        required: true,
      },
    ],
    renderAndWaitForResponse: ({ args, respond }) => {
      console.log("provideFeedback action called with full args:", args);

      // Parse the args - no need to check for nested args
      let feedbackOptions = args?.feedbackOptions;
      let message = args?.message;

      console.log("Extracted values:", {
        feedbackOptions,
        message,
        respondIsAvailable: !!respond,
      }); // Default values if none provided
      if (!Array.isArray(feedbackOptions)) {
        feedbackOptions = [
          "Thank you for the recommendations! These look perfect.",
          "Can you suggest more restaurants with different cuisines?",
          "I'm looking for more budget-friendly dining options.",
          "I prefer upscale fine dining experiences. Any suggestions?",
          "Are there any restaurants with unique dining experiences?",
        ];
      }

      if (!message) {
        message = "How do you feel about these recommendations?";
      }

      if (!respond) {
        return <div>Loading feedback options...</div>;
      }
      return (
        <div className="feedback-section mt-6 pt-4 border-t border-gray-200">
          <div className="mb-3">
            <div className="flex items-center gap-2 mb-2">
              <span className="text-blue-500 text-xl">💬</span>
              <span className="font-medium text-blue-600">
                Restaurant Recommendation Specialist
              </span>
            </div>
            <h3 className="text-lg font-medium mb-2">
              {message || "How do you feel about these recommendations?"}
            </h3>
          </div>
          <div className="flex flex-wrap gap-2">
            {feedbackOptions.map((option, index) => (
              <button
                key={index}
                className="px-4 py-2 bg-gray-50 hover:bg-gray-100 text-gray-800 rounded-full text-sm border border-gray-200 transition-colors"
                onClick={() => {
                  // Update UI state to show processing
                  setState(() => {
                    return {
                      ...state,
                      processing: {
                        ...state.processing,
                        inProgress: true,
                      },
                      status: {
                        ...state.status,
                        phase: "processing_feedback",
                      },
                    };
                  });

                  // Get the original location from state
                  const originalLocation = state?.search?.location || "";

                  // Create a properly structured feedback object
                  const feedbackObject = {
                    feedbackText: option,
                    originalLocation: originalLocation,
                  };

                  // Convert the object to a JSON string
                  const feedbackJsonString = JSON.stringify(feedbackObject);

                  console.log(`Sending feedback: ${feedbackJsonString}`);

                  // Send the JSON string - backend will parse this
                  respond(feedbackJsonString);
                }}>
                {option}
              </button>
            ))}
          </div>
        </div>
      );
    },
  });
Then navigate to http://localhost:3000/copilotkit, add “San Francisco, CA” to the chat, and press “Enter.” You should see the AG-UI CrewAI agent state rendered in the UI. Then the agent will present restaurant recommendations and ask for your feedback, as shown below.
In this guide, we have walked through the steps of adding a frontend to any AI agents framework using AG-UI protocol and CopilotKit.
While we’ve explored a couple of features, we have barely scratched the surface of the countless use cases for CopilotKit, ranging from building interactive AI chatbots to building agentic solutions—in essence, CopilotKit lets you add a ton of useful AI capabilities to your products in minutes.
Hopefully, this guide makes it easier for you to integrate AI-powered Copilots into your existing application.
Follow CopilotKit on Twitter and say hi, and if you'd like to build something cool, join the Discord community.
Subscribe to our blog and get updates on CopilotKit in your inbox.
