
Get early access

In this guide, you will learn how to build a frontend for your Agent Development Kit (ADK) Agents using AG-UI Protocol and CopilotKit. ADK will power the AI agents backend, while CopilotKit powers the frontend, and then AG-UI creates a bridge that enables the frontend to communicate with the backend.
This is essentially a quickstart guide to help you get started fast, and to see how the agent <> user pieces fully fit together.
Before we jump in, we want to give a special shoutout to Mark Fogle and Syed Fakher for initially building the ADK/AG-UI integration. With that said, here is what we will cover:
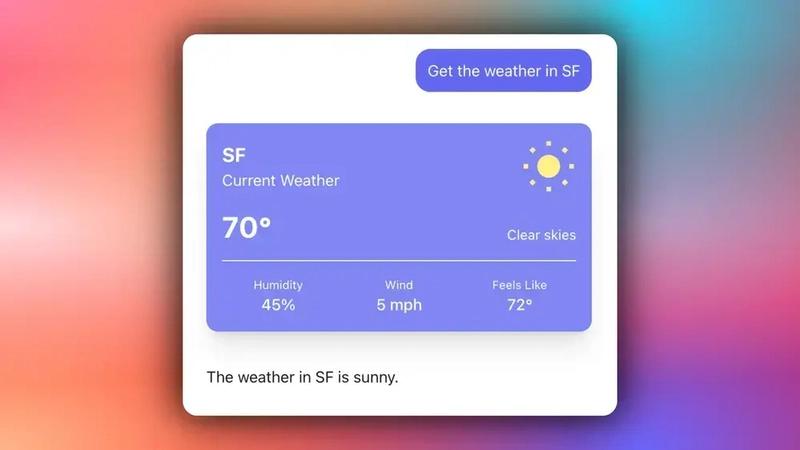
Here is a preview of what you can build when you bring your ADK agent to the frontend using AG-UI + CopilotKit.
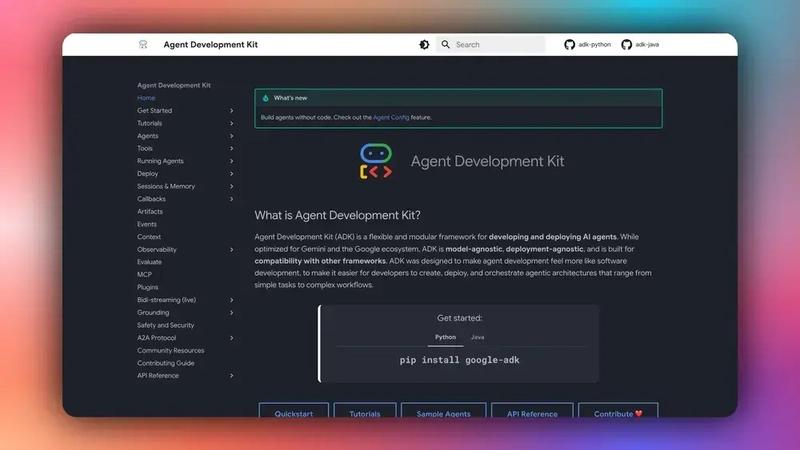
Agent Development Kit (ADK) is an open-source framework designed to simplify the process of building complex and production-ready AI agents.
Out of the box, ADK equips your AI agents with:
With ADK, you can go from an idea into a working prototype within hours, while maintaining complete flexibility to extend and customize your AI agent.
If you want to dive deeper, check out the ADK docs.
Now that you have learned about ADK, let's see how to use it together with AG-UI and CopilotKit to build full-stack AI agents.
To fully understand this tutorial, you need to have a basic understanding of React or Next.js
We'll also make use of the following:
Check out the CopilotKit ⭐️ GitHub
In this section, you will learn how to set up a full-stack ADK agent using a CLI command that sets up the backend using AG-UI protocol and the frontend using CopilotKit. This flow is fully covered in the Getting Started guide within the CopilotKit docs.
Let’s dive in.
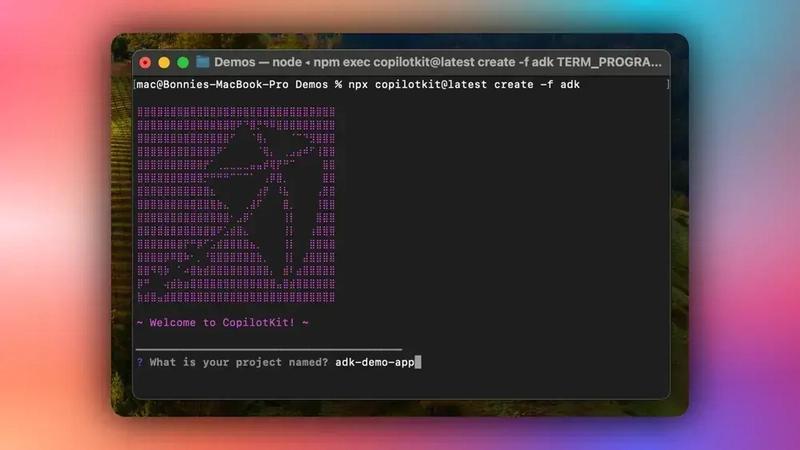
If you don’t already have an ADK agent, you can set up one quickly by running the CLI command below in your terminal.
npx copilotkit@latest create -f adkThen give your project a name as shown below.
Once your project has been created successfully, install dependencies using your preferred package manager:
# Using pnpm (recommended)
pnpm install

# Using npm
npm install

# Using yarn
yarn install

# Using bun
bun installAfter installing the dependencies, create a .env file in the root folder and add your [Gemini API key].(https://makersuite.google.com/app/apikey)
GOOGLE_API_KEY="your-google-api-key-here"Then start the development server using your preferred package manager:
# Using pnpm
pnpm dev

# Using npm
npm run dev

# Using yarn
yarn dev

# Using bun
bun run dev
Once the development server is running, navigate to http://localhost:3000/ and you should see your ADK + AG-UI + CopilotKit agent up and running.
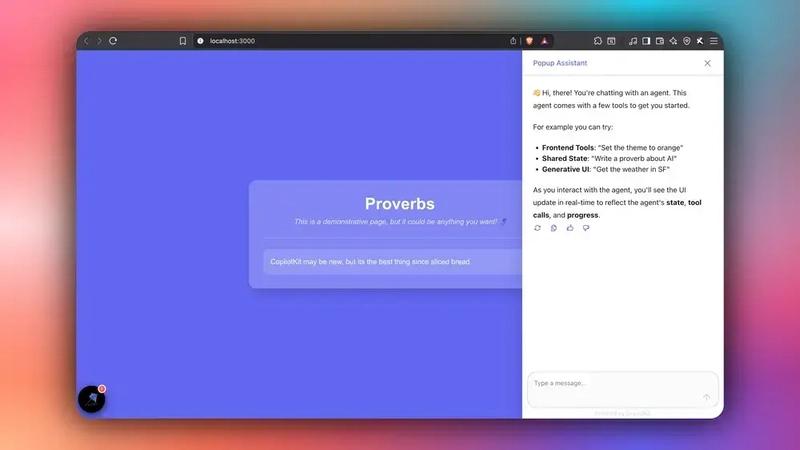
Congrats! You've successfully integrated an ADK Agent chatbot into your application. To start, try the provided tools to set the web page theme, write proverbs, or get the weather, as shown below.
In this section, you will learn how your ADK agent is integrated with the AG-UI protocol and exposed to the frontend as an ASGI application.
Let’s jump in.
To get started, install the AG-UI ADK package together with other necessary dependencies, such as FastAPI and uvicorn, in order to use them to run your ADK agent.
pip install ag_ui_adk uvicorn fastapiOnce you have installed the AG-UI package, configure your ADK agent by defining the agent name, specifying Gemini 2.5 Flash as the Large Language Model (LLM), and defining the agent’s instructions, as shown below in the ./agent.py file.
# Import core ADK (Agent Development Kit) components
from google.adk.agents import LlmAgent
from google.adk.agents.callback_context import CallbackContext
from google.adk.sessions import InMemorySessionService, Session
from google.adk.runners import Runner
from google.adk.events import Event, EventActions
from google.adk.tools import FunctionTool, ToolContext
from google.genai.types import Content, Part, FunctionDeclaration
from google.adk.models import LlmResponse, LlmRequest
from google.genai import types
// ...
proverbs_agent = LlmAgent(
# Define the agent name for identification
name="ProverbsAgent",
# Specify the LLM model to use (Gemini 2.5 Flash)
    model="gemini-2.5-flash",

    # Step 10c: Define the agent's core instructions and behavior
    instruction=f"""
    When a user asks you to do anything regarding proverbs, you MUST use the set_proverbs tool.

    IMPORTANT RULES ABOUT PROVERBS AND THE SET_PROVERBS TOOL:
    1. Always use the set_proverbs tool for any proverbs-related requests
    2. Always pass the COMPLETE LIST of proverbs to the set_proverbs tool. If the list had 5 proverbs and you removed one, you must pass the complete list of 4 remaining proverbs.
    3. You can use existing proverbs if one is relevant to the user's request, but you can also create new proverbs as required.
    4. Be creative and helpful in generating complete, practical proverbs
    5. After using the tool, provide a brief summary of what you created, removed, or changed.

    Examples of when to use the set_proverbs tool:
    - "Add a proverb about soap" → Use the tool with an array containing the existing list of proverbs with the new proverb about soap at the end.
    - "Remove the first proverb" → Use a tool with an array containing all of the existing proverbs except the first one.
    - "Change any proverbs about cats to mention that they have 18 lives." → If no proverbs mention cats, do not use the tool. If one or more proverbs mention cats, change them to mention cats having 18 lives, and use the tool with an array of all of the proverbs, including ones that were changed and ones that did not require changes.

    Do your best to ensure proverbs plausibly make sense.

    IMPORTANT RULES ABOUT WEATHER AND THE GET_WEATHER TOOL:
    1. Only call the get_weather tool if the user asks you for the weather in a given location.
    2. If the user does not specify a location, you can use the location "Everywhere ever in the whole wide world"

    Examples of when to use the get_weather tool:
    - "What's the weather today in Tokyo?" → Use the tool with the location "Tokyo"
    - "What's the weather right now?" → Use the location "Everywhere ever in the whole wide world"
    - "Is it raining in London?" → Use the tool with the location "London"
    """,

    # Register the available tools that the agent can use
    tools=[set_proverbs, get_weather],

    # Register callback functions for different lifecycle events
    before_agent_callback=on_before_agent,        # Runs before processing starts
    before_model_callback=before_model_modifier,  # Runs before LLM call
    after_model_callback=simple_after_model_modifier  # Runs after LLM responds
)</span>    # Specify the LLM model to use (Gemini 2.5 Flash)
    model="gemini-2.5-flash",

    # Step 10c: Define the agent's core instructions and behavior
    instruction=f"""
    When a user asks you to do anything regarding proverbs, you MUST use the set_proverbs tool.

    IMPORTANT RULES ABOUT PROVERBS AND THE SET_PROVERBS TOOL:
    1. Always use the set_proverbs tool for any proverbs-related requests
    2. Always pass the COMPLETE LIST of proverbs to the set_proverbs tool. If the list had 5 proverbs and you removed one, you must pass the complete list of 4 remaining proverbs.
    3. You can use existing proverbs if one is relevant to the user's request, but you can also create new proverbs as required.
    4. Be creative and helpful in generating complete, practical proverbs
    5. After using the tool, provide a brief summary of what you created, removed, or changed.

    Examples of when to use the set_proverbs tool:
    - "Add a proverb about soap" → Use the tool with an array containing the existing list of proverbs with the new proverb about soap at the end.
    - "Remove the first proverb" → Use a tool with an array containing all of the existing proverbs except the first one.
    - "Change any proverbs about cats to mention that they have 18 lives." → If no proverbs mention cats, do not use the tool. If one or more proverbs mention cats, change them to mention cats having 18 lives, and use the tool with an array of all of the proverbs, including ones that were changed and ones that did not require changes.

    Do your best to ensure proverbs plausibly make sense.

    IMPORTANT RULES ABOUT WEATHER AND THE GET_WEATHER TOOL:
    1. Only call the get_weather tool if the user asks you for the weather in a given location.
    2. If the user does not specify a location, you can use the location "Everywhere ever in the whole wide world"

    Examples of when to use the get_weather tool:
    - "What's the weather today in Tokyo?" → Use the tool with the location "Tokyo"
    - "What's the weather right now?" → Use the location "Everywhere ever in the whole wide world"
    - "Is it raining in London?" → Use the tool with the location "London"
    """,

    # Register the available tools that the agent can use
    tools=[set_proverbs, get_weather],

    # Register callback functions for different lifecycle events
    before_agent_callback=on_before_agent,        # Runs before processing starts
    before_model_callback=before_model_modifier,  # Runs before LLM call
    after_model_callback=simple_after_model_modifier  # Runs after LLM responds
)</span>After configuring your ADK agent, create an ADK middleware agent instance that wraps your ADK agent to integrate it with AG-UI protocol, as shown below in the ./agent.py file.
# Import ADK middleware components from AG-UI
from ag_ui_adk import ADKAgent

// ...

adk_proverbs_agent = ADKAgent(
    adk_agent=proverbs_agent,           # Your ADK agent
    app_name="proverbs_app",            # Application identifier
    user_id="demo_user",                # User identifier for session management
    session_timeout_seconds=3600,       # Session expires after 1 hour of inactivity
    use_in_memory_services=True         # Use memory-based services (good for demos)
)Once you have created an ADK middleware agent instance, configure a FastAPI endpoint that exposes your AG-UI wrapped ADK agent to the frontend.
# FastAPI for web framework
from fastapi import FastAPI
AG-UI ADK imports for agent functionality
from ag_ui_adk import ADKAgent, add_adk_fastapi_endpoint
Create FastAPI app instance
app = FastAPI(title="ADK Middleware Proverbs Agent")
Add the ADK endpoint to the FastAPI app
add_adk_fastapi_endpoint(app, adk_proverbs_agent, path="/")
Main execution block
if name == "main":
import os
import uvicorn
# Check for required environment variable
if not os.getenv("GOOGLE_API_KEY"):
    print("⚠️  Warning: GOOGLE_API_KEY environment variable not set!")
    print("   Set it with: export GOOGLE_API_KEY='your-key-here'")
    print("   Get a key from: https://makersuite.google.com/app/apikey")
    print()

# Get port from environment or default to 8000
port = int(os.getenv("PORT", 8000))
# Run the FastAPI app with the uvicorn server
uvicorn.run(app, host="0.0.0.0", port=port)</span>
Congrats! You've successfully integrated your ADK Agent and AG-UI protocol, and it is available at http://localhost:8000 (or specified port) endpoint. Let’s now see how to add a frontend to your AG-UI wrapped ADK agent.
In this section, you will learn how to add a frontend to your ADK + AG-UI agent using CopilotKit, which runs anywhere that React runs.
Let’s get started.
To get started, install the latest packages for CopilotKit into your frontend.
npm install @copilotkit/react-ui @copilotkit/react-core @copilotkit/runtimeOnce you have installed CopilotKit packages, set up the Copilot runtime instance with an HttpAgent instance in the /api/copilotkit API route that enables your frontend to make HTTP requests to the backend.
import {
  CopilotRuntime, // Main runtime that manages agent communication
  ExperimentalEmptyAdapter, // Service adapter for single-agent setups
  copilotRuntimeNextJSAppRouterEndpoint, // Next.js App Router endpoint handler
} from "@copilotkit/runtime";

// Import AG-UI client for connecting to ADK agents
import { HttpAgent } from "@ag-ui/client";

// Import Next.js types for request handling
import { NextRequest } from "next/server";

// Create a service adapter for the CopilotKit runtime
const serviceAdapter = new ExperimentalEmptyAdapter();

// Create the main CopilotRuntime instance that manages communication between the frontend and backend agents
const runtime = new CopilotRuntime({

  // Define the agents that will be available to the frontend
    agents: {

    // Configure the ADK agent connection
    my_agent: new HttpAgent({

      // Specify the URL where the ADK agent is running
      url: "http://localhost:8000/",
    }),
  },
});

// Export the POST handler for the API route
export const POST = async (req: NextRequest) => {

  // Create the request handler using CopilotKit's Next.js helper
  const { handleRequest } = copilotRuntimeNextJSAppRouterEndpoint({
    runtime, // The CopilotRuntime instance we configured
    serviceAdapter, // The service adapter for agent coordination
    endpoint: "/api/copilotkit", // The endpoint path (matches this file's location)
  });


  return handleRequest(req);
};After setting up a Copilot Runtime instance, set up the CopilotKit provider component that manages your ADK agent sessions.
To set up the CopilotKit Provider, the [<CopilotKit>](https://docs.copilotkit.ai/reference/components/CopilotKit) component must wrap the Copilot-aware parts of your application.
For most use cases, it's appropriate to wrap the CopilotKit provider around the entire app, e.g., in your layout.tsx file.
// Step 1: Import necessary types and components from Next.js and CopilotKit
import type { Metadata } from "next";

import { CopilotKit } from "@copilotkit/react-core";
import "./globals.css";
import "@copilotkit/react-ui/styles.css";

// Step 2: Define metadata for the application, used by Next.js for SEO and page headers
export const metadata: Metadata = {
  title: "Create Next App",
  description: "Generated by create next app",
};

// Step 3: Define the RootLayout component, which wraps the entire application
export default function RootLayout({
  children,
}: Readonly<{
  children: React.ReactNode;
}>) {
  // Step 4: Return the JSX structure for the layout
  return (
    <html lang="en">
      <body className={"antialiased"}>
        {/* Step 5: Wrap the children components with CopilotKit provider to enable CopilotKit functionality */}
        <CopilotKit runtimeUrl="/api/copilotkit" agent="my_agent">
          {children}
        </CopilotKit>
      </body>
    </html>
  );
}Once you have set up the CopilotKit Provider, set up a Copilot UI component that enables you to interact with your ADK agent. CopilotKit ships with several built-in chat components, which include CopilotPopup, CopilotSidebar, and CopilotChat.
To set up a Copilot UI component, define it alongside your core page components, e.g., in your page.tsx file.
"use client";

import { CopilotKitCSSProperties, CopilotSidebar } from "@copilotkit/react-ui";
import { useState } from "react";

export default function CopilotKitPage() {
  const [themeColor, setThemeColor] = useState("#6366f1");

  // ...

  return (
    <main style={{ "--copilot-kit-primary-color": themeColor } as CopilotKitCSSProperties}>
      <YourMainContent themeColor={themeColor} />
      <CopilotSidebar
        clickOutsideToClose={false}
        defaultOpen={true}
        labels={{
          title: "Popup Assistant",
          initial: "👋 Hi, there! You're chatting with an agent. This agent comes with a few tools to get you started.\n\nFor example you can try:\n- **Frontend Tools**: \"Set the theme to orange\"\n- **Shared State**: \"Write a proverb about AI\"\n- **Generative UI**: \"Get the weather in SF\"\n\nAs you interact with the agent, you'll see the UI update in real-time to reflect the agent's **state**, **tool calls**, and **progress**."
        }}
      />
    </main>
  );
}After setting up a Copilot UI component, sync your ADK agent state with the frontend using CopilotKit hooks.
To sync your ADK agent state with the frontend, use the CopilotKit useCoAgent hook that allows you to share state bidirectionally between your application and the agent.
"use client";

import { useCoAgent } from "@copilotkit/react-core";

// State of the agent, make sure this aligns with your agent's state.
type AgentState = {
  proverbs: string[];
}

function YourMainContent({ themeColor }: { themeColor: string }) {

  // 🪁 Shared State: https://docs.copilotkit.ai/coagents/shared-state
  const { state, setState } = useCoAgent<AgentState>({
    name: "my_agent",
    initialState: {
      proverbs: [
        "CopilotKit may be new, but it's the best thing since sliced bread.",
      ],
    },
  })

     // ...
  return (

  // ...
  )
To render your agent's state, progress, outputs, or tool calls with custom UI components in real-time, you can use tool-based Generative UI.
"use client";
import { useCoAgent, useCopilotAction } from "@copilotkit/react-core";
// ...
function YourMainContent({ themeColor }: { themeColor: string }) {
// ...
//🪁 Generative UI: https://docs.copilotkit.ai/coagents/generative-ui
useCopilotAction({
name: "get_weather",
description: "Get the weather for a given location.",
available: "disabled",
parameters: [
{ name: "location", type: "string", required: true },
],
render: ({ args }) => {
return <WeatherCard location={args.location} themeColor={themeColor} />
},
});
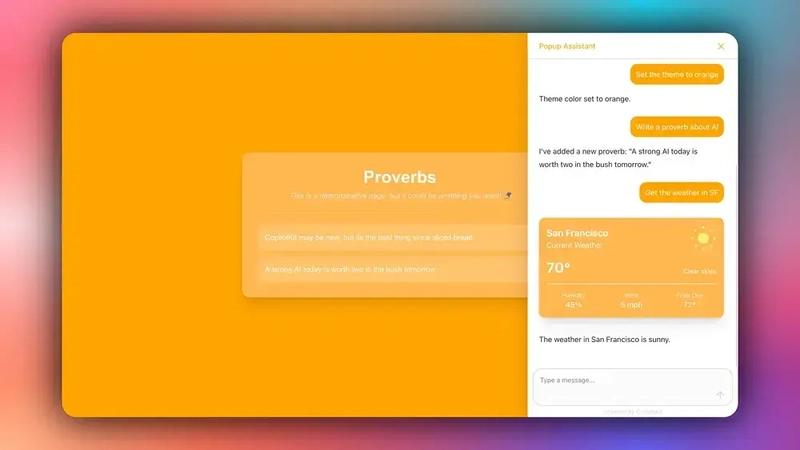
return ( ... )Then try asking the agent to get the weather for a location. You should see the custom UI component that we added to render the get weather tool call and display the arguments that were passed to the tool.
Once you have synced your ADK agent state with the frontend, stream your ADK agent responses or results in the frontend.
To stream your ADK agent responses or results in the frontend, pass the agent’s state field values to the frontend components, as shown below.
"use client";

import { useCoAgent } from "@copilotkit/react-core";

// State of the agent, make sure this aligns with your agent's state.
type AgentState = {
  proverbs: string[];
}

function YourMainContent({ themeColor }: { themeColor: string }) {
  // 🪁 Shared State: https://docs.copilotkit.ai/coagents/shared-state
  const { state, setState } = useCoAgent<AgentState>({
    name: "my_agent",
    initialState: {
      proverbs: [
        "CopilotKit may be new, but it's the best thing since sliced bread.",
      ],
    },
  })

  // ...

  return (
    <div
      style={{ backgroundColor: themeColor }}
      className="h-screen w-screen flex justify-center items-center flex-col transition-colors duration-300"
    >
      <div className="bg-white/20 backdrop-blur-md p-8 rounded-2xl shadow-xl max-w-2xl w-full">
        <h1 className="text-4xl font-bold text-white mb-2 text-center">Proverbs</h1>
        <p className="text-gray-200 text-center italic mb-6">This is a demonstrative page, but it could be anything you want! 🪁</p>
        <hr className="border-white/20 my-6" />
        <div className="flex flex-col gap-3">
          {state.proverbs?.map((proverb, index) => (
            <div
              key={index}
              className="bg-white/15 p-4 rounded-xl text-white relative group hover:bg-white/20 transition-all"
            >
              <p className="pr-8">{proverb}</p>
              <button
                onClick={() => setState({
                  ...state,
                  proverbs: state.proverbs?.filter((_, i) => i !== index),
                })}
                className="absolute right-3 top-3 opacity-0 group-hover:opacity-100 transition-opacity
                  bg-red-500 hover:bg-red-600 text-white rounded-full h-6 w-6 flex items-center justify-center"
              >
                ✕
              </button>
            </div>
          ))}
        </div>
        {state.proverbs?.length === 0 && <p className="text-center text-white/80 italic my-8">
          No proverbs yet. Ask the assistant to add some!
        </p>}
      </div>
    </div>
  );
}
If you query your ADK agent, you should see the agent’s response or results streaming in the UI, as shown below.

In this guide, we have walked through the steps of building a frontend for your ADK agent using AG-UI protocol and CopilotKit.
While we’ve explored a couple of features, we have barely scratched the surface of the countless use cases for CopilotKit, ranging from building interactive AI chatbots to building agentic solutions—in essence, CopilotKit lets you add a ton of useful AI capabilities to your products in minutes.
Hopefully, this guide makes it easier for you to integrate AI-powered Copilots into your existing application.
Follow CopilotKit on Twitter and say hi, and if you'd like to build something cool, join the Discord community.
Subscribe to our blog and get updates on CopilotKit in your inbox.
