
Get early access
AI agents are getting close to real world applications, but most developers still find it complex to build one.
So we are going to build two practical agents: Post Generator that drafts LinkedIn/X content using live web search & Stack Analyzer that inspects GitHub repos and creates structured reports.
We will be using Next.js frontend, FastAPI backend, CopilotKit, LangGraph workflows, and Google Gemini. You will find architecture, concepts, prompts, and practical stuff.
Let's build it.
Check out the CopilotKit GitHub ⭐️
We are building two practical agents using a full-stack setup:
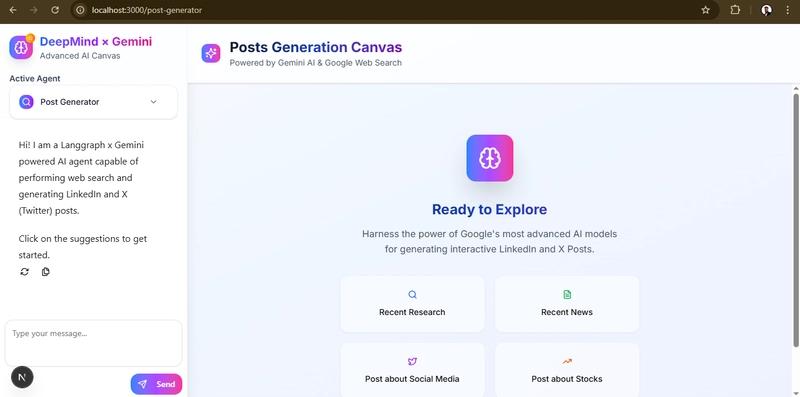
✅ Post Generator Agent : creates LinkedIn/X posts grounded in live Google Search results.
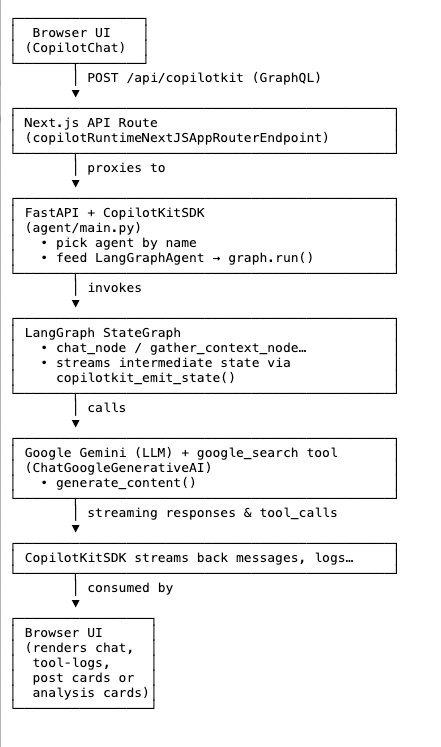
Here's a simplified call sequence of what will happen when a user generates a post.
[User types prompt]
↓
Next.js UI (CopilotChat)
↓ (POST /api/copilotkit → GraphQL)
Next.js API route (copilotkit)
↓ (forwards)
FastAPI backend (/copilotkit)
↓ (LangGraph workflow)
Post Generator graph nodes
↓ (calls → Google Gemini + web search)
Streaming responses & tool-logs
↓
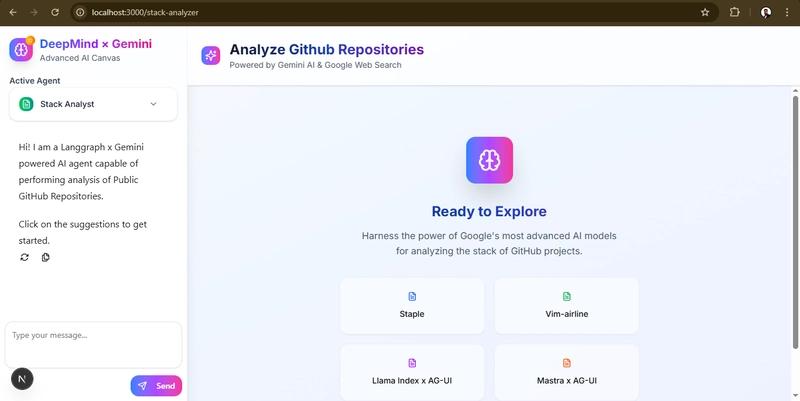
Frontend UI renders chat + tool logs + final postcards✅ Stack Analyzer Agent: analyzes a public GitHub repo (metadata, README, code manifests) and infers its stack.
Here's a simplified call sequence of what will happen when a user analyzes the tech stack of a repo.
[User pastes GitHub URL]
     ↓
Next.js UI (/stack-analyzer)
     ↓
/api/copilotkit → FastAPI
     ↓
Stack Analysis graph nodes (gather_context → analyze → end)
     ↓
Streaming tool-logs & structured analysis cards
Here's what we'll be building!
At the core, we are going to use this stack for building these agents.
@copilotkit/react-core, @copilotkit/runtime, @copilotkit/react-ui)Here's the high-level architecture of the project.
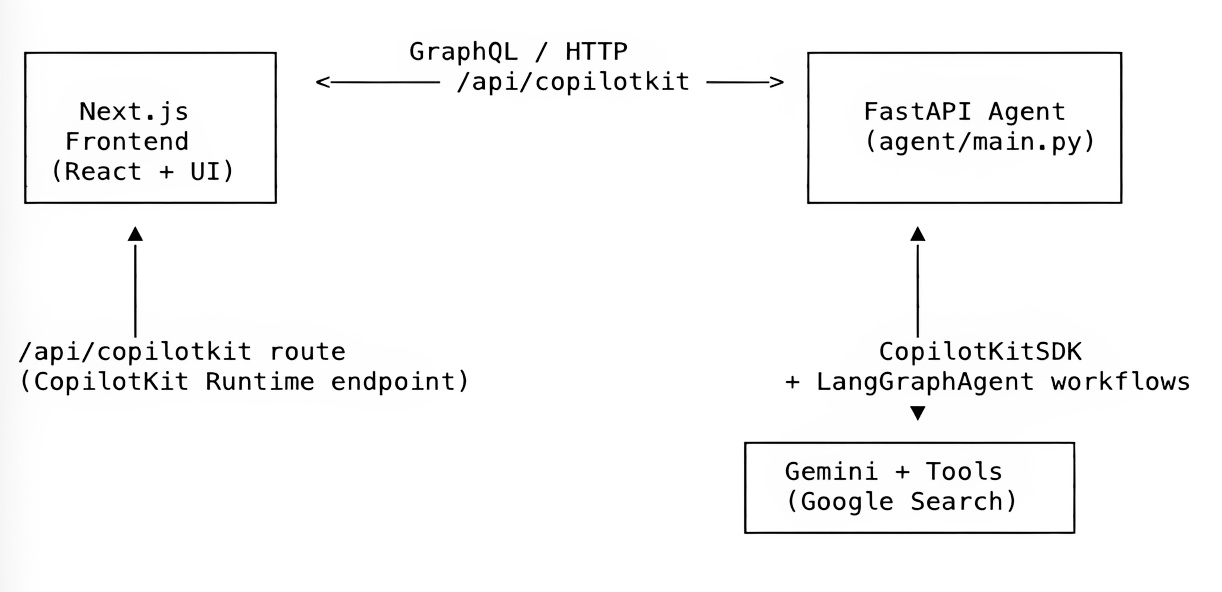
This is how our directory will look. The agent directory will hold the Python/FastAPI backend hosting the LangGraph agents, and the frontend directory hosts the Next.js 15 application, including UI routes, API routes, and shared components.
.
├── assets/
├── frontend/                ← Next.js 15 App (UI + API routes)
│   ├── app/
│   │   ├── layout.tsx       ← Wraps the app with <CopilotKit>
│   │   ├── post-generator/  ← Post Generator UI routes
│   │   ├── stack-analyzer/  ← Stack Analyzer UI routes
│   │   └── api/             ← Next.js API routes used by the UI
│   │   ...
│   ├── contexts/LayoutContext.tsx
│   ├── wrapper.tsx            ← CopilotKit provider wrapper
│   ├── components/          ← Shared UI components
│   │   ...
├── agent/                   ← FastAPI + LangGraph “agents” (Python)
│   ├── main.py              ← Registers agents and exposes them via FastAPI
│   ├── posts_generator_agent.py  ← Workflow for content creation agent
│   ├── stack_agent.py       ← Workflow for repo analysis agent
│   ├── prompts.py           ← Shared prompt templates
│   ├── agent.py             ← Core agent classes and helpers
│   ...
└── README.md                ← Project overview and setup instructions
Here's the GitHub repository and deployed live at copilot-kit-deepmind.vercel.app if you want to explore yourself. I will be covering the implementation with all the key concepts in the following sections.
The easiest way to follow along is to clone the repo but I'm explaining how to build it from scratch.
git clone https://github.com/CopilotKit/CopilotKit-Deepmind.git
cd copilotkit-deepmindCreate a .env file under both the agent & frontend directory and add your Gemini API Key to the file. I've attached the docs link so it's easy to follow.
The naming convention is the same for both directories.
GOOGLE_API_KEY=<<your-gemini-key-here>>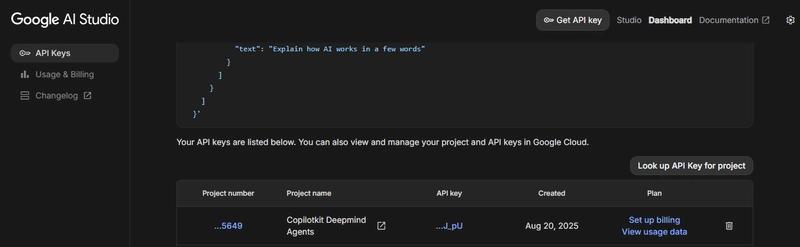
Let's create the frontend. I'm attaching the project structure of the frontend again so it's easier for you to follow the whole layout.
frontend/
├── app/
│   ├── page.tsx               ← landing redirect
│   ├── post-generator/page.tsx← Post Generator UI
│   ├── stack-analyzer/page.tsx← Stack Analyzer UI
│   ├── api/
│   │   ├── copilotkit/route.ts← CopilotKit router endpoint
│   │   └── chat/route.ts      ← OpenAI research demo
│   ├── contexts/LayoutContext.tsx
│   ├── wrapper.tsx            ← CopilotKit provider wrapper
│   └── prompts/prompts.ts     ← UI prompt templates
├── components/…                ← shared UI components (tool-logs, cards, posts…)
└── layout.tsx, globals.css, etc.
If you don’t have a frontend, you can create a new Next.js app with TypeScript and then install the Copilotkit package. In the cloned repository, it’s already there, so you just need to install the dependencies using pnpm i under the frontend directory.
// creates a nextjs app with typescript
npx create-next-app@latest frontend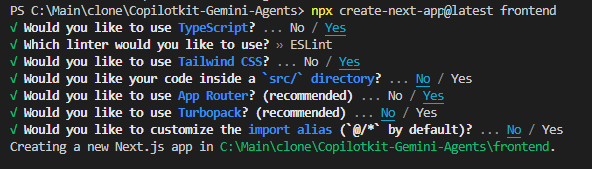
Install the necessary CopilotKit packages.
pnpm install copilotkit @copilotkit/react-core @copilotkit/react-ui @copilotkit/runtime @copilotkit/runtime-client-gqlcopilotkit is the lower-level SDK that bundles backend utilities for Python. Used here for wiring up state graphs, emitting state updates, and talking to Gemini.@copilotkit/react-core provides the core context and logic to connect your React app with the CopilotKit backend and MCP servers.@copilotkit/react-ui offers ready-made UI components like <CopilotChat /> to build AI chat or assistant interfaces quickly.@copilotkit/runtime is the server-side runtime library. Let's you declare agents, connect them to LangGraph workflows, and expose them through an API endpoint.@copilotkit/runtime-client-gql is a client for GraphQL transport. Used under the hood by the Next.js API route to proxy between the browser and your backend.
The <CopilotKit> component must wrap the Copilot-aware parts of your application. In most cases, it's best to place it around the entire app, like in layout.tsx.
The root layout wraps everything in a LayoutProvider and the CopilotKit client wrapper:
import "./globals.css"
import { LayoutProvider } from "./contexts/LayoutContext"
import Wrapper from "./wrapper"

export default function RootLayout({ children }) {
  return (
    <html lang="en">
      <LayoutProvider>
        <Wrapper>
          <body>{children}</body>
        </Wrapper>
      </LayoutProvider>
    </html>
  )
}
The LayoutProvider (frontend\app\contexts\LayoutContext.tsx) sets up a React context for layout state and picks the active agent based on the current route (/post-generator or others) using usePathname() to detect the path.
"use client"

import { usePathname } from "next/navigation"
import React, { createContext, useContext, useState } from "react"

interface LayoutState { … }

interface LayoutContextType {
  layoutState: LayoutState
  updateLayout: (updates: Partial<LayoutState>) => void
}

const LayoutContext = createContext<LayoutContextType | undefined>(undefined)

const defaultLayoutState = { agent: "post_generation_agent", … }
export function LayoutProvider({ children }) {
  const pathname = usePathname()

  const [layoutState, setLayoutState] = useState({
    ...defaultLayoutState,
    agent: (pathname == "/post-generator"
      ? "post_generation_agent"
      : "stack_analysis_agent"),
  })

  const updateLayout = (updates) =>
    setLayoutState((prev) => ({ ...prev, ...updates }))

  return (
    <LayoutContext.Provider value={{ layoutState, updateLayout }}>
      {children}
    </LayoutContext.Provider>
  )
}

export function useLayout() {
  return useContext(LayoutContext)
}
...
Here's the code for the CopilotKit client wrapper (frontend\app\wrapper.tsx). Every page is rendered inside so that UI components know which agent to call and where.
"use client"
import { CopilotKit } from "@copilotkit/react-core";
import { useLayout } from "./contexts/LayoutContext";

export default function Wrapper({ children }: { children: React.ReactNode }) {
  const { layoutState } = useLayout()
  return (
    <CopilotKit runtimeUrl="/api/copilotkit" agent={layoutState.agent}>
      {children}
    </CopilotKit>
  )
}CopilotKit Runtime endpoint available at Next.js API route app/api/copilotkit/route.ts just proxies all agent/graph calls to the FastAPI backend.
Rather than calling the Python agent directly from the browser, we introduce a thin proxy.
Why?
In this example, we are only using a single agent, but if you are looking to run multiple LangGraph agents, check the official Multi-Agent guide.
import { CopilotRuntime, copilotRuntimeNextJSAppRouterEndpoint, GoogleGenerativeAIAdapter } from "@copilotkit/runtime";
import { NextRequest } from "next/server";

// You can use any service adapter here for multi-agent support.
const serviceAdapter = new GoogleGenerativeAIAdapter();
const runtime = new CopilotRuntime({
  remoteEndpoints: [{ url: process.env.NEXT_PUBLIC_LANGGRAPH_URL || "http://localhost:8000/copilotkit" }],
});

export const POST = async (req: NextRequest) => {
  const { handleRequest } = copilotRuntimeNextJSAppRouterEndpoint({
    runtime,
    serviceAdapter,
    endpoint: "/api/copilotkit",
  });
  return handleRequest(req);
};
Here's a simple explanation of the above code:
remoteEndpoints: specifies where the agent logic lives (such as endpoint served by backend).copilotRuntimeNextJSAppRouterEndpoint: helper that wraps the incoming req and routes it to Copilot Runtime for agent processing. It returns a handleRequest method.One last thing is to redirect to /post-generator route whenever someone hits home / route at frontend\app\page.tsx.
"use client"

import "@copilotkit/react-ui/styles.css";
import { useEffect } from "react";
import { useRouter } from "next/navigation";
import { useLayout } from "./contexts/LayoutContext";

export default function GoogleDeepMindChatUI() {
  const router = useRouter();
  const { updateLayout } = useLayout();
  useEffect(() => {
    updateLayout({ agent: "post_generation_agent" });
    router.push("/post-generator");
  }, [router]);

  return (
    <></>
  )
}Let's create the frontend for Post Generator (frontend/app/post-generator/page.tsx) using the CopilotChat UI (<CopilotChat>), suggestions, and a custom action to render the final posts.
The real codebase also includes UI extras like agent switching, quick actions and live tool logs. For clarity, I have trimmed them here, so check the code for full UI.
import { CopilotChat, useCopilotChatSuggestions } from "@copilotkit/react-ui"
import { initialPrompt, suggestionPrompt } from "../prompts/prompts"

useCopilotChatSuggestions({
  available: "enabled",
  instructions: suggestionPrompt,
})

return (
  <div className="…" >
    {/* …sidebar & header omitted… */}

    {/* Chat canvas */}
    <CopilotChat
      className="h-full p-2"
      labels={{ initial: initialPrompt }}
    />

    {/* Post previews (rendered after generation) */}
    <div className="flex gap-6 mt-6">
      <LinkedInPostPreview title="Generated Title" content="Generated LinkedIn content…" />
      <XPostPreview title="Generated Title" content="Generated X content…" />
    </div>
  </div>
)
The system & suggestion prompts come from app/prompts/prompts.ts.
export const initialPrompt  = "Hi! I am a Langgraph x Gemini-powered AI agent capable of performing web search and generating LinkedIn and X (Twitter) posts.\n\n Click on the suggestions to get started."

export const suggestionPrompt = "Generate suggestions that revolve around the creation/generation of LinkedIn and X (Twitter) posts on any specific topics."
In the full UI code, we also use useCopilotAction to define a generate_post action. This is what lets the agent return structured LinkedIn/X posts, which then render into previews. For simplicity, here’s the trimmed code.
import { useCopilotAction } from "@copilotkit/react-core"
import { XPostCompact, LinkedInPostCompact } from "@/components/ui/posts"

useCopilotAction({
  name: "generate_post",
  description: "Render a LinkedIn and X post",
  parameters: {
    tweet: { title: "string", content: "string" },
    linkedIn: { title: "string", content: "string" }
  },
  render: ({ args }) => (
    <>
      {args.tweet?.content && (
        <XPostCompact title={args.tweet.title} content={args.tweet.content} />
      )}
      {args.linkedIn?.content && (
        <LinkedInPostCompact title={args.linkedIn.title} content={args.linkedIn.content} />
      )}
    </>
  )
})
For debugging, we also render tool_logs with useCoAgentStateRender, which shows live tool invocations while the agent is working.
import { useCoAgentStateRender } from "@copilotkit/react-core"
import { ToolLogs } from "@/components/ui/tool-logs"

useCoAgentStateRender({
  name: "post_generation_agent",
  render: (state) => (
    <ToolLogs logs={state?.state?.tool_logs || []} />
  )
})
Here's the final output of the code.
I'm not covering the code for basic components like Badge, textarea, x-post, linkedin-post, and button. You can check all the components in the repository at frontend/components/ui.
The stack‑analysis page (frontend/app/stack-analyzer/page.tsx) hooks into stack_analysis_agent and renders a set of cards. As previously, I have trimmed UI extras like agent switching, quick actions and live tool logs. You can check the code for full UI.
It's identical to what we did before, so I'm skipping the explanation of the code.
import { CopilotChat, useCopilotChatSuggestions } from "@copilotkit/react-ui"
import { initialPrompt1, suggestionPrompt1 } from "../prompts/prompts"
import { StackAnalysisCards } from "@/components/ui/stack-analysis-cards"
import { ToolLogs } from "@/components/ui/tool-logs"

useCoAgentStateRender({
  name: "stack_analysis_agent",
  render: (state) => <ToolLogs logs={state?.state?.tool_logs || []} />,
})

useCopilotChatSuggestions({
  available: "enabled",
  instructions: suggestionPrompt1,
})

return (
  <div className="…" >
    {/* …sidebar omitted… */}

    <CopilotChat
      className="h-full p-2"
      labels={{ initial: initialPrompt1 }}
    />

    {state.show_cards && <StackAnalysisCards analysis={state.analysis} />}
  </div>
)
The system & suggestion prompts come from app/prompts/prompts.ts.
export const initialPrompt1 = 'Hi! I am a Langgraph x Gemini-powered AI agent capable of performing analysis of Public GitHub Repositories.\n\n Click on the suggestions to get started.'

export const suggestionPrompt1 = `Generate suggestions that revolve around the analysis of Public GitHub Repositories. Only provide suggestions from these public URLs:
[
  "https://github.com/freeCodeCamp/freeCodeCamp",
  "https://github.com/EbookFoundation/free-programming-books",
  "https://github.com/jwasham/coding-interview-university",
  "https://github.com/kamranahmedse/developer-roadmap",
  "https://github.com/public-apis/public-apis",
  "https://github.com/donnemartin/system-design-primer",
  "https://github.com/facebook/react",
  "https://github.com/tensorflow/tensorflow",
  "https://github.com/trekhleb/javascript-algorithms",
  "https://github.com/twbs/bootstrap",
  "https://github.com/vinta/awesome-python",
  "https://github.com/ohmyzsh/ohmyzsh",
  "https://github.com/tldr-pages/tldr",
  "https://github.com/ytdl-org/youtube-dl",
  "https://github.com/taigaio/taiga-back"
]`
Here's the final output of the code.
I'm not covering the code for basic components like Badge, textarea, stack-analysis-cards, and button. You can check all the components in the repository at frontend/components/ui.
Under the /agent directory lives a FastAPI server that exposes two LangGraph‑based agents. Here's the project structure of the backend again, so it's easier for you to follow the whole layout.
agent/
├── main.py                  ← FastAPI + CopilotKitSDK wiring
├── posts_generator_agent.py ← “Post Generator” graph & nodes
├── stack_agent.py           ← “Stack Analysis” graph & nodes
├── prompts.py               ← system prompts
├── pyproject.toml
└── agent.py                 ← Core agent classes and helpers
The backend uses Poetry instead of requirements.txt. Install it if you don't have it in your system.
pip install poetryThen, inside your agent directory, initialize a new Poetry project using the following command.
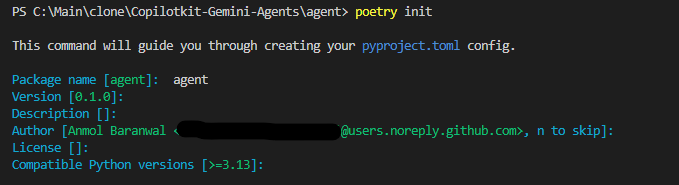
cd agent
poetry init  # creates a pyproject.toml here (answer prompts or skip with --no-interaction)
This will generate a fresh pyproject.toml and poetry.lock, which means your backend now has its own virtual environment.
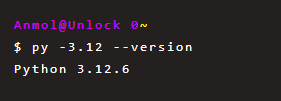
Most of the AI ecosystem (LangChain, LangGraph, Google SDKs) only supports up to Python 3.12 for now, so make sure to tell Poetry to use a compatible Python version by using this command: poetry env use python3.12.
Then install the dependencies.

fastapi: web framework for serving the agent endpoints (/copilotkit).uvicorn: the ASGI server used to run FastAPI in production or dev mode.copilotkit: the CopilotKit Python SDK that integrates LangGraph workflows with CopilotKit state streaming.langgraph: state-machine framework for defining agents as graphs of nodes (chat, analyze, end).langchain: provides core abstractions (RunnableConfig, message types, etc.) used inside nodes.langchain-google-genai: LangChain wrapper for Google Gemini models (e.g. ChatGoogleGenerativeAI).google-genai: official Google client SDK for Gemini, used for lower-level calls (e.g. genai.Client).pydantic: schema validation (StructuredStackAnalysis) to enforce strict JSON outputs.python-dotenv → loads .env files for managing API keys (like GOOGLE_API_KEY).Now run the following command to generate a poetry.lock file pinned with exact versions.
poetry install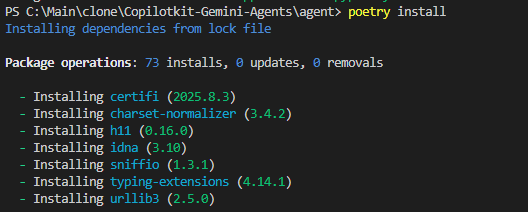
All agents live behind a single FastAPI server (agent/main.py), which mounts them on /copilotkit.
from fastapi import FastAPI
import uvicorn
from copilotkit.integrations.fastapi import add_fastapi_endpoint
from copilotkit import CopilotKitSDK, LangGraphAgent
from posts_generator_agent import post_generation_graph
from stack_agent import stack_analysis_graph

app = FastAPI()

sdk = CopilotKitSDK(
    agents=[
        LangGraphAgent(
            name="post_generation_agent",
            description="An agent that can help with the generation of LinkedIn posts and X posts.",
            graph=post_generation_graph,
        ),
        LangGraphAgent(
            name="stack_analysis_agent",
            description="Analyze a GitHub repository URL to infer purpose and tech stack (frontend, backend, DB, infra).",
            graph=stack_analysis_graph,
        ),
    ]
)

add_fastapi_endpoint(app, sdk, "/copilotkit")

# A simple endpoint to confirm the server is alive
@app.get("/healthz")
def health():
    return {"status": "ok"}

def main():
    """Run the uvicorn server."""
    port = int(os.getenv("PORT", "8000"))
    uvicorn.run(
        "main:app",
        host="0.0.0.0",
        port=port,
        reload=True,
    )

if __name__ == "__main__":
    main()
Here's what's happening behind the scenes:
post_generation_agent, stack_analysis_agent) inside CopilotKit/copilotkit so the frontend can talk to themBoth agents are expressed as LangGraph state machines, stitched together with a few async nodes.
Every agent file (whether posts_generator_agent.py or stack_agent.py) follows the same LangGraph skeleton:
StateGraphSTART → … → END)MemorySaver()But what changes is what each node actually does.
The “Post Generator” workflow is defined in posts_generator_agent.py. It wires up three nodes (chat_node, fe_actions_node, end_node) into a compiled StateGraph.
Here's the rough flow:
chat_node: invokes Google Gemini via genai.Client, optionally calls a web‑search tool, streams intermediate tool‑logs back to the UIfe_actions_node: post‑processes the chat result to generate the final LinkedIn/X postsend_node: finishes the workflowSimilarly, the “Stack Analyzer” workflow is defined in stack_agent.py. It also wires up three nodes (gather_context_node, analyze_with_gemini_node, end_node ) into a compiled StateGraph.
# OpenAI-style tool that ensures the JSON schema is enforced
@tool("return_stack_analysis", args_schema=StructuredStackAnalysis)
def return_stack_analysis_tool(**kwargs) -> Dict[str, Any]:
    """Return the final stack analysis in strict JSON."""
    # …validate and return…
    validated = StructuredStackAnalysis(**kwargs)
    return validated.model_dump(exclude_none=True)

# ...
workflow = StateGraph(StackAgentState)
workflow.add_node("gather_context", gather_context_node)
workflow.add_node("analyze", analyze_with_gemini_node)
workflow.add_node("end", end_node)
workflow.add_edge(START, "gather_context")
workflow.add_edge("gather_context", "analyze")
workflow.add_edge("analyze", END)
workflow.set_entry_point("gather_context")
workflow.set_finish_point("end")

stack_analysis_graph = workflow.compile(checkpointer=MemorySaver())
Unlike Post Generator, this agent is much larger (~500 lines). Instead of pasting everything, I will walk through each node with key snippets.
You can check the repo for the full implementation (with retries, detailed logging, and schema validation).
Each node and what they actually do:
✅ 1. gather_context_node: this node parses the GitHub URL from the user’s message, fetches metadata via the GitHub API (repo info, languages, README, root files, manifests), and stores it in state["context"] for downstream analysis.
async def gather_context_node(state: StackAgentState, config: RunnableConfig):
    last_user_content = state["messages"][-1].content if state["messages"] else ""
    parsed = _parse_github_url(last_user_content)

    if not parsed:
        return Command(goto="analyze", update={...})

    owner, repo = parsed
    repo_info = _fetch_repo_info(owner, repo)
    languages = _fetch_languages(owner, repo)
    readme = _fetch_readme(owner, repo)
    root_items = _list_root(owner, repo)
    manifests = _fetch_manifest_contents(owner, repo, repo_info.get("default_branch"), root_items)

    context = {"owner": owner, "repo": repo, "repo_info": repo_info,
               "languages": languages, "readme": readme,
               "root_files": _summarize_root_files(root_items),
               "manifests": manifests}

    return Command(goto="analyze", update={"context": context, ...})
✅ 2. analyze_with_gemini_node: builds a structured-output prompt from the repo context and asks Gemini (gemini-2.5-pro) to analyze it. Gemini is required to call the return_stack_analysis tool, which enforces a strict JSON schema.
async def analyze_with_gemini_node(state: StackAgentState, config: RunnableConfig):
    prompt = _build_analysis_prompt(state["context"])
    messages = [
        SystemMessage(content="You are a senior software architect..."),
        HumanMessage(content=prompt),
    ]

    model = ChatGoogleGenerativeAI(model="gemini-2.5-pro", temperature=0.4, ...)
    bound = model.bind_tools([return_stack_analysis_tool])
    tool_msg = await bound.ainvoke(messages, config)

    # Extract structured payload (stack details)
    for call in getattr(tool_msg, "tool_calls", []):
        if call.get("name") == "return_stack_analysis":
            args = call.get("args", {})
            state["analysis"] = json.dumps(args)
            state["show_cards"] = True
✅ 3. end_node: this final node clears tool logs and emits the finished analysis back to the UI.
async def end_node(state: StackAgentState, config: RunnableConfig):
    state["tool_logs"] = []
    await copilotkit_emit_state(config or RunnableConfig(recursion_limit=25), state)
    return Command(goto=END, update={
        "messages": state["messages"],
        "show_cards": state["show_cards"],
        "analysis": state["analysis"]
})Before wiring up graphs and nodes, agents rely heavily on prompts and tools. Prompts define how the model should behave (such as “always use Google search” or “generate posts in LinkedIn style”), while tools provide structured ways to capture output.
Let's cover the core building blocks that both agents share: system prompts, structured-output tools, and helper functions for constructing analysis prompts.
All the “system & user prompt” templates for the Post Generator live in agent/prompts.py. These templates act as the persona of the agent.
Keeping prompts in a different file makes them easy to tweak independently of the workflow logic.
system_prompt = """You have access to a google_search tool …
You MUST ALWAYS use the google_search tool for EVERY query…"""

system_prompt_2 = """
You are an Amazing artist. You need to generate an image …
"""

system_prompt_3 = """
You are an amazing assistant. You are familiar with the LinkedIn and X (Twitter) algorithms…
Always use the generate_post tool to generate the post.
{context}
"""
How it is used:
system_prompt is injected inside the chat_node, forcing Gemini to ground answers using the google_search tool.system_prompt_3 is consumed inside the fe_actions_node to tell Gemini how to frame LinkedIn/X posts.In the Stack Analyzer, we use a helper function to inject GitHub repo context into a single “analyze the stack” prompt. This lives in agent/stack_agent.py.
Unlike prompts, this helper is tightly coupled to the stack analysis logic (schema, context parsing), so it's in the same agent file.
def _build_analysis_prompt(context: Dict[str, Any]) -> str:
    return (
        "You are a senior software architect. Analyze the following GitHub repository at a high level.\n"
        "Goals: Provide a concise, structured overview of what the project does and the tech stack.\n\n"
        f"Repository metadata:\n{json.dumps(context['repo_info'], indent=2)}\n\n"
        f"Languages:\n{json.dumps(context['languages'], indent=2)}\n\n"
        "Root items:\n" + json.dumps(context['root_files'], indent=2) + "\n\n"
        "README content (truncated):\n" + context["readme"][:8000] + "\n\n"
        "Infer the stack with specific frameworks and libraries when possible…"
    )
How it is used:
_build_analysis_prompt is passed into Gemini inside analyze_with_gemini_node, feeding a consolidated view of repo metadata, languages, manifests, and README.In stack_agent.py, we declare an OpenAI-style tool that enforces JSON output.
@tool("return_stack_analysis", args_schema=StructuredStackAnalysis)
def return_stack_analysis_tool(**kwargs) -> Dict[str, Any]:
    """Return the final stack analysis in a strict JSON structure."""
    validated = StructuredStackAnalysis(**kwargs)
    return validated.model_dump(exclude_none=True)
How it is used:
return_stack_analysis_tool is bound to Gemini inside analyze_with_gemini_node, so it must output JSON instead of free-form text.The schema ensures every repo analysis has the same shape, which the UI can reliably display.
This is how the end-to-end data flow looks once we have integrated all the parts. It would be easier to understand if you had followed up with the blog.
After completing all the parts of the code, it's time to run it locally. Please make sure you have added the Google Gemini credentials to the .env file.
Run the following commands in the agent directory.
cd agent
poetry install
# set GOOGLE_API_KEY in agent/.env
poetry run python main.py
Run the following command to start the server locally under frontend and navigate to localhost:3000/copilotkit in your browser to view your frontend.
cd frontend
pnpm install # if you have cloned the repo
pnpm run dev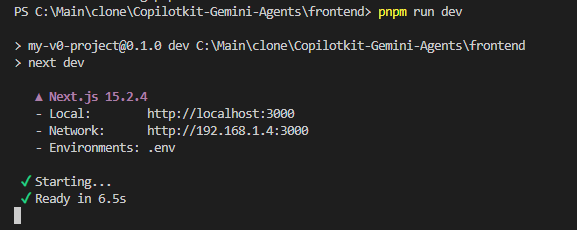
The default route will lead to the post-generator agent. As you can see, it's properly generating the posts with deep research.
It emits intermediate “tool‑logs” so the UI shows each research/search/generation step in real time & you can also find some pre‑built starter prompts to get going with one click.
It analyzes a public GitHub repo (metadata, README, code manifests) and infers its stack.
As I mentioned previously, it uses a Pydantic data model (StructuredStackAnalysis) to enforce a strictly defined JSON output covering:
Similar to the Post Generator, it streams each step (URL parsing → fetching metadata → analyzing → summarizing) back to the UI.
That's it. The patterns users here (stateful graphs, tool bindings, structured outputs) will save you hours.
I hope you found something valuable in this hands-on guide. If you have built something before, please share in the comments.
Have a great day! Until next time :)
Follow CopilotKit on Twitter and say hi, and if you'd like to build something cool, join the Discord community.
Subscribe to our blog and get updates on CopilotKit in your inbox.
