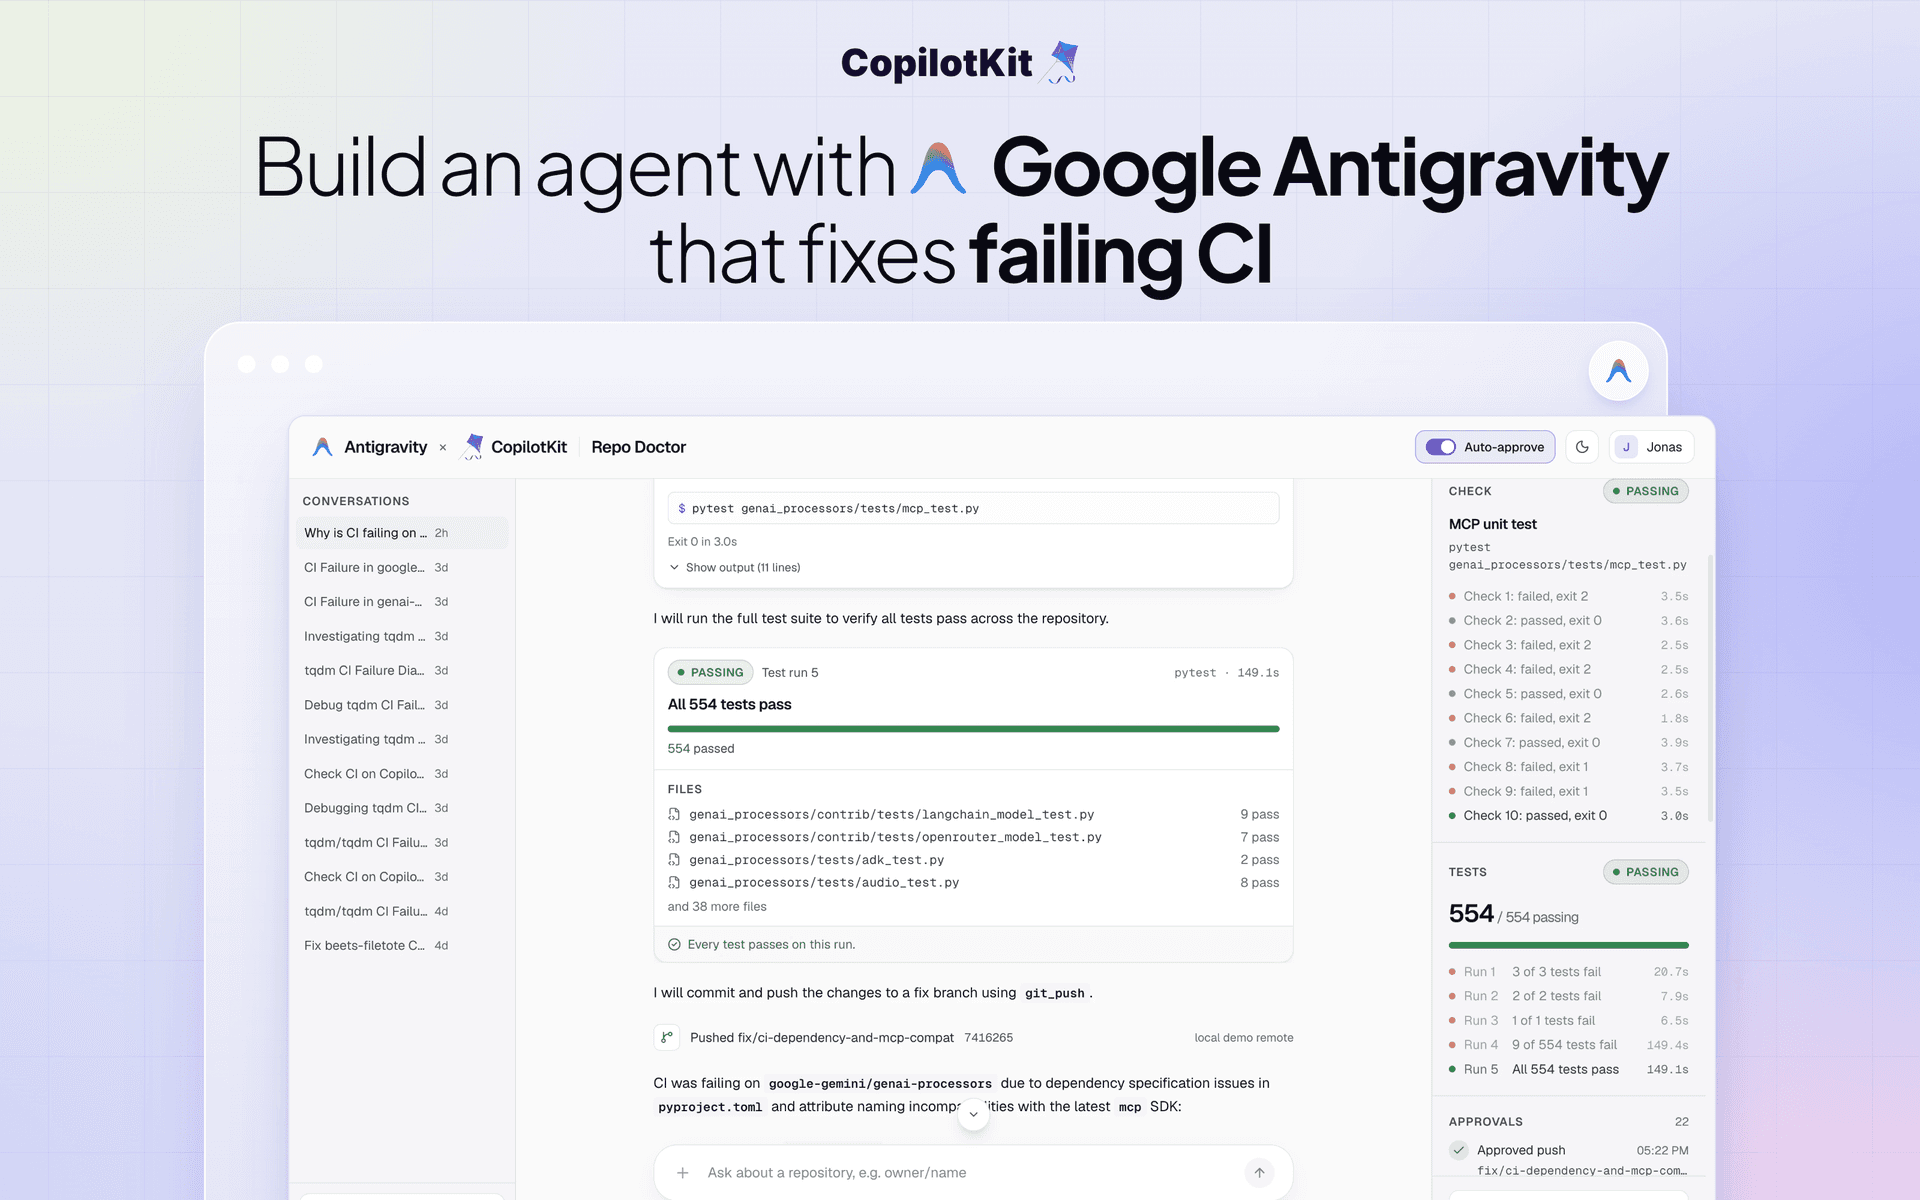
Antigravity is Google's agentic development platform. Its Python SDK brings the same agent harness into your own code, with built-in tools to read files, run shell commands and make edits.
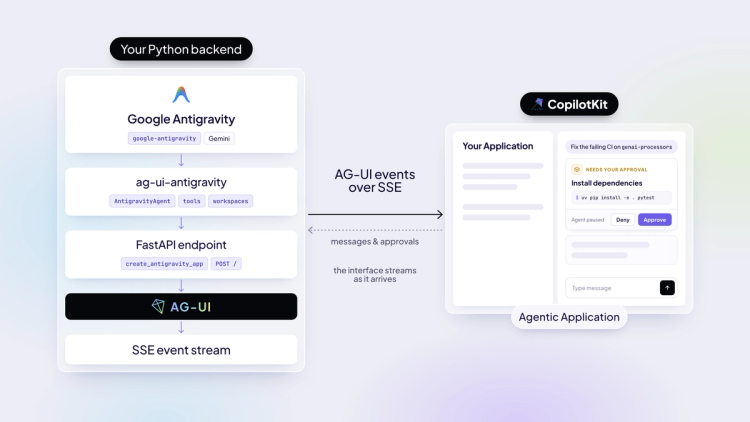
The Antigravity AG-UI SDK (ag-ui-antigravity) streams every step of that agent over AG-UI, the open protocol between agents and user-facing apps. Connect it to CopilotKit and those steps show up in your UI as they happen, from tool calls and live state to approval prompts for risky actions.
In this tutorial, we'll build Repo Doctor, an app that fixes broken CI on GitHub repos. It reads the CI results, runs the tests, reproduces the failure, then fixes the code, shows the change as a diff and proves the fix before pushing it. You approve each step or let auto-approve handle it, then download a report of the whole run.
Every conversation is saved in CopilotKit Intelligence and opens on any device with its full history, while Product Analytics shows how the agent is used. The whole app runs as one Cloud Run service on Google Cloud, with each conversation's workspace backed up to Cloud Storage.
GitHub Source Code: CopilotKit/examples/showcases/antigravity-repo-doctor
Cookbook docs: docs.copilotkit.ai/cookbook/antigravity-repo-doctor
An agent harness is the code around the model. It sends the conversation to the model, runs the tools the model asks for, feeds the results back and decides when the turn is done. Antigravity gives you Google's own harness, shipped as a compiled binary inside the google-antigravity package, and your Python code drives it over a local connection.
Out of the box, the harness can list, search, view and edit files, run shell commands, search the web and hand work to subagents. It only touches the folders you pass in workspaces, so you decide where the agent is allowed to work.
Your own tools are plain Python functions, and the SDK builds each tool's schema from its signature and docstring. Hooks run before every tool call and can allow or block it, which is how Repo Doctor asks you before anything risky runs.
The Antigravity AG-UI SDK wraps that agent in an AG-UI server. Every step the harness takes streams to the app as a typed event: text as it's written, tool calls with their results, state updates, and an interrupt when a tool needs your approval.
from ag_ui_antigravity import AntigravityAgent, create_antigravity_app

agent = AntigravityAgent(
    model="gemini-3.5-flash",
    api_key="...",                       # or GEMINI_API_KEY in the environment
    system_instructions="You are a helpful assistant.",
    workspaces=["/path/to/a/sandbox"],
)

app = create_antigravity_app(agent, path="/")
create_antigravity_app returns a FastAPI app, so the agent runs as a regular web service.
On the frontend, CopilotKit connects to the agent over AG-UI and turns each event into UI, from a card for each tool call and a side panel that follows the agent's state to Approve and Deny buttons for an interrupt.
Repo Doctor takes a GitHub repo with red CI, finds out why it’s failing and gets it back to green. Here’s the flow:
Installs, file edits, shell commands and pushes each wait for you to approve or deny them. Pushes go to a local copy of the repo, so nothing reaches GitHub.
Here’s the architecture. The CopilotKit runtime sends each message over AG-UI to the Python agent, which plans each step with Gemini and runs the tools, all on Cloud Run.
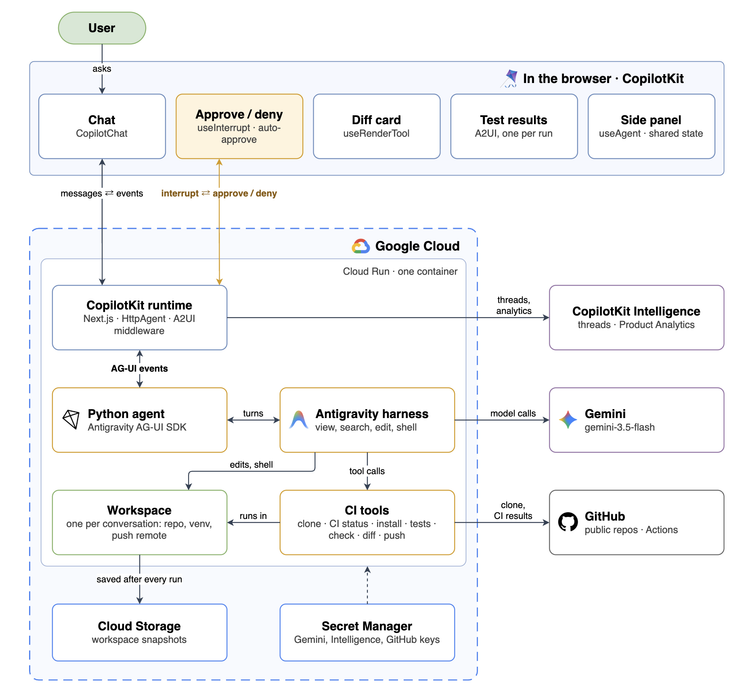
Here’s the stack behind Repo Doctor.
gemini-3.5-flash)Repo Doctor has two parts: a Next.js app with the chat and the CopilotKit runtime, and the Python agent in agent/. We’ll connect the chat to the agent first, then give the agent its CI tools in the next section.
You'll need Node.js 22 or newer, pnpm, Python 3.13, uv and a Gemini API key from Google AI Studio.
Create the app and add the CopilotKit packages:
pnpm create next-app@latest repo-doctor --yes
cd repo-doctor
pnpm add @copilotkit/react-core @copilotkit/runtime @copilotkit/a2ui-renderer @ag-ui/client zod@3
@copilotkit/a2ui-renderer draws the test results card, and @ag-ui/client lets the runtime talk to the Python agent. The A2UI catalog needs zod 3, so zod stays on version 3.
The CopilotKit provider wraps the app. It points at the runtime route, registers the A2UI catalog we'll build in the next section, and turns on the CopilotKit Inspector in development (useful for debugging).
"use client";

import {
  CopilotChatConfigurationProvider,
  CopilotKit,
} from "@copilotkit/react-core/v2";
import { catalog } from "@/a2ui/catalog";
// ...

const A2UI = { catalog };

export function AppShell(props: ShellProps) {
  return (
    <CopilotKit
      runtimeUrl="/api/copilotkit"
      useSingleEndpoint={false}
      a2ui={A2UI}
      enableInspector={process.env.NODE_ENV === "development"}
    >
      <CopilotChatConfigurationProvider agentId={AGENT_ID}>
        {/* ... */}
      </CopilotChatConfigurationProvider>
    </CopilotKit>
  );
}
The chat is one CopilotChat component pointed at the agent. Its welcomeScreen prop replaces the empty chat with a start screen of example repos, each showing its CI status and a suggested prompt.
<CopilotChat
  agentId={AGENT_ID}
  className="h-full"
  welcomeScreen={Welcome}
/>The agent lives in agent/ as a uv project. Create it and add the Antigravity SDK along with its AG-UI adapter.
uv init --package --name repo-doctor agent
cd agent
uv add ag-ui-antigravity==0.2.1 google-antigravity==0.1.22 ag-ui-protocol==1.0.0 fastapi "uvicorn[standard]" pydantic pydantic-settings
The agent is an AntigravityAgent from the Antigravity AG-UI SDK, wrapped in a small subclass, ThreadScopedAntigravityAgent, that gives each conversation its own workspace folder.
The config picks the model and the prompt, lists the built-in tools the agent may use, points the harness at a workspace and turns on approvals.
def create_agent(settings: Settings) -> ThreadScopedAntigravityAgent:
    # ...
    return ThreadScopedAntigravityAgent(
        settings=settings,
        model=settings.gemini_model,
        api_key=settings.gemini_api_key.get_secret_value(),
        system_instructions=SYSTEM_INSTRUCTIONS,
        capabilities=CapabilitiesConfig(enabled_tools=ENABLED_BUILTINS, enable_subagents=False),
        workspaces=[str(settings.workspace_root)],
        tool_approval=True,
        auto_approve_tools=list(AUTO_APPROVED),
        # ...
    )
tool_approval=True pauses every tool call that isn’t in auto_approve_tools:
ENABLED_BUILTINS turns on the file and shell tools, plus finish, which the harness needs to end a turn. SYSTEM_INSTRUCTIONS tells the model which tool to use when, and that a fix only counts once a check goes from failed to passed.
To serve the agent, create_antigravity_app turns it into an AG-UI endpoint at POST /.
from ag_ui_antigravity import create_antigravity_app

# ...

def create_app() -> FastAPI:
    settings = get_settings()
    agent = create_agent(settings)
    app: FastAPI = create_antigravity_app(agent, path="/")
    return app


def main() -> None:
    settings = get_settings()
    uvicorn.run(create_app(), host=settings.agent_host, port=settings.agent_port)
The settings, shell and workspace helpers are small files you can copy from the agent folder.
The app and the agent share one .env at the project root. GITHUB_TOKEN is optional and raises the CI lookups from 60 to 5,000 an hour.
GEMINI_API_KEY=...
GITHUB_TOKEN=...   # optional
AGENT_URL=http://127.0.0.1:8000/
Start the agent from agent/ with uv run python -m repo_doctor.server. It listens on 127.0.0.1:8000, and only the Next.js server talks to it.
The runtime route sits between the chat and the agent. HttpAgent sends each run to the agent’s URL over AG-UI, and the a2ui option turns on the A2UI middleware, which passes the agent’s test results cards to the chat.
// src/app/api/copilotkit/[[...slug]]/route.ts
import { HttpAgent } from "@ag-ui/client";
import { CopilotRuntime, createCopilotRuntimeHandler } from "@copilotkit/runtime/v2";

const agent = new HttpAgent({ url: env.AGENT_URL });

const runtime = new CopilotRuntime({
  agents: { [AGENT_ID]: agent },
  a2ui: { injectA2UITool: false },
  // ...
});

const handler = createCopilotRuntimeHandler({ runtime, basePath: "/api/copilotkit" });

export const GET = handler;
export const POST = handler;
export const PATCH = handler;
export const DELETE = handler;
The runtime has no model config, because the harness calls Gemini itself. injectA2UITool: false tells the runtime that the agent writes its own A2UI, so the model doesn’t get an extra render tool.
With the agent running, start the app with pnpm dev in a second terminal. Open http://localhost:3000, say hello, and the Antigravity agent answers in the chat.
With the chat connected, the agent gets its CI tools, and each tool gets its own piece of UI.
The built-in tools already read and edit code. The CI work lives in seven tools in tools.py:
clone_repo makes a shallow clone of the repoci_status reads the latest GitHub Actions results and names the failing jobs and stepsinstall_dependencies installs the projectrun_tests runs the test suiterun_check runs one command that reproduces the CI failureshow_diff returns the real git diffgit_push commits the fix on a new branch and pushes itEach one is a plain async function with a docstring, and the SDK offers it to the model next to the built-in tools.
Tools also write what happened into shared state, which streams to the browser for the side panel. experimental_set_state replaces the whole state, so update_state merges each change into it.
from ag_ui_antigravity import experimental_get_state, experimental_set_state

def _update_state(**changes: Any) -> None:
    experimental_set_state({**_state(), **changes})
clone_repo uses _update_state to save the repo’s details under repo. It also keeps pushes away from GitHub. The GitHub remote becomes upstream with pushing turned off, and a local bare repo becomes origin, so git_push only ever pushes to that local copy.
All seven tools are bound to the conversation’s folder, and ThreadScopedAntigravityAgent builds a fresh set for each conversation, so two conversations never share a checkout.
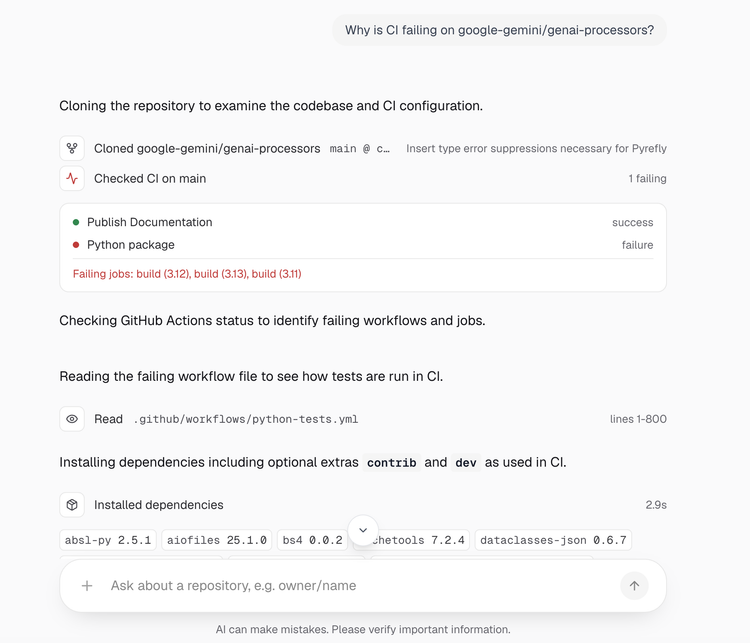
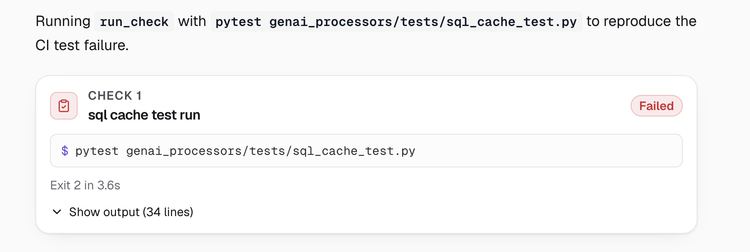
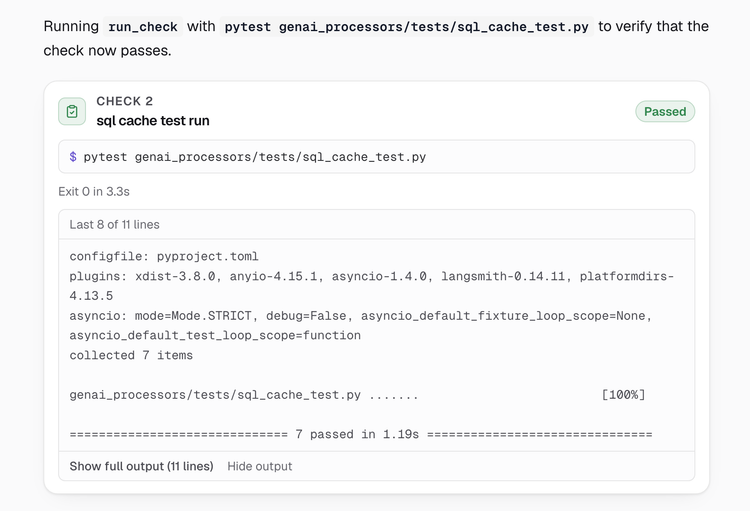
Green tests alone don’t prove the fix addressed what CI saw. So the agent turns the failing CI step into one short command and runs it twice, once before the fix to reproduce the failure and once after to confirm it’s gone.
async def run_check(command: str, label: str) -> dict[str, Any]:
    """Runs one shell command that reproduces a failing CI step, and records it."""
    # ...
    result = await shell.run(
        [shell_bin, "-c", command], cwd=repo, timeout=CHECK_TIMEOUT_SECONDS, env=_check_env()
    )
    exit_code = result.exit_code
    status = "passed" if exit_code == 0 else "failed"
    checks: list[dict[str, Any]] = list(_state().get("checks", []))
    record = {
        "run": len(checks) + 1,
        "label": label,
        "command": command,
        "status": status,
        # ...
    }
    checks.append(record)
    _update_state(checks=checks)
    return {"ok": True, **record}
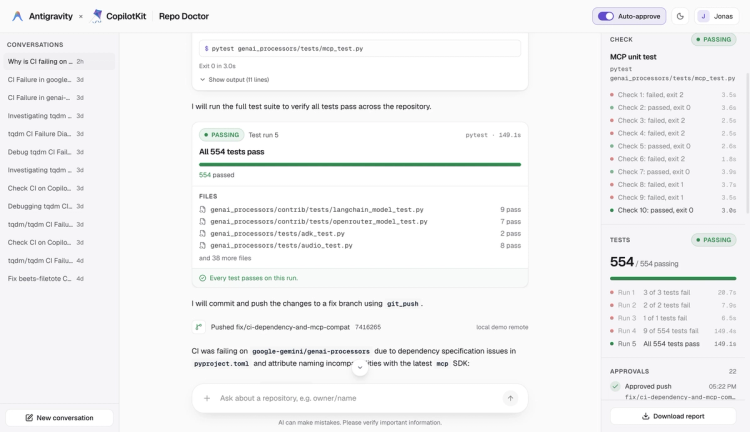
The exit code decides passed or failed. Both runs land in checks, so the side panel shows the same check failing and then passing, and the agent quotes both in its final summary.
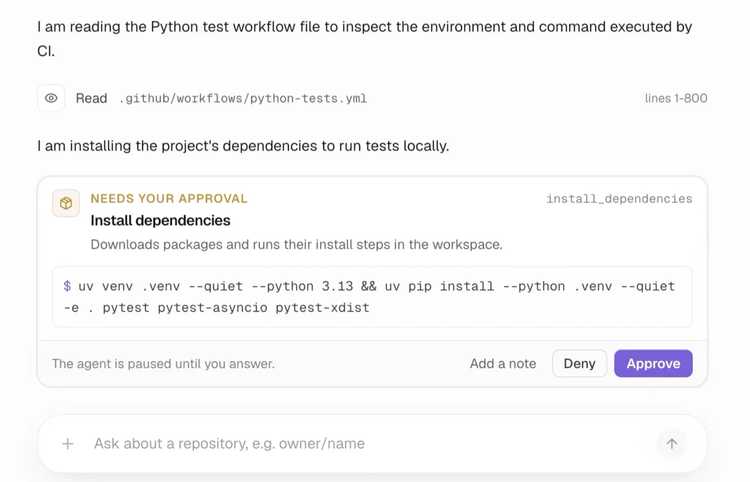
When the model calls a tool that needs approval:
tool_approval, and its metadata carries the tool’s name and argumentsuseInterrupt renders a card for it, and resolve sends your answer back to the held calluseInterrupt({
agentId: AGENT_ID,
enabled: (event) =>
(event.value as { reason?: string } | undefined)?.reason === "tool_approval",
render: ({ interrupt, resolve }) => {
const { tool_name, args, ...meta } = (interrupt?.metadata ?? {}) as {
tool_name?: string;
args?: Record<string, unknown>;
} & Record<string, unknown>;
const tool = tool_name ?? "tool";
return (
<ApprovalCard
key={interrupt?.id}
request={{ tool, args: args ?? {}, meta }}
autoApprove={autoApprove && !ALWAYS_ASK.has(tool)}
onAnswer={(answer: ApprovalAnswer) => resolve(answer, interrupt?.id)}
/>
);
},
});The card shows exactly what’s about to run, from the install command to the lines an edit changes or the branch a push creates. Approve sends { approved: true } and the held call runs. Deny sends { approved: false, message }. The call is skipped, and your note tells the agent why, so it can try another way or ask you.
The Auto-approve switch in the navbar answers the cards for you, except for pushes. That’s the ALWAYS_ASK check in the snippet.
The Auto-approve switch in the navbar answers the cards for you, except for pushes. That’s the ALWAYS_ASK check in the snippet.
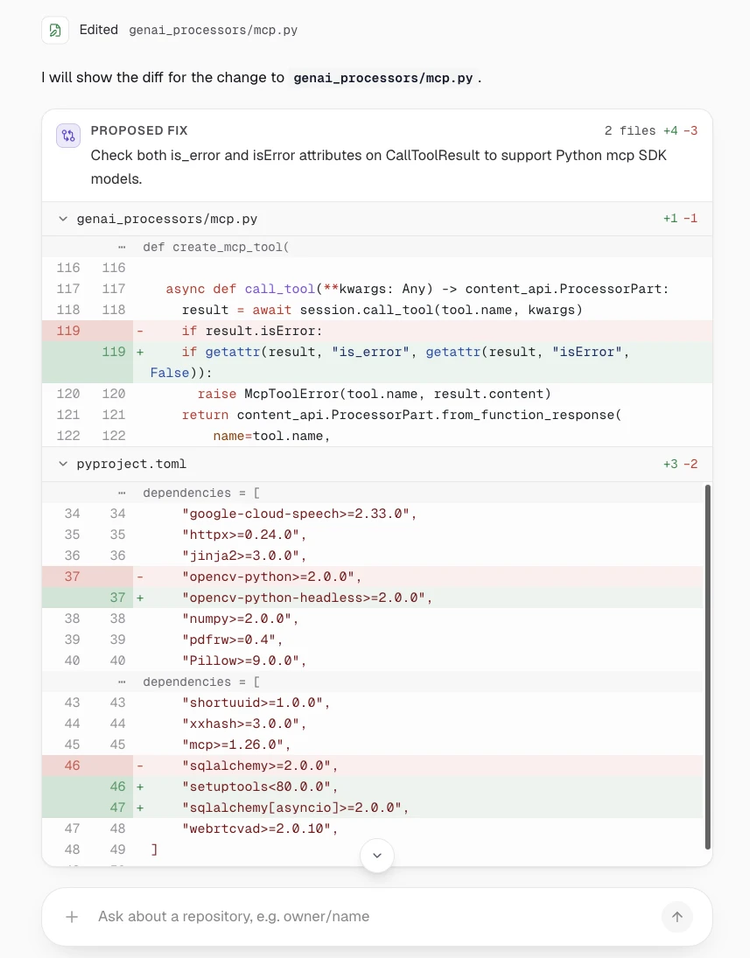
show_diff returns the workspace’s real git diff with a one-line summary from the model. useRenderTool matches the tool call by name and draws it in the chat.
const Any = z.record(z.unknown());

useRenderTool({
  name: "show_diff",
  agentId: AGENT_ID,
  parameters: Any,
  render: (p) => <DiffBlock status={p.status} result={p.result} />,
});
DiffBlock waits for the call to complete, then draws each changed file with its added and removed lines. useRenderTool draws a row or card for each of the other tools the same way.
With A2UI, the agent describes a card as data and the app draws it with its own component. Each card lives in a surface, its own slot in the chat. run_tests runs the suite, turns the output into a TestReport and returns a2ui_operations next to the results the model reads.
async def run_tests(target: str = "") -> dict[str, Any]:
    """Runs the test suite and shows a live report card to the user."""
    # ...
    return {
        "a2ui_operations": report_surface_operations(report, run=number),
        "status": report.status,
        "summary": report.headline(),
        # ...
    }
report_surface_operations builds three operations:
createSurface opens a new surface tied to the catalogupdateComponents sets its one TestReport component (COMPONENTS never changes)updateDataModel fills in that run’s dataCATALOG_ID = "https://repo-doctor.dev/a2ui/catalog/v1"
def report_surface_operations(report: TestReport, *, run: int) -> list[dict[str, Any]]:
sid = surface_id(run)
return [
{"version": "v0.9", "createSurface": {"surfaceId": sid, "catalogId": CATALOG_ID}},
{"version": "v0.9", "updateComponents": {"surfaceId": sid, "components": COMPONENTS}},
{
"version": "v0.9",
"updateDataModel": {"surfaceId": sid, "path": "/", "value": report_data(report, run=run)},
},
]Each run gets its own surface id (test-run-1, test-run-2 and so on), so a new run adds a new card and the earlier ones stay in the chat.
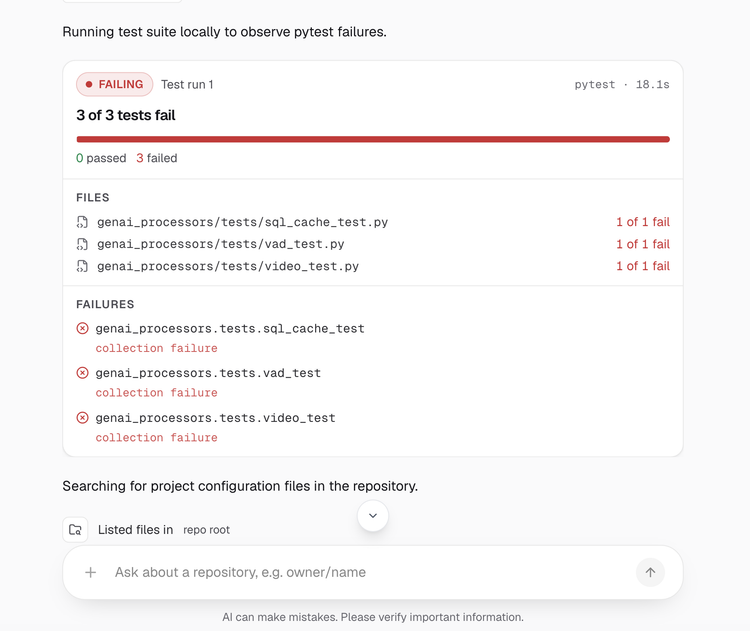
On the web side, createCatalog maps TestReport onto the app’s own React component. It uses the same catalog id as the agent, which is how the two sides find each other. This is the catalog the provider registered in section 4.
export const CATALOG_ID = "https://repo-doctor.dev/a2ui/catalog/v1";

const renderers: CatalogRenderers<Definitions> = {
  TestReport: ({ props }) => (
    <TestReport
      run={num(props.run)}
      status={str(props.status)}
      headline={str(props.headline)}
      files={list<FileResultData>(props.files)}
      failures={list<FailedTestData>(props.failures)}
      summary={str(props.summary)}
    />
  ),
};

export const catalog = createCatalog(definitions, renderers, {
  catalogId: CATALOG_ID,
  includeBasicCatalog: false,
});
definitions holds a zod schema for the card’s props, which is the contract between the agent and the UI. With includeBasicCatalog: false, TestReport is the only component the agent can draw.
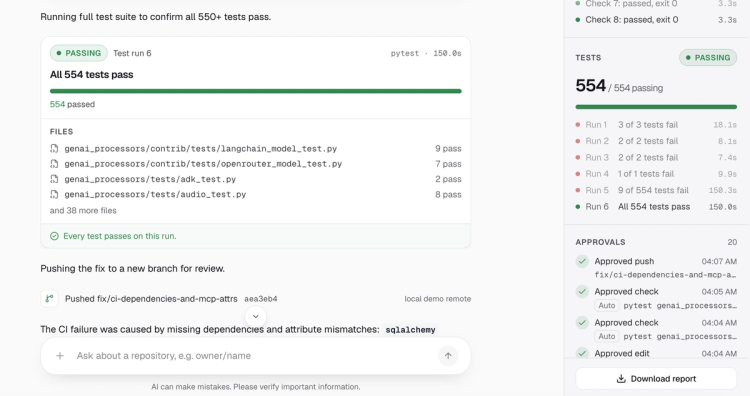
By now every tool has written its part into shared state: repo, install, testRuns, checks, approvals and push. useAgent gives the browser that state, so the side panel updates the moment a tool finishes.
const { agent } = useAgent({ agentId: AGENT_ID });
const state = useMemo(() => parseAgentState(agent.state), [agent.state]);
parseAgentState checks the state with zod first, since it comes over the network. The panel then shows the repo, the check going from failed to passed, every test run, every approval and the pushed branch.
The Download report button turns the same state into a Markdown report of the whole run, right in the browser.
CopilotKit Intelligence saves every conversation under the person who started it, and turns the runs into Product Analytics. Connect a project with the CopilotKit CLI, which writes CPK_INTELLIGENCE_API_KEY to .env.
npx copilotkit@latest login
npx copilotkit@latest project select --create repo-doctor --env-name .env
Then add Intelligence to the runtime from section 4, in route.ts.
const runtime = new CopilotRuntime({
  agents: { [AGENT_ID]: agent },
  a2ui: { injectA2UITool: false },
  intelligence: new CopilotKitIntelligence({ apiKey: env.CPK_INTELLIGENCE_API_KEY }),
  generateThreadNames: false,
  identifyUser: (request: Request) =>
    userFromCookieHeader(request.headers.get("cookie")) ?? {
      id: env.DEMO_USER_ID,
      name: "Demo user",
    },
});
identifyUser tells Intelligence who made each request. Repo Doctor reads it from the name you type in the navbar, stored as a cookie by user.ts. That works for a demo, so swap in your own login before real users get the link.
generateThreadNames is off because naming a thread would run the whole agent a second time, so the conversation list names each thread from its first message. Without an Intelligence key, the runtime keeps runs in memory instead.
Every conversation is saved as a thread with its messages, tool calls, cards and state. The conversation list in the app is one hook, useThreads.
const { threads, isLoading, archiveThread, deleteThread } = useThreads({ agentId: AGENT_ID, limit: 50 });Type the same name on another device and you’re back in the conversation, with the cards, test results and approvals where you left them.
In the Intelligence dashboard, Threads shows every event of every run. A run that stopped for an approval ends with an interrupt outcome holding the exact command that’s waiting for you.
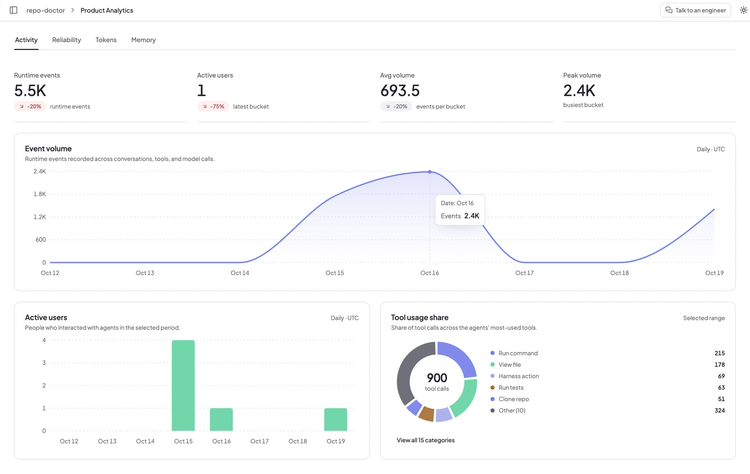
Product Analytics reads the same runs, with nothing extra to set up. The Activity tab shows how many people used the agent and which tools it calls most. The Reliability tab shows the error rate over time and the share of runs that finished cleanly.
Clone the repo and install the dependencies.
git clone --depth 1 https://github.com/CopilotKit/CopilotKit.git
cd CopilotKit/examples/showcases/antigravity-repo-doctor
pnpm install
Run pnpm dev. The first run creates a .env file, sets up the Python agent, then stops because the Gemini key is empty. Open .env and paste your key:
GEMINI_API_KEY=...If you’ve been following along, the two CLI commands from section 6 already set up CopilotKit Intelligence and added its API key to .env.
Run pnpm dev again and open http://localhost:3000. The agent runs code from the repos you give it, so only use repos you trust.
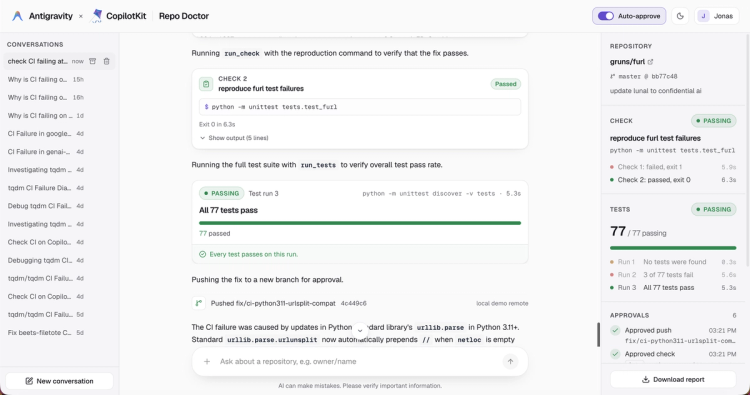
Here’s the agent fixing CI on google-gemini/genai-processors from start to finish.
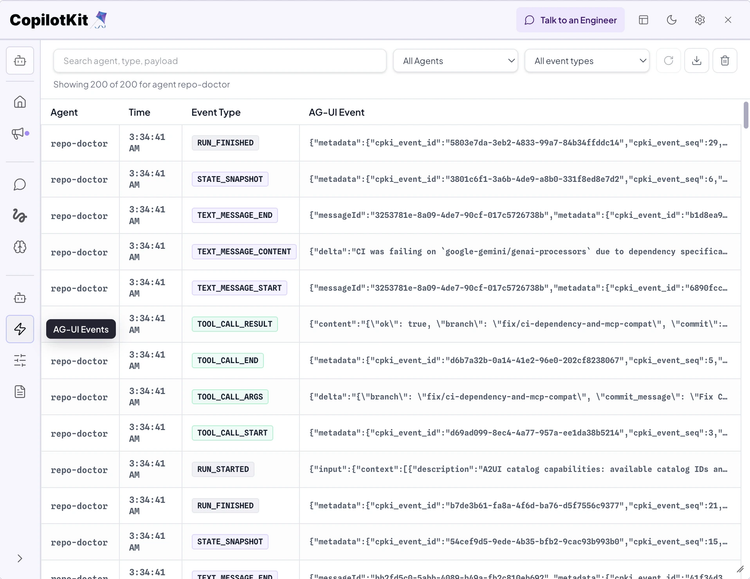
Click the CopilotKit logo in the corner of the app to open the CopilotKit Inspector. Its AG-UI Events tab shows every tool call streaming in, the ACTIVITY_SNAPSHOT that carries each test results card and the STATE_SNAPSHOT the side panel reads.
The whole app runs as one Cloud Run service: the Next.js app with the CopilotKit runtime and the Python agent with the harness, in one container. Run these from the app folder with the gcloud CLI, after gcloud auth login.
Build the image with Cloud Build:
PROJECT=your-project
REGION=us-central1
IMAGE=$REGION-docker.pkg.dev/$PROJECT/repo-doctor/app
gcloud config set project $PROJECT

gcloud services enable run.googleapis.com artifactregistry.googleapis.com \
  cloudbuild.googleapis.com secretmanager.googleapis.com
gcloud artifacts repositories create repo-doctor --repository-format=docker --location=$REGION
gcloud builds submit --tag $IMAGE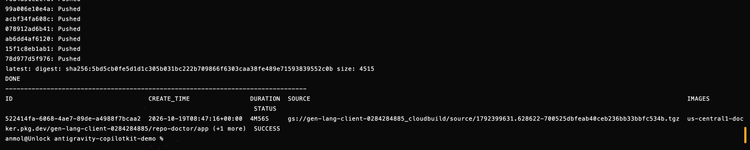
Put the keys in Secret Manager, straight from .env without printing them. Then create a service account that can only read those secrets and one bucket, and the bucket that holds each conversation's workspace:
secret() { grep "^$1=" .env | cut -d= -f2- | tr -d '\n"' | gcloud secrets create "$2" --data-file=-; }
secret GEMINI_API_KEY gemini-api-key
secret CPK_INTELLIGENCE_API_KEY cpk-intelligence-api-key
secret GITHUB_TOKEN github-token

gcloud iam service-accounts create repo-doctor --display-name="Repo Doctor"
SA=repo-doctor@$PROJECT.iam.gserviceaccount.com
# A new service account takes a few seconds to appear, so each binding retries.
for s in gemini-api-key cpk-intelligence-api-key github-token; do
  for try in 1 2 3 4 5 6; do
    gcloud secrets add-iam-policy-binding $s --member=serviceAccount:$SA \
      --role=roles/secretmanager.secretAccessor && break
    sleep 10
  done
done

BUCKET=$PROJECT-repo-doctor-ws
gcloud storage buckets create gs://$BUCKET --location=$REGION --uniform-bucket-level-access
gcloud storage buckets add-iam-policy-binding gs://$BUCKET \
  --member=serviceAccount:$SA --role=roles/storage.objectUser
Deploy it as a private service:
gcloud run deploy repo-doctor \
  --image $IMAGE --region $REGION --service-account $SA \
  --min-instances 1 --max-instances 1 \
  --cpu 4 --memory 16Gi --no-cpu-throttling \
  --timeout 3600 --execution-environment gen2 \
  --set-secrets GEMINI_API_KEY=gemini-api-key:latest,CPK_INTELLIGENCE_API_KEY=cpk-intelligence-api-key:latest,GITHUB_TOKEN=github-token:latest \
  --set-env-vars GEMINI_MODEL=gemini-3.5-flash,DEMO_USER_ID=repo-doctor-demo,WORKSPACE_BUCKET=gs://$BUCKET \
  --no-allow-unauthenticated

APP_URL=$(gcloud run services describe repo-doctor --region $REGION --format='value(status.url)')
gcloud run services update repo-doctor --region $REGION --update-env-vars APP_URL=$APP_URL
A paused approval waits in the agent's memory, so the service runs exactly one instance that never scales to zero. --no-cpu-throttling keeps the agent working while it waits for you, and --timeout 3600 covers long runs.

After every run, the agent saves the conversation to its own folder in the bucket: the repo with its edits, the pushed fix branches and the agent's session. If the service restarts, the next message in that conversation brings everything back and the agent picks up where it left off.
The service is private, and it should stay that way: the cloned repos' code runs inside it, and every message spends your Gemini credits. Open it through an authenticated proxy at http://localhost:8080.
gcloud run services proxy repo-doctor --region $REGION --port 8080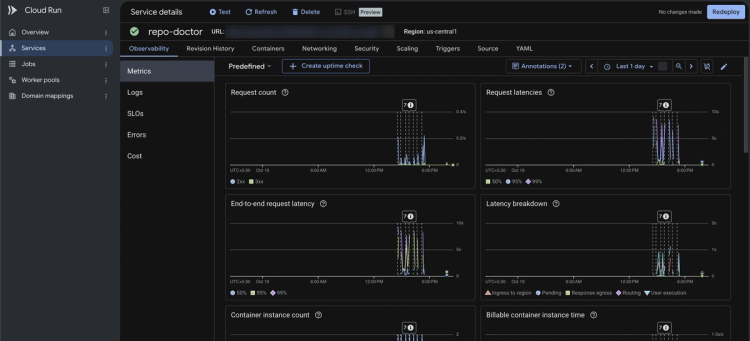
Repo Doctor is one way to put a real interface on an Antigravity agent. Swap the CI tools for your own, and the same AG-UI wiring gives you approvals, live cards and saved conversations.
Follow CopilotKit on Twitter and join the Discord community. If you get stuck, reach out in the CopilotKit or AG-UI communities.
Subscribe to our blog and get updates on CopilotKit in your inbox.



